

This is something of an old recipe. Considering I haven't blogged since September 2008, I have a lot of oldies! I made this last summer after a mushroom impulse by at my Saturday farmer's market. I had no plans for them whatsoever, I just had to have them. Lucky for me, Jamie's Italy had this easy, tasty snack!
His recipe didn't call for the toast, he thought the mushrooms on a plate would be good enough. He's probably right - I mean, he IS Jamie Oliver! However, we're big toast fans... and frankly, why NOT add a toast element? I want to say we made these a half-dozen more times, and not always with market mushrooms (store-bought are just as nice, just get whatever type you like.)
The meatiness of the mushrooms, earthy thyme and creamy cheese played really well together. I'd only lightly oiled the bread, so it had a pleasant crunch and held up nicely to the weight of the toppings.
These toasts made a great weekend afternoon snack, but I could see them serving quite nicely as party fare - with a glass of wine, perhaps?
Sliced Mushrooms with Melted Mozzarella and Thyme
c/o Jamie’s Italy, by Jamie Oliver
http://www.amazon.com/JAMIES-ITALY-Jamie-Oliver/dp/1401301959/ref=pd_bbs_sr_1?ie=UTF8&s=books&qid=1195857365&sr=8-1
This is a great little recipe – it takes no time at all to put together and is perfect for serving at a party. I’ve used mozzarella, but another Italian cheese called scamorza would be good too. As this dish grills very quickly, I actually cook it on the plate I’m serving it on, but if you’re using bone china, think again. (I don’t want any bills through the post!)
2 big handfuls of mushrooms, very thinly sliced
2 5 ounce balls mozzarella or scamorza cheese, torn into small pieces
A sprig of fresh thyme, leaves picked
Sea salt and freshly ground black pepper
Extra virgin olive oil
Get yourself a large ovenproof platter and spread your mushrooms on it in one layer. Scatter over the cheese and the thyme leaves. Season with salt and pepper, drizzle with olive oil, and place the plate under the grill.
Grill for a couple of minutes, checking frequently, until the cheese is melted, bubbling, and golden, and tuck in! Serve with some crusty bread.
Friday, March 20, 2009
Sliced Mushrooms with Melted Mozzarella and Thyme
Tuesday, September 9, 2008
from Latin: omne all, everything; vorare to devour
 Omnivore.
Do you know one? Chances are, you do. Chances are, you ARE one. Likely, you've heard of The Omnivore's 100 - brainchild of Andrew at Very Good Taste. While I've been more than a little mum lately, I thought I would give this a go. (And I'll shortly get that meme to you, Grace, I promise!)
While I may not be one yet, I am at least trying omnivorocity on for size (grasshopper taco and kangaroo burger, anyone?) I did strike-through three things on the list below - foie gras, headcheese, and roadkill. No foie gras due to my giant love of gooses; no headcheese because I think it's cooties; and no roadkill for obvious reasons. (Seriously, there are better things I could put in my mouth.)
I think exposure is key to broadening your horizons (well duh!). That and trust in the chef you're asking to provide you these delicacies (loosely used on the Big Mac meal, mind you). I wouldn't have had that grasshopper taco just anywhere... and I made the 'roo burger myself... and I tried marrow at Daniel Boulud's place in Las Vegas... I wouldn't get any of those things just anywhere... But you see what I mean? Proximity, trust and a leap of faith that it will all work out... or, at the very least, will make for a great story.
Here’s what I want you to do:
1) Copy this list into your blog or journal,
including these instructions.
2) Bold all the items you’ve eaten.
3) Cross out any items that you would never consider eating.
4) Optional extra: Post a comment here at www.verygoodtaste.co.uk linking to your results.
The VGT Omnivore’s Hundred:
1. Venison
2. Nettle tea
3. Huevos rancheros
4. Steak tartare
5. Crocodile
6. Black pudding
7. Cheese fondue
8. Carp
9. Borscht
10. Baba ghanoush
11. Calamari
12. Pho
13. PB&J sandwich
14. Aloo gobi
15. Hot dog from a street cart
16. Epoisses
17. Black truffle
18. Fruit wine made from something other than grapes
19. Steamed pork buns
20. Pistachio ice cream
21. Heirloom tomatoes
22. Fresh wild berries
23. Foie gras
24. Rice and beans
25. Brawn, or head cheese
26. Raw Scotch Bonnet pepper
27. Dulce de leche
28. Oysters
29. Baklava
30. Bagna cauda
31. Wasabi peas
32. Clam chowder in a sourdough bowl
33. Salted lassi
34. Sauerkraut
35. Root beer float
36. Cognac with a fat cigar
37. Clotted cream tea
38. Vodka jelly/Jell-O
39. Gumbo
40. Oxtail
41. Curried goat
42. Whole insects
43. Phaal
44. Goat’s milk
45. Malt whisky from a bottle worth £60/$120 or more
46. Fugu
47. Chicken tikka masala
48. Eel
49. Krispy Kreme original glazed doughnut
50. Sea urchin (does sea urchin foam count???)
51. Prickly pear
52. Umeboshi
53. Abalone
54. Paneer
55. McDonald’s Big Mac Meal
56. Spaetzle
57. Dirty gin martini
58. Beer above 8% ABV
59. Poutine
60. Carob chips
61. S’mores
62. Sweetbreads
63. Kaolin
64. Currywurst
65. Durian
66. Frogs’ legs
67. Beignets, churros, elephant ears or funnel cake
68. Haggis
69. Fried plantain
70. Chitterlings, or andouillette
71. Gazpacho
72. Caviar and blini
73. Louche absinthe
74. Gjetost, or brunost
75. Roadkill
76. Baijiu
77. Hostess Fruit Pie
78. Snail
79. Lapsang souchong
80. Bellini
81. Tom yum
82. Eggs Benedict
83. Pocky
84. Tasting menu at a three-Michelin-star restaurant.
85. Kobe beef (but I will at my upcoming Hotdog-Off!!)
86. Hare
87. Goulash
88. Flowers
89. Horse
90. Criollo chocolate
91. Spam
92. Soft shell crab
93. Rose harissa
94. Catfish
95. Mole poblano
96. Bagel and lox
97. Lobster Thermidor
98. Polenta
99. Jamaican Blue Mountain coffee
100. Snake
Sunday, August 31, 2008
Dare to Bake a Food Memory?
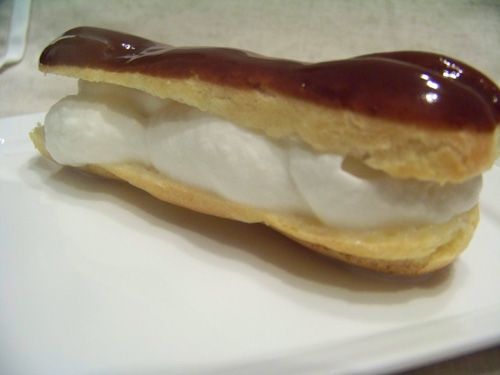 I wanted to love you... I really did. From the very first announcement of the August Daring Bakers challenge, I wanted to rekindle this romance... but it just wasn't meant to be. It wasn't you, my dear eclair, it was me. I shouldn't have expected my first attempt to measure up to my childhood food memory... it was folly. I'm happy to try another date... just give me time to figure out what happened.
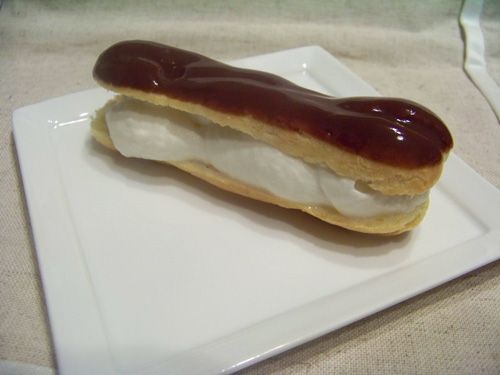 You see, I used to love eclairs. My grandpa would come home with a box of them every so often, and I was always so excited. They weren't even fancy - I want to say they were Entenmanns - but they didn't have the traditional pastry cream filling - oh no, it was much lighter and daintier. (I've since learned that this mystery filling is creme Chantilly - a fancied-up whipped cream.) I shy away from eclairs now, because I know I won't like the filling and I don't want to be disappointed.
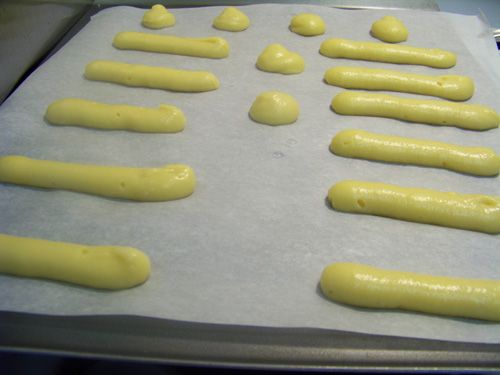 We were allowed to swap out either the filling or the glaze (but something had to stay chocolate - I'm not complaining!), so I wanted to try my hand at a Chantilly cream. Where I got the idea to flavor it with lavender is anyone's guess. I wasn't sure if chocolate and lavender could be friends, but I wanted to try. As someone I polled said, how could something NOT be friends with chocolate?
Yes, yes, I waited until the absolute last day to get my challenge on. My kitchen ennui held me back, for starters. I also realized late in the month that my pastry bag, tip, and coupler had been thrown out and I needed to find a new one. When? Oh, yesterday. Ha! My new one is much fancier, so I shouldn't complain.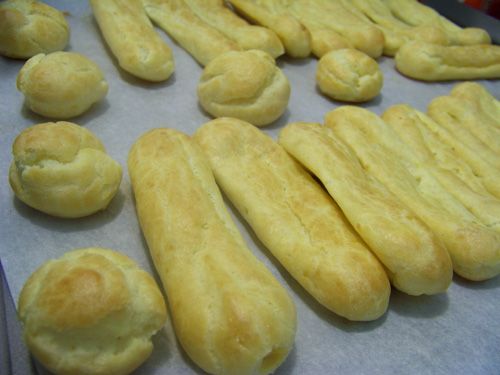 After yoga this morning, I pulled the choux pastry together and popped them in the oven. I didn't catch the part in the thread that suggested a longer baking time (to avoid deflation), so... well... my puffs aren't so puffy anymore. They WERE, I promise, but they all sank. I have to say, there aren't many things as sad as a flat cream puff. :) They needed time to cool and dry out, so I saved completion until after dinner.
At which point I steeped some lavender syrup (recipe courtesy of Chockylit), prepared the chocolate sauce and glaze. I then whipped the cream and added the syrup. Now, I think I must have mis-measured, because there seemed to be a high syrup-to-cream ratio that left the resulting cream really really soft. Like, really soft. Tasty as all get-out (and not the least bit soapy, as I'd feared), but just a little too giving in a pastry. (Read: it squishes right out when you bite in to the eclair - messy messy!!)
Are lavender and chocolate friends? Heck yes. Would I like to combine them in various other ways? Double yes! (I can't say that lavender will be the new pistachio in OPF-land, though.) Would I made this recipe again? Probably not. The sunken puffs were demoralizing and I found the chocolate glaze overly sweet. Overall, this was a good experience, and I'm more than happy to make more eclairs and cream puffs, just maybe with a different recipe (no disrespect to Pierre Hermes.) Many thanks to Meeta and Tony for yet another terrific challenge!!
For eleventy-billion more versions of Mr. Hermes' eclairs, check out the Daring Bakers Blogroll.
Pierre Hermé’s Chocolate Éclairs
Recipe from Chocolate Desserts by Pierre Hermé
(makes 20-24 Éclairs)
• Cream Puff Dough (see below for recipe), fresh and still warm
1) Preheat your oven to 375 degrees F (190 degrees C). Divide the oven into thirds by
positioning the racks in the upper and lower half of the oven. Line two baking sheets with
waxed or parchment paper.
2) Fill a large pastry bag fitted with a 2/3 (2cm) plain tip nozzle with the warm cream puff dough.
Pipe the dough onto the baking sheets in long, 4 to 41/2 inches (about 11 cm) chubby fingers.
Leave about 2 inches (5 cm) space in between each dough strip to allow them room to puff.
The dough should give you enough to pipe 20-24 éclairs.
3) Slide both the baking sheets into the oven and bake for 7 minutes. After the 7 minutes, slip the
handle of a wooden spoon into the door to keep in ajar. When the éclairs have been in the
oven for a total of 12 minutes, rotate the sheets top to bottom and front to back. Continue
baking for a further 8 minutes or until the éclairs are puffed, golden and firm. The total baking
time should be approximately 20 minutes.
Notes:
1) The éclairs can be kept in a cool, dry place for several hours before filling.
Assembling the éclairs:
• Chocolate glaze (see below for recipe)
• Chocolate pastry cream (see below for recipe)
1) Slice the éclairs horizontally, using a serrated knife and a gently sawing motion. Set aside the
bottoms and place the tops on a rack over a piece of parchment paper.
2) The glaze should be barely warm to the touch (between 95 – 104 degrees F or 35 – 40
degrees C, as measured on an instant read thermometer). Spread the glaze over the tops of
the éclairs using a metal icing spatula. Allow the tops to set and in the meantime fill the
bottoms with the pastry cream.
3) Pipe or spoon the pastry cream into the bottoms of the éclairs. Make sure you fill the bottoms
with enough cream to mound above the pastry. Place the glazed tops onto the pastry cream
and wriggle gently to settle them.
Notes:
1) If you have chilled your chocolate glaze, reheat by placing it in a bowl over simmering water,
stirring it gently with a wooden spoon. Do not stir too vigorously as you do not want to create
bubbles.
2) The éclairs should be served as soon as they have been filled.
Pierre Hermé’s Cream Puff Dough
Recipe from Chocolate Desserts by Pierre Hermé
(makes 20-24 Éclairs)
• ½ cup (125g) whole milk
• ½ cup (125g) water
• 1 stick (4 ounces; 115g) unsalted butter, cut into 8 pieces
• ¼ teaspoon sugar
• ¼ teaspoon salt
• 1 cup (140g) all-purpose flour
• 5 large eggs, at room temperature
1) In a heavy bottomed medium saucepan, bring the milk, water, butter, sugar and salt to the
boil.
2) Once the mixture is at a rolling boil, add all of the flour at once, reduce the heat to medium
and start to stir the mixture vigorously with a wooden spoon. The dough comes together very
quickly. Do not worry if a slight crust forms at the bottom of the pan, it’s supposed to. You
need to carry on stirring for a further 2-3 minutes to dry the dough. After this time the dough
will be very soft and smooth.
3) Transfer the dough into a bowl of a mixer fitted with the paddle attachment, or using your
handmixer or if you still have the energy, continue by hand. Add the eggs one at a time,
beating after each egg has been added to incorporate it into the dough.
You will notice that after you have added the first egg, the dough will separate, once again do
not worry. As you keep working the dough, it will come back all together again by the time you
have added the third egg. In the end the dough should be thick and shiny and when lifted it
should fall back into the bowl in a ribbon.
4) The dough should be still warm. It is now ready to be used for the éclairs as directed above.
Notes:
1) Once the dough is made you need to shape it immediately.
2) You can pipe the dough and the freeze it. Simply pipe the dough onto parchment-lined baking
sheets and slide the sheets into the freezer. Once the dough is completely frozen, transfer the
piped shapes into freezer bags. They can be kept in the freezer for up to a month.
Chocolate Pastry Cream
Recipe from Chocolate Desserts by PierreHermé
• 2 cups (500g) whole milk
• 4 large egg yolks
• 6 tbsp (75g) sugar
• 3 tablespoons cornstarch, sifted
• 7 oz (200g) bittersweet chocolate, preferably Velrhona Guanaja, melted
• 2½ tbsp (1¼ oz: 40g) unsalted butter, at room temperature
1) In a small saucepan, bring the milk to a boil. In the meantime, combine the yolks, sugar and cornstarch together and whisk in a heavy‐bottomed saucepan.
2) Once the milk has reached a boil, temper the yolks by whisking a couple spoonfuls of the hot milk into the yolk mixture.Continue whisking and slowly pour the rest of the milk into the tempered yolk mixture.
3) Strain the mixture back into the saucepan to remove any egg that may have scrambled. Place the pan over medium heat and whisk vigorously (without stop) until the mixture returns to a boil. Keep whisking vigorously for 1 to 2 more minutes (still over medium heat).Stir in the melted chocolate and then remove the pan from the heat.
4) Scrape the pastry cream into a small bowl and set it in an ice‐water bath to stop the cooking process. Make sure to continue stirring the mixture at this point so that it remains smooth.
5) Once the cream has reached a temperature of 140 F remove from the ice‐water bath and stir in the butter in three or four installments. Return the cream to the ice‐water bath to continue cooling, stirring occasionally, until it has completely cooled. The cream is now ready to use or store in the fridge.
[bNotes:[/b]
1) The pastry cream can be made 2‐3 days in advance and stored in the refrigerator.
2) In order to avoid a skin forming on the pastry cream, cover with plastic wrap pressed onto the cream.
3) Tempering the eggs raises the temperature of the eggs slowly so that they do not scramble.
Chocolate Glaze
Recipe from Chocolate Desserts by Pierre Hermé
(makes 1 cup or 300g)
• 1/3 cup (80g) heavy cream
• 3½ oz (100g) bittersweet chocolate, finely chopped
• 4 tsp (20 g) unsalted butter, cut into 4 pieces, at room temperature
• 7 tbsp (110 g) Chocolate Sauce (recipe below), warm or at room temperature
1)In a small saucepan, bring the heavy cream to a boil. Remove from the heat and slowly begin to add the chocolate, stirring with a wooden spoon or spatula.
2) Stirring gently, stir in the butter, piece by piece followed by the chocolate sauce.
Notes:
1) If the chocolate glaze is too cool (i.e. not liquid enough) you may heat it briefly
in the microwave or over a double boiler. A double boiler is basically a bowl sitting over (not touching) simmering water.
2) It is best to glaze the eclairs after the glaze is made, but if you are pressed for time, you can make the glaze a couple days ahead of time, store it in the fridge and bring it up to the proper temperature (95 to 104 F) when ready to glaze.
Chocolate Sauce
Recipe from Chocolate Desserts by Pierre Hermé
(makes 1½ cups or 525 g)
• 4½ oz (130 g) bittersweet chocolate, finely chopped
• 1 cup (250 g) water
• ½ cup (125 g) crème fraîche, or heavy cream
• 1/3 cup (70 g) sugar
1) Place all the ingredients into a heavy‐bottomed saucepan and bring to a boil, making sure to stir constantly. Then reduce the heat to low and continue stirring with a wooden spoon until the sauce thickens.
2) It may take 10‐15 minutes for the sauce to thicken, but you will know when it is done when it coats the back of your spoon.
Notes:
1) You can make this sauce ahead of time and store it in the refrigerator for two weeks. Reheat the sauce in a microwave oven or a double boiler before using.
2) This sauce is also great for cakes, ice-cream and tarts.
Thursday, August 28, 2008
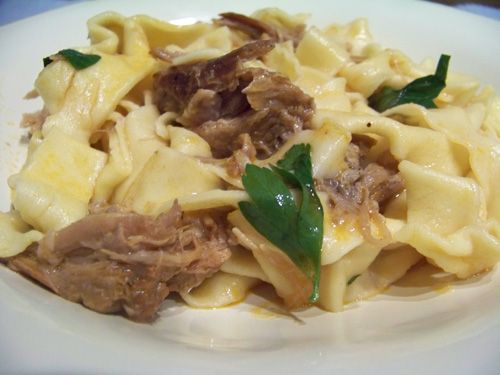
Smokey Pork Pappardelle
 Alright, so. My excuse didn't stick. It's been weeks and I'm still on the outs with the kitchen. My foot is better, I've been to the gym every day but one since my last post (and incidentally, am as light as I've ever been as an adult) and I've even tried cooking a bit. It's a measure of how checked out I am, though, that I didn't take one measly photo. Blah.
What is carrying me through? Well, let me tell you about my freezer. Because sauce is so.... saucy... we are often left with more than enough leftover for multiple dinners. Out of the freezer and into the pot and we can have a delicious home-cooked dinner in a matter of minutes. I cannot wait to have a garage that I can put a giant freezer in - seriously. (This is how I know I'm grown-up now, I long for appliances.) I am more than happy to make some pasta while the sauce reheats - I find it soothing.
So. Three hours in the oven. Don't worry about it. Pop it in and wander off. You won't go far, believe you me, because the smell coming from your oven will intoxicate you. Seriously. It's meaty and deep yet sweet... and feels just like home. I really like that the sauce is strained, because bits other than pork would have been out of place. Smooth sauce, tender pork, and home made pasta - really can't go wrong.
The recipe will probably feed 6 at once, but in our case, we ended up with three meals.
Smokey Pork Pappardelle
c/o Food & Wine Magazine, July 2008
http://www.foodandwine.com/recipes/smoky-pork-pappardelle
For the luscious meat sauce here, Gerard Craft braises pork with apples and honey, which adds some unexpected sweetness. Another surprise: He finishes the pasta with a sprinkling of smoked salt.
One 2-pound piece of boneless pork shoulder
Smoked sea salt
2 tablespoons canola oil
1 Granny Smith apple, cut into 1-inch dice
1 medium onion, cut into 1-inch dice
1 carrot, cut into 1-inch dice
1 celery rib, cut into 1-inch dice
2 garlic cloves, crushed
3 thyme sprigs
1/2 cup tomato paste
1 cup dry white wine
2 cups chicken stock or low-sodium broth
1/3 cup Champagne vinegar
3 tablespoons honey
3 tablespoons mascarpone cheese
Freshly ground pepper
1 pound pappardelle
1 tablespoon chopped flat-leaf parsley
Extra-virgin olive oil, for drizzling
Preheat the oven to 300°F. Season the pork with 1 1/2 tablespoons of smoked salt. In a medium, enameled cast-iron casserole, heat the canola oil until shimmering. Add the pork and cook over moderately high heat, turning, until browned on all sides, 15 minutes. Transfer the pork to a plate.
Add the apple, onion, carrot, celery, garlic and thyme to the casserole and cook over moderate heat until beginning to brown, about 6 minutes. Add the tomato paste and cook, stirring, until it deepens in color, about 2 minutes. Add the wine and bring to a boil. Add the chicken stock, vinegar and honey and bring to a simmer. Add the pork, cover and transfer the casserole to the oven. Braise the pork for about 3 hours, turning once halfway through, until very tender.
Transfer the pork to a plate. Strain the sauce into a large bowl, gently pressing on the solids. Pour the sauce back into the pot. Using 2 forks, shred the pork; discard any large pieces of fat. Transfer the shredded pork to the sauce and stir in the mascarpone. Season the sauce with smoked salt and pepper. Cover and keep warm.
Meanwhile, in a large pot of boiling salted water, cook the pappardelle until al dente. Drain the pasta and transfer to the casserole with the sauce. Toss the pasta with the sauce and the parsley over moderate heat until well coated, about 1 minute. Transfer the pasta to warm bowls. Drizzle with olive oil, sprinkle with smoked salt and serve.
Make ahead: The sauce can be refrigerated for up to 3 days.
Wine: Craft’s smoky-sweet pappardelle will pair well with a red that has enough rich fruit not to be overwhelmed by the dish’s luxurious flavors. Southern Italy seems to specialize in reds of that nature, especially the flat, warm vineyards of Puglia and its primary grape variety, Negroamaro. Try the peppery 2005 Li Veli Pezzo Morgana Salice Salentino or the figgy 2006 La Corte Salice Salentino.
Friday, August 15, 2008
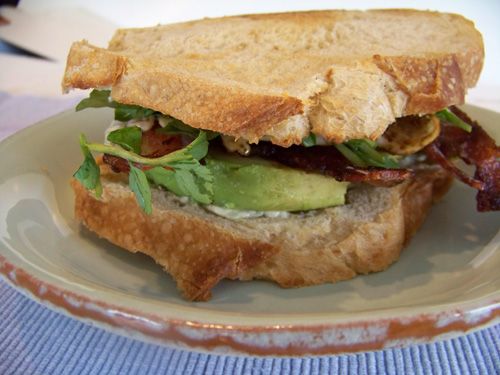
Bacon, Double A and T Sandwiches
 I have lost my vim. Have you seen it? I am sure I've left it in a good place...
I could say it was the weekend I pulled together my last Daring Baker's challenge - when I did the challenge, tried making homemade chicken stock for the first time, whatever we were eating that weekend AND preparing to have friends over for dinner the next night. I could easily blame that weekend (and I mostly do), because I haven't been in the mood to cook since (but believe me, I've tried anyway, and nothing has tasted right). As I was telling Dave, I need to get a wife to make ME dinner for a while, and then I'll be right as rain. But then I went and sprained my foot. And because of that, couldn't go to the gym, which has left me lethargic. Luckily, I have had two very nice days in a row at the gym, so things are on the up-and up!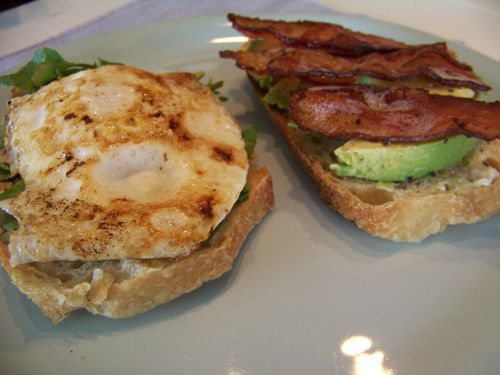 While I made these sandwiches for dinner in early July, and these photos are of the sandwiches I re-made the next morning for breakfast, I think they would be perfect to break me out of my funk. Seeing as how avocados, arugula and bacon are three of my favorite foods, I don't see why not. Added the second go round is a nice over-easy egg... I know, sneaky of me - but it was breakfast after all!! The mayo was a really nice touch - something I wouldn't have thought of on my own, but was glad to have. You'll end up with plenty for more than the two sandwiches it's supposed to dress, but that's ok, cause you can just make more sandwiches!
I cannot say enough good things about this cookbook. It has become my new go-to book for dinner, and I have made almost a dozen things (if not more) and have yet to be disappointed. The recipes are creative and easy to prepare - and are just plain delicious. Prepare yourselves to see many more of Jeanne Kelley's creations - I have a stockpile!
Enjoy your weekend!!
Bacon, Double A and T Sandwiches
c/o Blue Eggs and Yellow Tomatoes, by Jeanne Kelley
http://www.amazon.com/Blue-Eggs-Yellow-Tomatoes-Recipes/dp/0762431830/ref=pd_bbs_sr_1?ie=UTF8&s=books&qid=1215393679&sr=1-1
Adding the double-A – arugula and avocado – to the traditional BLT makes the perfect sandwich! Any leftover mayonnaise can be saved for later use on other sandwiches.
Yield: 2 sandwiches
Mayonnaise:
½ cup mayonnaise, preferably organic
2 tablespoons Dijon mustard
1 green onion, minced
1 garlic cloves, minced
Sandwiches:
6 slices (about 6 ounces) applewood-smoked bacon
4 slices country-style white or sourdough bread
1 avocado, sliced
1 large tomato, sliced
Salt and pepper
1 cup arugula leaves, lightly packed
To make the mayonnaise: Combine the mayonnaise ingredients in a small bowl. (Can be made several days ahead. Cover and refrigerate.)
To assemble the sandwiches: Cook the bacon to desired crispiness in a heavy, large skillet. Drain well.
Lightly toast the bread. Spread two pieces of toast with a thin layer of the mayonnaise. Top with avocado and tomato slices, dividing them evenly. Sprinkle the tomatoes with salt and pepper to taste. Arrange 3 slices of bacon atop the tomatoes. Divide the arugula between the sandwiches. Spread the remaining slices of toast with the mayonnaise and place atop the sandwiches. Press the sandwiches gently to compress. Cut each sandwich in half and serve.
Thursday, July 31, 2008
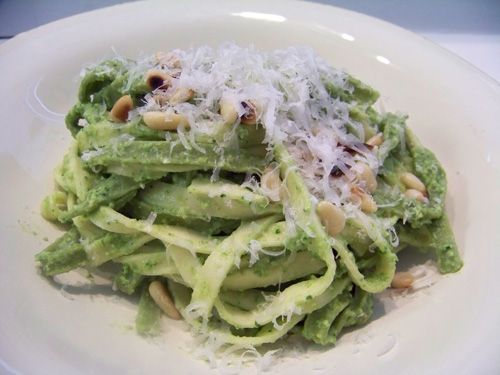
Straw and Hay Fettuccine Tangle with Spring Asparagus Puree
 I hate to say that we had this a month ago, at least. I'm even a little sheepish about it. I have a really strong affection to this pesto. Stupid simple to pull together and it was incredibly versatile. I know Ruth will get a laugh at this - yet another pesto for Presto Pasta Night! :)
Found in Heidi Swanson's Super Natural Cooking, I chose this pasta dish because I really wanted to showcase the fresh vegetables I found at the market - asparagus and peas. If you are familiar with this recipe, you'll know that it doesn't call for fresh peas... but I had them, and they were green, and I wanted to eat them, so in they went with the asparagus to blanch.
Really tasty. Happened to have about a pint of fresh peas from the market, so I tossed those in to blanch with the asparagus. I did cheat and buy my pasta this time. Isn't it weird, how foreign something can be until you're used to it? At this point, I can't imagine not making my own pasta - so long as it isn't anything shaped - which I guess is kinda simple, but still. We have the attachment for macaroni, but my one attempt was a disaster. Pasta sheets it shall be. :)
Anyway, the combination of egg and spinach pasta was visually interesting and it tasted quite nice, too. The spinach pasta added an element we aren't normally used to - so much so that I want to try to make my own spinach pasta... but that is a story for another post.
The asparagus, spinach and peas played really nicely together in the puree. The flavors blended, leaving them all to be equal players - no one flavor stood among the rest. I think I added a little more than half a lemon, but I really enjoy the extra bite of citrus in pesto.
Because I'd added a good cup of peas to the mix, I ended up with quite a lot of puree. I followed Heidi's suggestion in the book and used it everywhere I could: in sandwiches, other recipes calling for pesto, and on pizza.... all in a 10 day period. We even had the pesto pizza TWICE in that time. Why? Because the pesto, on a pizza, with ricotta, goat cheese, or mozzarella, is amazing - and we tried it each way. You'd think that having the same flavor so many times would get old, but it didn't. Our socks were that knocked off.
I'm sorry to share this past the asparagus season, but if you're like me a cheat a little and get them at other times in the season, please bookmark this recipe and give it a try. In pasta, it is surprisingly creamy, smooth and tart. On pizza, it is even better.
Straw and Hay Fettuccine Tangle with Spring Asparagus Puree
c/o Super Natural Cooking, by Heidi Swanson
http://www.amazon.com/Super-Natural-Cooking-Incorporate-Ingredients/dp/1587612755/ref=pd_bbs_sr_1?ie=UTF8&s=books&qid=1214342419&sr=1-1
The folate-rich asparagus and spinach puree can be made ahead of time; store it in the refrigerator in a jar topped with a layer of olive oil. It’s also great slathered on a grilled vegetable Panini, as a swirl in a simple potato soup, or as a sauce for pizza.
Spring Asparagus Puree
1 bunch asparagus spears, trimmed and halved crosswise
3 handfuls baby spinach leaves
2 cloves garlic
1 cup freshly grated Parmesan cheese, plus more for topping
1 cup toasted pine nuts
¼ cup extra-virgin olive oil, plus more for topping
Juice of ½ lemon
½ teaspoon fine-grain sea salt
4 ounces dried spinach fettuccine, or 6 ounces fresh
4 ounces dried egg fettuccine, or 6 ounces fresh
Bring two pots of water to a rolling boil, one large and one medium. You’ll use the large one to cook the pasta and the medium one to blanch the asparagus.
To make the asparagus puree, salt the asparagus water and drop the spears into the pot. Cook for 2 to 3 minutes, or until the spears are bright green and barely tender. Drain and transfer to a food processor (preferably) or a blender. Add the spinach, garlic, the 1 cup of Parmesan, and ¾ cup of the pine nuts. Puree and, with the motor running, drizzle the ¼ cup olive oil until a paste forms. It should be the loose consistency of pesto; if too thick, thin it with a bit of the pasta water. Add the lemon juice and salt, then taste and adjust the seasoning.
Salt the pasta water well and cook the pasta until just tender; you’ll need less time for fresh pasta, more for dried. Drain and toss immediately with 1 cup of the asparagus puree, stirring in more afterward depending on how heavily coated you like your pasta. Serve sprinkled with the remaining ¼ cup toasted pine nuts, a dusting of Parmesan, and a quick drizzle of extra-virgin olive oil.
Serves 4 to 6.
Wednesday, July 30, 2008
Daring Bakers July: You Mean I Can't Have Cake for Dinner?
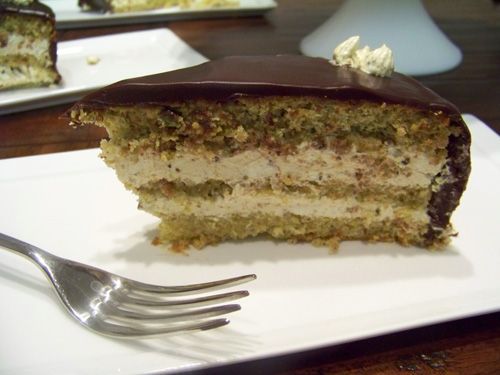 This Pistachio Gateau with Praline Buttercream has a power. The Power of Magnetic Deliciousness. I took my time this past weekend preparing it - and didn't cut into it until Monday night with friends. But yesterday? I spent almost my entire Tuesday thinking about this cake. I wanted to have it for dinner. And then again for dessert. Forking a bite was the first thing I did when I got home. (This obsession is starting to sound a little weird, isn't it?) I am not alone, however. A bite of cake was also on my husband's short list upon arriving home - I got a smooch and then off he went to the cake. At least he got it in the right order. ;)
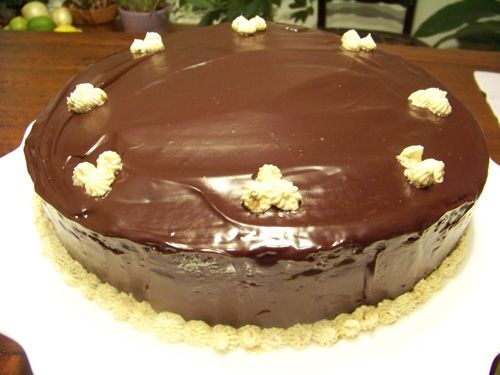 I started this challenge this past Saturday night with the cake. I only have 8-inch cake pans, so I opted to use my 9-inch springform pan instead. The Daring Bakers that braved this challenge earlier in the month suggested using a round of parchment paper in the bottom, so I thought that the springform action would be an added help. I used pistachios instead of hazelnuts (the hazels were twice the cost for half the amount of shelled pistachios at the store - and I want to marry pistachios.) I was more than a little nervous that the cake wouldn't turn out - because the way the instructions read, it seems to indicate that we are to mix the nut flour into the butter - when it really means to fold it directly into the batter... so I ended up trying to delicately fold in the dense buttery nut meal into my light and fluffy egg mixture... A moment of panic, indeed, but it worked out in the end - the genoise seemed no worse for wear and baked up nicely. Cooled and wrapped up, it spend the night in the fridge.
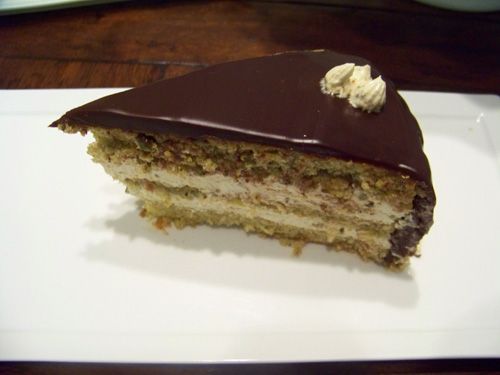 Sunday afternoon, I started with the praline - pistachio, of course. Such a simple combination of sugar and nuts created a most delicious brittle. (I even made a second batch to snack on!!) While it cooled, I prepared the buttercream (with its three sticks of butter!!!) I was lucky in that it came together easily for me - I've read countless horror stories of failed buttercreams... I made sure to have extra of everything, just in case. Layering the cake was a little of a catastrophe, because I mangled the middle one - the center of the cake is mostly crumbly bits... I figured if I doused it with enough of the sugar syrup, it would just bond together, right? I'd like to think that worked - and if I slice the cake when it is still cold, it mostly stays put... but whatever - it all tastes the same, crumbly or not! :)
Final assembly: glaze, ganache, garnish. I am a big fan of glazing before ganache-ing. It acts like something of a crumb coat, allowing the chocolate to flow a little easier - which is terrific. I don't often ganache a cake, and I'm starting to wonder why. I find it remarkably easier than icing a cake, and it looks so spectacular in the end, too. Consider me a convert. I have also never ever not once used a piping bag and tips to decorate a cake. I own a set, yes, but I'd never used it. I picked a basic star tip and as you can see, went with a basic dot pattern. If this has been any other cake (not a challenge) and if it was only Dave and I eating it (instead of having friends over), I might have been a little more bold... but I didn't want it to be a major flop. I also prefer spare simplicity, so I was happy with the result. I considered using some of the second batch of brittle as garnish, but didn't want the hardness of it to detract from the cake itself. Texture issues and all that. Into the fridge to wait for Monday night.
Soon enough, it was time to have some cake! I boldly cut us all giant pieces and we all dug in. I don't think a single one of us finished our slice. Smaller is certainly better. This cake is rich rich rich and a little goes a long way. A long way I'm happy to take for breakfast, lunch or dinner! The buttercream is by far my favorite part. I really enjoyed the flecks of nut/crunch in it and it provided just the right amount of both. The cake was moist and light. I can't sing the praises far or wide enough for this cake. I am considering buying the book it is from: Great Cakes by Carole Walters - because if this recipe is any indication, I will love trying the rest!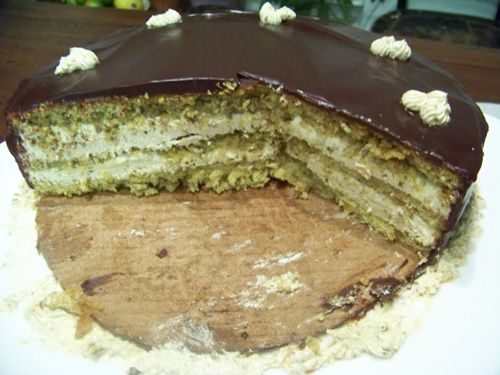 I really enjoyed making this cake - all eleventy billing elements. I gleefully whipped, frothed, caramelized and folded every last bit. I skipped off with tastings of every stage for Dave and my excitement grew with each accomplished step. Not only that, but I never felt overwhelmed by this challenge - which is new for me. Yes, there were a lot of moving parts - and some of them were new - but I felt like, if I just followed them in order, took them as an individual piece and not a giant behemoth of a cake, I could do it. I did, and I loved it.
Thanks to the lovely Chris at Mele Cotte for a delicious challenge. Head on over to her post for the recipe and then pop over to the Daring Bakers Blogroll for more inspiration!
Monday, July 28, 2008
HHDD #21: The Tiramisu That Won Him Over
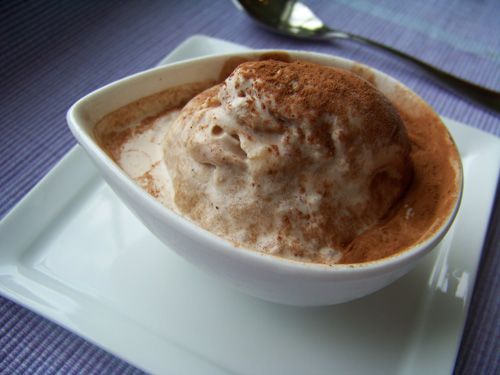 I love tiramisu. Love it. Whenever I go into Whole Foods, I make sure to include a little square in my purchase. I adore the creamy mascarpone, the coffee and liqueur-soaked lady fingers, and the barest of dustings of cocoa powder. Tiramisu might be the one dessert I eat slowly, savoring each spoonful (vs. greedily stuffing my face.)
How I managed to marry a man that doesn't also share the same love of tiramisu is beyond me. He'll choke it down, sure, but it doesn't sit on quite the same pedestal. Silly man. When Alexandra announced this round of HHDD, I was both elated and worried. I knew I would make it - I knew it - but I wasn't thrilled for the mournful sighs from the hubs ("Can't you make a dessert I like??!?!?!") . How could I make it in a way he would like it, nay, love it??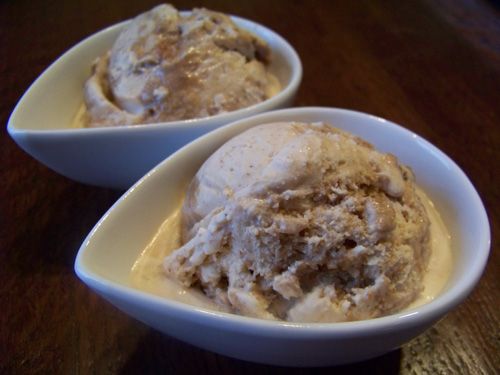 I was staring at the Donna Hay recipe Alexandra provided... that stare one uses when they don't really see the object of their staring?... and it clicked - I would turn the mascarpone cream into ice cream! I would blend the soaked lady fingers into it! It would be brilliant! My brain clicked back and I set to work. I decided to use the recipe provided, and tweak another D. Hay recipe for mascarpone ice cream - I figured, if I'm going to do this, I'm going the whole Donna Hay Way.
I was sneaky about it, for sure. I didn't tell Dave what I was up to. I didn't even explain why I was buying the lady fingers very well, "O, I need those for ice cream." Such is his trust in me, however, he didn't even ask for more information. Maybe it isn't trust, but he probably knows by now that he doesn't really need to know. He just eats what I make and is happy - that's enough for him. I made the base Saturday morning and poured it into the machine. Thirty minutes later, and it still hadn't reached the soft-serve stage... cold, for sure, but in no way thick enough to pop into the freezer. I let it go another 20 minutes, thinking more mixing might help. Nope - the opposite happened... my mix was back where I started, cold, but completely liquid. I considered throwing in the towel. Instead, I poured it out of the ice cream bowl and into two containers. I hadn't realized just how much was in the machine - easily twice what I normally run. Perhaps if I let the bowl refreeze and then just process half at a time? Bingo - success!
Meanwhile, I soaked the lady fingers in a mix of espresso and coffee liqueur. The delay in getting the ice cream processed meant that the finished product was a little soggy - but it still mixed into the mascarpone ice cream nicely.
Maybe too nicely? As you can see, there aren't too many "chunks" of soaked finger - more like swirls. I contend that this is part of the reason Dave enjoyed the ice cream as much as he did. You see, Dave doesn't drink coffee. Doesn't like it, not the smell, not the taste. The benefit of having the fingers so soaked as to be to blended in dispersed the flavor enough that it was never overwhelmingly coffee-flavored. Each bite was a brilliant blend of tiramisu - I think this might always be the method of production in our home going forward. I get my guilty indulgence, and my dear husband can enjoy it with me - except - now I have to share.
Tiramisu
c/o Modern Classics Book 2 by Donna Hay
via Addicted Sweet Tooth
http://addictedsweettooth.net/?p=277
1/2 cup (4 fl oz) strong espresso coffee
1/2 cup (4 fl oz) coffee liqueur
16 sponge finger biscuits, halved widthwise
cocoa powder for dusting
filling
1 1/4 cups (310 g/10 1/2 oz) mascarpone
1 1/2 cups (12 fl oz) (single or pouring) cream
3 tablespoons icing (confectioner’s) sugar, sifted
To make the filling, place the mascarpone, cream and icing sugar in a bowl and whisk until light and creamy. Set aside.
Place the coffee and liqueur in a small bowl and stir to combine. Quickly dip both sides of half the biscuit halves in the coffee mixture and place in 4 glasses or small bowls. Top with half the filling. Dip the remaining biscuit halves, place on top of the cream layer and spoon over the remaining filling. Dust heavily with cocoa and refrigerate until required.
Serves 4.
Mascarpone Ice Cream
c/o Bear Necessities
http://brookes-bearnecessities.blogspot.com/2007/05/cinnamon-marscapone-ice-cream.html
1 1/2 cups sugar
1 3/4 cups water
2 tsp cinnamon
14oz mascarpone
1/2 cup cream
1. Place the sugar and water in a saucepan over low heat and stir until sugar dissolves. Simmer for 3 minutes, then remove from heat, add the cinnamon and leave syrup to cool.
2. Mix the syrup with mascarpone and cream. Place in an ice cream maker and follow manufacturer's instructions until ice cream is thick and scoopable.


