
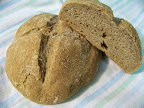
 Yep, you read that correctly. Once printed, this recipe was 18 pages long! It had 13 steps and took 12 hours for me to produce the two lovely loaves you see above. At first, I thought our hostesses (hostessi?), Mary and Sara, had lost their minds. However, what's not to like about trying something challenging on for size - particularly if it's a Julia Child recipe!! I didn't join the Daring Bakers for nothin'! 'Cept, if you've come from the Daring Bakers Blogroll, you've no doubt noticed that my boules don't look like the others. This is because I'm an idiot, but I will explain. :)
 I printed the recipe and reviewed it (repeatedly) to make sure I had everything I needed. I got started after a late and lazy breakfast. I'd made it to step 3 by the time Dave left for his afternoon Caps game. I was only on step 7 when he returned. That might seem like progress, but he was gone a loooooong time. I particularly enjoyed step 3. I would pop into the kitchen to check on it every half hour or so, and see it bubbling and rising like a wild little monster. My rises in steps 4 and 6 weren't nearly the same spectacle, so I should have known I was in for trouble.
Trouble isn't the right word, to be fair. My loaves, as they were, came out nicely. They certainly filled our home with a warm, yeasty aroma that excited me. Imagine my surprise, then, once I'd waited for what felt like forever to slice into the loaves.... and they were dense... and brown... and chewy... not like I expected my french bread to be. What had I done? I emailed Mary to find out. My flour was the issue.
You'd think I would have learned by now. As much as I love white whole wheat, I really really cannot use it for everything I would use AP flour for. I have pretended long enough. You have no idea how happy this makes me, though. I'd simply thought I was a bad bread maker. (Those, plus one cinnamon roll recipe I never published.) I'd loused up my gluten content, my bread didn't rise enough, so it didn't have the nice, fluffy French insides I'd been expecting. Much in the same way the potato bread and the no-knead rolls were still good, they just weren't right.
My husband even suggested I give up. (Horror!) Instead, I'm going to get some normal, all-purpose flour and try this grand recipe again. There are so many perfect and amazing versions out there to be had, I can't resist the temptation! (And not just so that I can steam-out ice cubes in the oven again!!)
My thanks to Mary and Sara for a great learning experience and for making me stretch outside my comfort zone! Go Daring Bakers, go!
Pain Francais (French Bread)
(From Mastering the Art of French Cooking: Volume Two by Julia Child and Simone Beck)
Daring Bakers Challenge #16: February 2008
Hosts: Breadchick Mary (The Sour Dough) and Sara (I Like To Cook)
Step 1: The Dough Mixture – le fraisage (or frasage)
(Mary and Sara Note: The metric measurements were converted from an online conversion chart and then checked for us by Baking Soda, who gets a Golden Loaf Award for standing in her kitchen in her pjs and while she drank her first cup of coffee scooping flour onto scales.)
1 cake (0.6 ounce) (20grams) fresh yeast or 1 package dry active yeast
1/3 cup (75ml) warm water, not over 100 degrees F/38C in a glass measure
3 1/2 cup (about 1 lb) (490 gr) all purpose flour, measured by scooping
dry measure cups into flour and sweeping off excess
2 1/4 tsp (12 gr) salt
1 1/4 cups (280 - 300ml) tepid water @ 70 – 74 degrees/21 - 23C
(Mary and Sara Note: if you are using instant yeast, you may reduce the amount to 1 3/4 tsp or 7 gr but you will still want to "proof" it because that is important for taste development in this bread)
Both Methods: Stir the yeast in the 1/3 cup warm water and let liquefy completely while measuring flour into mixing bowl. When yeast has liquefied, pour it into the flour along with the salt and the rest of the water.
Hand Method: Stir and cut the liquids into the flour with a rubber spatula, pressing firmly to form a dough and making sure that all the bits of flour and unmassed pieces are gathered in. Turn dough out onto kneading surface, scraping bowl clean. Dough will be soft and sticky.
Stand Mixer: (Mary and Sara note: Julia did not give detailed instructions about how the dough comes together other than “combine the ingredients using the dough hook”, therefore these directions are based upon their experiences) Using the dough hook attachment on the speed the mixer manufacturer recommends for dough hook use or the lowest setting if there is no recommendation, slowly work all the ingredients together until a dough ball is formed, stopping the mixer and scrapping the bits of flour and chunks of dough off the bottom of the bowl and pressing them into the dough ball. Continue to mix the dough on a low speed until all the bits of flour and loose chunks of dough have formed a solid dough ball.
(Mary and Sara Note for both methods: Depending the humidity and temperature of your kitchen and the type of AP flour your use, you may need to add additional flour or water to the dough. To decide if this is necessary, we recommend stopping during the mixing process and push at your dough ball. If the dough is super sticky, add additional flour one handful at a time until the dough is slightly sticky and tacky but not dry. If the dough is dry and feels hard, add 1 Tbsp of water a time until the dough is soft and slightly sticky. Mary likes to keep a soup or cereal bowl of flour and a 1 cup measure of water with a tablespoon next to her mixer for this.)
Both Methods: Turn dough out onto kneading surface, scraping bowl clean. Dough will be soft and sticky. Let the dough rest for 2 – 3 minutes while you wash and dry the bowl (and the dough hook if using a stand mixer).
Step 2: Kneading – petrissage
The flour will have absorbed the liquid during this short rest, and the dough will have a little more cohesion for the kneading that is about to begin. Use one hand only for kneading and keep the other clean to hold a pastry scrapper, to dip out extra flour, to answer the telephone, and so forth. Your object in kneading is to render the dough perfectly smooth and to work it sufficiently so that all the gluten molecules are moistened and joined together into an interlocking web. You cannot see this happen, of course, but you can feel it because the dough will become elastic and will retract into shape when you push it out.
Hand Method: Start kneading by lifting the near edge of the dough, using a pastry scraper or stiff wide spatula to help you if necessary, and flipping the dough over onto itself. Scrape dough off the surface and slap it down; lift edge and flip it over again, repeating the movement rapidly.
In 2 -3 minutes the dough should have enough body so that you can give it a quick forward push with the heel of your hand as you flip it over. Continue to knead rapidly and vigorously in this way. If the dough remains too sticky, knead in a sprinkling of flour. The whole kneading process will take 5 – 10 minutes, depending on how expert you become.
Shortly after this point, the dough should have developed enough elasticity so it draws back into shape when pushed, indicating the gluten molecules have united and are under tension like a thin web of rubber; the dough should also begin to clean itself off the kneading surface, although it will stick to your fingers if you hold a pinch of dough for more than a second or two.
Stand Mixer: (Mary and Sara note: Julia did not give detailed instructions about kneading the dough other than “knead”) Place dough back into the bowl and using the dough hook attachment at the recommended speed (low), knead the dough for about 5 – 7 minutes. At about the 5 minute mark, stop the mixer and push at the dough with your fingertips. If it springs back quickly, you have kneaded the dough enough. If it doesn’t spring back continue to knead, stopping the mixer and retesting every 2 minutes. If the dough sticks to your fingers, toss a sprinkling of flour onto the dough and continue to knead. The dough should be light and springy when it is ready. Mary also recommends always finishing with about 1 – 2 minutes of hand kneading just to get a good feel for how the gluten is formed.
Both Methods: Let dough rest for 3 – 4 minutes. Knead by hand for a minute. The surface should now look smooth; the dough will be less sticky but will still remain soft. It is now ready for its first rise.
(Mary and Sara note: From here out in the recipe, there is no difference for the hand vs. stand method)
Step 3: First Rising – pointage premier temps (3-5 hours at around 70 degrees)
You now have approximately 3 cups of dough that is to rise to 3 1/2 times its original volume, or to about 10 1/2 cups. Wash and fill the mixing bowl with 10 1/2 cups of tepid water (70 – 80 degrees) and make a mark to indicate that level on the outside of the bowl. Note, that the bowl should have fairly upright sides; if they are too outward slanting, the dough will have difficulty in rising. Pour out the water, dry the bowl, and place the dough in it (Mary and Sara Note: Very lightly grease the bowl with butter or kitchen spray as well to prevent the risen dough from sticking to the bowl).
Slip the bowl into a large plastic bag or cover with plastic, and top with a folded bath towel. Set on a wooden surface, marble or stone are too cold. Or on a folded towel or pillow, and let rise free from drafts anyplace where the temperature is around 70 degrees. If the room is too hot, set bowl in water and keep renewing water to maintain around 70 degrees. Dough should take at least 3 – 4 hours to rise to 10 1/2 cups. If temperature is lower than 70 degrees, it will simply take longer.
(Mary and Sara Note: If your oven has an oven light, turn on the oven light when you start making the dough. By the time you are ready for the first rise, the temperature in your oven will be around 70 degrees. You can check with your oven thermometer. If you don’t have an oven light, like Mary, you can turn the oven on to its lowest setting about 5 minutes before you begin your rise. Leave on for 1 – 5 minutes until the temperature is around 75- 80 degrees. Turn off oven, when you open the door to put the dough in to rise, your oven will be around 70 degrees. Another trick is to put your dough on top of your hot water heater. Place a folded towel on top of the hot water heater and let rise. Also a heating pad works well. Mary also has used those give away shower caps from hotels to cover her bowls and the bowl covers for the metal mixing bowls work well too. Always lightly grease the plastic wrap or bowl cover so if the risen dough touches it, the dough won’t stick.)
When fully risen, the dough will be humped into a slight dome, showing that the yeast is still active; it will be light and spongy when pressed. There will usually be some big bubbly blisters on the surface, and if you are using a glass bowl you will see bubbles through the glass.
Step 4: Deflating and Second Rising – rupture; pointage deuxieme temps (1 1/2 to 2 hours at around 70 degrees)
The dough is now ready to be deflated, which will release the yeast engendered gases and redistribute the yeast cells so that the dough will rise again and continue the fermentation process.
With a rubber spatula, dislodge dough from inside of bowl and turn out onto a lightly floured surface, scraping bowl clean. If dough seems damp and sweaty, sprinkle with a tablespoon of flour.
Lightly flour the palms of your hands and flatten the dough firmly but not too roughly into a circle, deflating any gas bubbles by pinching them.
Lift a corner of the near side and flip it down on the far side. Do the same with the left side, then the right side. Finally, lift the near side and tuck it just under the edge of the far side. The mass of dough will look like a rounded cushion.
Slip the sides of your hands under the dough and return it to the bowl. Cover and let rise again, this time to not quite triple, but again until it is dome shaped and light and spongy when touched.
(Mary and Sara Note: You may need to lightly re-grease your bowl and plastic wrap for the second rise to prevent sticking)
Step 5: Cutting and resting dough before forming loaves
Loosen dough all around inside of bowl and turn out onto a lightly floured surface. Because of its two long rises, the dough will have much more body. If it seems damp and sweaty, sprinkle lightly with flour.
Making clean, sure cuts with a large knife or a bench scraper, divide the dough into:
• 3 equal pieces for long loaves (baguettes or batards) or small round loaves (boules only)
• 5 – 6 equal pieces for long thin loaves (ficelles)
• 10 – 12 equal pieces for small oval rolls (petits pains, tire-bouchons) or small round rolls (petits pains, champignons)
• 2 equal pieces for medium round loaves (pain de menage or miche only)
• If you making one large round loaf (pain de menage, miche, or pain boulot), you will not cut the dough at all and just need to follow the directions below.
After you have cut each piece, lift one end and flip it over onto the opposite end to fold the dough into two; place dough at far side of kneading surface. Cover loosely with a sheet of plastic and let rest for 5 minutes before forming. This relaxes the gluten enough for shaping but not long enough for dough to begin rising again.
While the dough is resting, prepare the rising surface; smooth the canvas or linen towelling on a large tray or baking sheet, and rub flour thoroughly into the entire surface of the cloth to prevent the dough from sticking
Step 6: Forming the loaves – la tourne; la mise en forme des patons
Because French bread stands free in the oven and is not baked in a pan, it has to be formed in such a way that the tension of the coagulated gluten cloak on the surface will hold the dough in shape.
For Long Loaves - The Batard: (Baguettes are typically much too long for home ovens but the shaping method is the same)
After the 3 pieces of dough have rested 5 minutes, form one piece at a time, keeping the remaining ones covered.
Working rapidly, turn the dough upside down on a lightly floured kneading surface and pat it firmly but not too roughly into an 8 to 10 inch oval with the lightly floured palms of your hands. Deflate any gas bubbles in the dough by pinching them.
Fold the dough in half lengthwise by bringing the far edge down over the near edge.
Being sure that the working surface is always lightly floured so the dough will not stick and tear, which would break the lightly coagulated gluten cloak that is being formed, seal the edges of the dough together, your hands extended, thumbs out at right angles and touching.
Roll the dough a quarter turn forward so the seal is on top.
Flatten the dough again into an oval with the palms of your hands.
Press a trench along the central length of the oval with the side of one hand.
Fold in half again lengthwise.
This time seal the edges together with the heel of one hand, and roll the dough a quarter of a turn toward you so the seal is on the bottom.
Now, by rolling the dough back and forth with the palms of your hands, you will lengthen it into a sausage shape. Start in the middle, placing your right palm on the dough, and your left palm on top of your right hand.
Roll the dough forward and backward rapidly, gradually sliding your hands towards the two ends as the dough lengthens.
Deflate any gas blisters on the surface by pinching them. Repeat the rolling movement rapidly several times until the dough is 16 inches long, or whatever length will fit on your baking sheet. During the extension rolls, keep circumference of dough as even as possible and try to start each roll with the sealed side of the dough down, twisting the rope of dough to straighten the line of seal as necessary. If seal disappears, as it sometimes does with all purpose flour, do not worry.
Place the shaped piece of dough, sealed side up, at one end of the flour rubbed canvas, leaving a free end of canvas 3 to 4 inches wide. The top will crust slightly as the dough rises; it is turned over for baking so the soft, smooth underside will be uppermost.
Pinch a ridge 2 1/2 to 3 inches high in the canvas to make a trough, and a place for the next piece. Cover dough with plastic while you are forming the rest of the loaves.
After all the pieces of dough are in place, brace the two sides of the canvas with long rolling pins, baking sheets or books, if the dough seems very soft and wants to spread out. Cover the dough loosely with flour rubbed dish towel or canvas, and a sheet of plastic. Proceed immediately to the final rising, next step.
(Mary and Sara Note: Empty paper towel tubes and/or bottles of spices work well as braces as well)
For Long Thin Loaves – Fincelles: Follow the steps above but making thinner sausage shapes about 1/2 inch in diameter. When they have risen, slash as with the Batard.
For Oval Rolls – Petits Pains, Tire-Bouchons: Form like batards, but you will probably not have to lengthen them at all after the two foldings and sealings. Place rolls on a floured canvas about 2 – 4” apart and cover with plastic to rise. When they have risen, make either 2 parallel slashes or a single slash going from one end to the other.
For Small, Medium, or Large Round Loaves – Pain de Menage, Miches, Boules: The object here is to force the cloak of coagulated gluten to hold the ball of dough in shape: the first movement will make cushion; the second will seal and round the ball, establishing surface tension.
Place the dough on a lightly floured surface.
Lift the left side of the dough with the side of your left hand and bring it down almost to the right side.
Scoop up the right side and push it back almost to the left side. Turn the dough a quarter turn clockwise and repeat the movement 8 – 10 times. The movement gradually smooths the bottom of the dough and establishes the necessary surface tension; think of the surface of the dough as if it were a fine sheet of rubber you were stretching in every direction.
Turn the dough smooth side up and begin rotating it between the palms of your hands, tucking a bit of the dough under the ball as you rotate it. In a dozen turns you should have a neatly shaped ball with a little pucker of dough, le cle, underneath where all the edges have joined together.
Place the dough pucker side up in a flour-rubbed canvas; seal the pucker by pinching with your fingers. Flour lightly, cover loosely and let rise to almost triple its size. After unmolding upside down on the baking sheet, slash with either a long central slash, two long central slashes that cross at right angles, or a semi-circular slash around half the circumference.
For Small Round Rolls – Petits Pains, Champignons: The principles are the same here as for the preceding round loaves, but make the cushion shape with your fingers rather than the palms of your hands.
For the second stage, during which the ball of dough is rotated smooth side up, roll it under the palm of one hand, using your thumb and little finger to push the edges of the dough underneath and to form the pucker, where the edges join together
Place the formed ball of dough pucker side up on the flour rubbed canvas and cover loosely while forming the rest. Space the balls 2 inches apart. When risen to almost triple its size, lift gently with lightly floured fingers and place pucker side down on baking sheet. Rolls are usually too small for a cross so make either one central slash or the semi-circular cut.
For Large Oval Loaf – Pain Boulot: Follow the directions for the round loaves except instead of rotating between the balms of your hands and tucking to form a round loaf, continue to turn the dough from the right to the left, tucking a bit of each end under the oblong loaf. In a dozen turns you should have a neatly shaped oval with tow little puckers of dough, le cles, underneath where all the edges of have joined together.
Place the dough pucker sides up in a flour-rubbed canvas; seal the puckers by pinching with your fingers. Flour lightly, cover loosely and let rise to almost triple its size. After unmolding upside down on the baking sheet, slash with parallel slashes going diagonally across the top starting from the upper left and going to the lower right.
Step 7: Final Rise – l’appret - 1 1/2 to 2 1/2 hours at around 70 degrees
The covered dough is now to rise until almost triple in volume; look carefully at its pre-risen size so that you will be able to judge correctly. It will be light and swollen when risen, but will still feel a little springy when pressed.
It is important that the final rise take place where it is dry; if your kitchen is damp, hot, and steamy, let the bread rise in another room or dough will stick to the canvas and you will have difficulty getting it off and onto another baking sheet. It will turn into bread in the oven whatever happens, but you will have an easier time and a better loaf if you aim for ideal conditions.
Preheat oven to 450 degrees about 30 minutes before estimated baking time.
Step 8: Unmolding risen dough onto baking sheet – le demoulage.
(Mary and Sara note: we are only going to describe the unmolding of The Batard but the unmolding process is the same no matter the shape of your loaf or loaves. The key to unmolding without deflating your bread is slow and gentle!)
The 3 pieces of risen dough are now to be unmolded from the canvas and arranged upside down on the baking sheet. The reason for this reversal is that the present top of the dough has crusted over during its rise; the smooth, soft underside should be uppermost in the oven so that the dough can expand and allow the loaf its final puff of volume. For the unmolding you will need a non-sticking intermediate surface such as a stiff piece of cardboard or plywood sprinkled with cornmeal or pulverized pasta.
Remove rolling pins or braces. Place the long side of the board at one side of the dough; pull the edge of the canvas to flatten it; then raise and flip the dough softly upside down onto the board.
Dough is now lying along one edge of the unmolding board: rest this edge on the right side of a lightly buttered baking sheet. Gently dislodge dough onto baking sheet, keeping same side of the dough uppermost: this is the soft smooth side, which was underneath while dough rose on canvas. If necessary run sides of hands lightly down the length of the dough to straighten it. Unmold the next piece of dough the same way, placing it to the left of the first, leaving a 3 inch space. Unmold the final piece near the left side of the sheet.
Step 9: Slashing top of the dough – la coupe.
(Mary and Sara Note: We will only describe the slashing for the Batard here. All other slashes for the other shapes are described in Step 6: Forming the Loaves)
The top of each piece of dough is now to be slashed in several places. This opens the covering cloak of gluten and allows a bulge of dough underneath to swell up through the cuts during the first 10 minutes of baking, making decorative patterns in the crust. These are done with a blade that cuts almost horizontally into the dough to a depth of less than half an inch. Start the cut at the middle of the blade, drawing toward you in a swift clean sweep. This is not quite as easy as it sounds, and you will probably make ragged cuts at first; never mind, you will improve with practice. Use an ordinary razor blade and slide one side of it into a cork for safety; or buy a barbers straight razor at a cutlery store.
For a 16 to 18 inch loaf make 3 slashes. Note that those at the two ends go straight down the loaf but are slightly off centre, while the middle slash is at a slight angle between the two. Make the first cut at the far end, then the middle cut, and finally the third. Remember that the blade should lie almost parallel to the surface of the dough.
Step 10: Baking – about 25 minutes; oven preheated to 450 degrees (230 degrees C).
As soon as the dough has been slashed, moisten the surface either by painting with a soft brush dipped in cold water, or with a fine spray atomizer, and slide the baking sheet onto rack in upper third of preheated oven. Rapidly paint or spray dough with cold water after 3 minutes, again in 3 minutes, and a final time 3 minutes later. Moistening the dough at this point helps the crust to brown and allows the yeast action to continue in the dough a little longer. The bread should be done in about 25 minutes; the crust will be crisp, and the bread will make a hollow sound when thumped.
If you want the crust to shine, paint lightly with a brush dipped in cold water as soon as you slide the baking sheet out of oven.
Step 11: Cooling – 2 to 3 hours.
(Mary and Sara Note: We know this will be the hardest thing to do for this challenge. But, if you do not let the French bread cool, the bread will be doughy and the crust will be soft. If you want to have warm French bread, re-heat the bread after it has cooled in a 400 degree oven, uncovered and directly on the oven rack for 10 – 12 minutes if it is unfrozen. If it has been frozen see the directions below)
Cool the bread on a rack or set it upright in a basket or large bowl so that air can circulate freely around each piece. Although bread is always exciting to eat fresh from the oven, it will have a much better taste when the inside is thoroughly cool and has composed itself.
Step 12: Storing French bread
Because it contains no fats or preservatives of any kind, French bread is at its best when eaten the day it is baked. It will keep for a day or two longer, wrapped airtight and refrigerated, but it will keep best if you freeze it – let the loaves cool first, then wrap airtight. To thaw, unwrap and place on a baking sheet in a cold oven; heat the oven to 400 degrees. In about 20 minutes the crust will be hot and crisp, and the bread thawed. The French, of course, never heat French bread except possibly on Monday, the baker’s holiday, when the bread is a day old.
Step 13: Canvas housekeeping
After each bread session, if you have used canvas, brush it thoroughly to remove all traces of flour and hang it out to dry before putting away. Otherwise the canvas could become mouldy and ruin your next batch of dough.
The Simulated Bakers’ Oven
Baking in the ordinary way, as described in the preceding recipe, produces an acceptable loaf of bread but does not nearly approach the glory you can achieve when you turn your home oven into a baker’s oven. Merely providing yourself with the proper amount of steam, if you can do nothing else, will vastly improve the crust, the color, the slash patterns, and the volume of your bread; steam is only a matter of plopping a heated brick or stone into a pan of water in the bottom of the oven. The second provision is a hot surface upon which the naked dough can bake; this gives that added push of volume that improves both the appearance and the slash patterns. When you have the hot baking surface, you will then also need a paddle or board upon which you can transfer dough from canvas to hot baking surface. For the complete set up here is you should have, and any building-supply store stocks these items.
For the hot baking surface: Metal will not do as a hot baking surface because it burns the bottom of the dough. The most practical and easily obtainable substance is ordinary red floor tiles 1/4” thick. They come in various sizes such as 6 x 6, 6 x 3, and you only need enough to line the surface of an oven rack. Look them up under Tiles in your Directory, and ask for “quarry tiles” their official name.
(Mary and Sara Note: When this book was written, quarry tiles had a fair amount of asbestos in them. Today, in North America and Europe, they normally are made of clay. Make sure if you decide to go purchase some quarry tiles you only purchase unglazed quarry tiles because most of the glazes used contain lead or some other nasty substance that could get transferred. A large pizza stone will also work but make sure it is at least 1/4 inch thick because the thinner ones can break when used at the high heats that baking bread requires. Make sure you never put wet tiles in the oven because they can shatter or worse as the oven heats up.)
For unmolding the risen dough from its canvas: A piece of 3/16 inch plywood about 20 inches wide.
For sliding the dough onto the hot tiles: When you are doing 3 long loaves, you must slide them together onto the hot tiles; to do so you unmold them one at a time with one board and arrange them side by side on the second board, which takes place on the baker’s paddle, la pelle. Buy a piece of plywood slightly longer but 2 inches narrower than your oven rack.
(Mary and Sara note: Today, you can buy a real baker’s paddle easily online or at a restaurant supply store for about the same money as a piece of plywood and it will have a bevelled edge that will make sliding loaves in and out of the oven easier)
To prevent dough from sticking to unmolding and sliding boards: White cornmeal or small dried pasta pulverized in the electric blender until it is the consistency of table salt. This is called fleurage.
The steam contraption: Something that you can heat to sizzling hot on top of the stove and then slide into a pan of water in the oven to make a great burst of steam: a brick, a solid 10lb rock, piece of cast iron or other metal. A 9 x 12 inch roasting pan 2 inches deep to hold an inch of water and the hot brick.
(Mary and Sara note: Other ways to get steam in the oven is pre-heat the oven and then to fill a pan with ice cubes put it on the lower rack and then pour warm water into the pan. The temperature difference between the ice cubes and the warm water will create steam. Also you can toss ice cubes on the bottom of the oven. Put a metal baking sheet on the bottom rack, pre-heat the oven with the baking sheet in the oven and right before you put your loaves in, spritz water onto the pan.)
Friday, February 29, 2008
Daring Bakers: The 18 page Recipe
Thursday, February 28, 2008
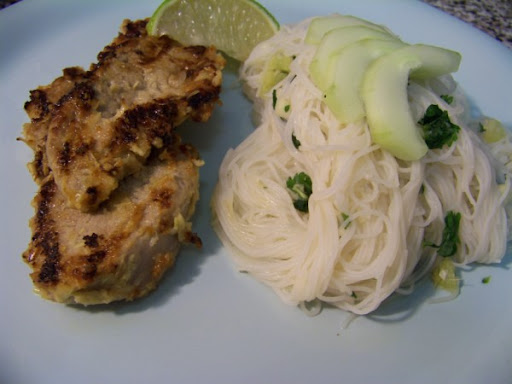
Happy Birthday, PPN!!!: Lemongrass-Barbecued Pork with Rice-Vermicelli Salad
 Do you think Ruth had any idea how popular her Presto Pasta Nights would become? Do you think she knew we'd be able to celebrate 52 weeks - a full year (and a Leap Day, to boot!) with her? I know she puts a lot of effort and a lot of heart into her round-ups, and I couldn't be happier for her!! You rock, Ruth!
 For this momentous of an event, I wanted to make something different and special. I rarely use lemongrass, even though I love it... and I even more rarely use rice vermicelli, so this recipe fit the bill nicely. I will admit it, I tensed up a little at the ingredient list... I get a little squidgy if I see more than 10 things listed... but once I actually read it and saw that some ingredients repeat themselves... I exhaled the breath I'd been holding.
You're probably used to me by now, telling how I deviated from the directions... I didn't use a mortar and pestle (the one I have is too small and dainty to actually use), so I used my mini-chopper (besides, I think I'd have to be really really buff to do any serious damage to lemongrass with a pestle)... and I don't have a grill, so I used my trusty grill pan... O right, and no pickled anythings to go-with... You'll have to let me know how it turns out if you make this and have the pickled stuff...
This dinner was so light and fresh and magical on the tongue. I really need to use mint more often. And I certainly have to find more dinners that include pulverized lemongrass. The dressing on the rice noodles was fantastic, and nicely offset by the crisp cucumbers. As glowing this recommendation is, my favorite part were the noodles... the way they were too long to eat neatly and they'd end up slapping me in the face... cracked me up!!!
I love noodles, you love noodles, Ruth loves noodles. Check in to her blog, Once Upon a Feast, tomorrow for her Week 52 Roundup!!
Lemongrass-Barbecued Pork with Rice-Vermicelli Salad
c/o Food & Wine Magazine, May 2006
http://www.foodandwine.com/recipes/lemongrass-barbecued-pork-with-rice-vermicelli-salad
Mai My Lin, one of the chefs Kiesel met at the Nha Trang night market, prepares an aromatic and pungent marinade for grilled pork with two quintessential Vietnamese ingredients—lemongrass and fish sauce. The real surprise here is Mai's zesty Carrot and Daikon Pickles, which are amazing with the smoky grilled meat.
4 large garlic cloves, thickly sliced
3 large stalks of fresh lemongrass, tender inner white bulb only, sliced crosswise
2 large shallots, thickly sliced
1 1/2 tablespoons sugar
3 tablespoons Asian fish sauce
3 tablespoons fresh lime juice
3 tablespoons vegetable oil
2 tablespoons soy sauce
1 1/2 pounds boneless pork loin, sliced 1/4 inch thick
1/2 pound rice vermicelli
4 medium garlic cloves, quartered
3 Thai chiles or 1 large jalapeño, thickly sliced
3 tablespoons sugar
1/4 cup Asian fish sauce
1/2 cup finely chopped cilantro
1/2 cup finely chopped mint
1/4 cup fresh lime juice
1/3 cup water
2 large cucumbers—peeled, halved lengthwise, seeded and thinly sliced crosswise
PREPARE THE PORK: In a food processor, finely chop the garlic, lemongrass and shallots. Add the sugar, fish sauce, lime juice, vegetable oil and soy sauce and process to a paste. In a large shallow dish, coat the pork with the marinade. Cover and refrigerate for at least 1 hour and up to 11/2 hours.
MAKE THE RICE-VERMICELLI SALAD: In a large bowl, cover the rice vermicelli with cold water and let soak until pliable, about 20 minutes.
In a large mortar, using a pestle, pound the garlic cloves to a paste with the chiles and sugar. Stir in the fish sauce, cilantro, mint, lime juice and water.
Bring a large saucepan of water to a boil over high heat. Drain the rice vermicelli. Add it to the boiling water and cook, stirring, until barely tender, about 1 minute. Drain the vermicelli. Rinse the vermicelli in cold water and drain them thoroughly. Transfer the vermicelli to a large bowl, add the cilantro-and-mint dressing and toss well. Scatter the sliced cucumbers over the rice-vermicelli salad.
Light a grill. Lift the pork slices from the marinade, leaving on some of the flavorings. Grill the pork over a hot fire until nicely charred, about 2 minutes per side. Transfer the pork to plates and serve with the rice-vermicelli salad.
Sunday, February 24, 2008
Taste & Create VI: Bring on the Burger
I apologize for having this to you a day late - I was having some interweb-connectivity issues that seem to have resolved themselves. This is fortunate, because I am chomping at the very tasty bit to tell you about this lovely burger!!!
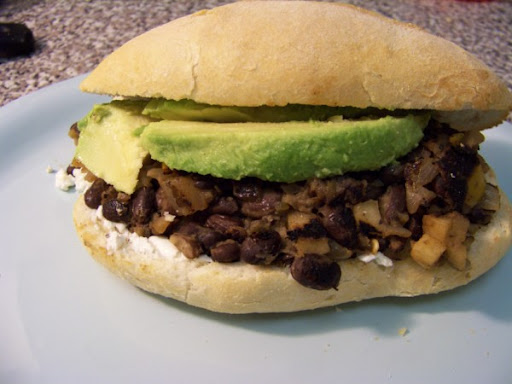
For this sixth round of Taste & Create, hosted by Nicole, I was paired with a fellow Daring Baker, Krishna from Cooking from A to Z. Truly, I couldn't have asked for a better partner. I seriously spent the better part of an afternoon reading through her blog. (Don't tell work!) I gotta tell you, the photography is AMAZING! I drooled over almost everything, from her Pomegranate Chocolate Pots, to her Hot'n'Sour Soup ... I wanted to try it ALL!! Ultimately, though, my choice was made - Black Bean Burgers!
Why the burgers when there were so many other tasty options? Well, because we love burgers and I've never made a vegetarian version - and considering my desire to lead more a meat-free life, these burgers seemed like a perfect choice. Because I'd never done this before, I kept a pretty open mind... bell pepper and apple in a burger? Sure, whatever! I'll take it! In fact, I love that there were so many flavor elements in these burgers - I love love love the feeling of knowing that dinner is delicious AND incredibly healthy. My only horse-up? I don't think I smushed enough of the beans... I had a teensy bit of trouble getting the burgers to stick together. So long as I was delicate enough getting the formed patties into the pan, the act of cooking them helped bind them together.
I served each patty on a roll smeared with goat cheese and topped with sliced avocado (I know, I know, I'll take any opportunity to use either or both in a meal!) I'd meant to roast some baby red potatoes to go with, but I got distracted. Didn't matter in the end anyway, as the burgers were super filling on their own! (And Dave had two!)
Would I make this again? You betcha. And you should, too.
Black Bean Burgers
c/o Cooking from A to Z
http://cookingfromatoz.blogspot.com/2007/10/good-old-black-bean-burgers.html
(makes 10 large patties)
1/2 medium Vidalia onion - chopped fine
1/3 medium red onion - chopped fine
1/2 orange bell pepper - chopped fine
1/2 granny smith apple - chopped fine
4 cloves garlic
1 jalapeno pepper
1.5" ginger
2 cans black beans
1/2 t allspice
1 t olive oil
1 t cumin seeds
salt
a few drops of habanero sauce
Grind up the garlic, ginger and jalapeno into a coarse paste, adding a little water if needed.
Heat the oil in a saucepan and toss in the cumin seeds. Once they're browned, add the onions and sauté them till translucent.
Add the bell peppers, apple, allspice and ginger/garlic/jalapeno mix and cook for another 3-4 minutes.
Now add the black beans, salt and habanero sauce and stir. Lightly mash the mixture with the spoon, leaving half of the black beans whole.
Cook, stirring, for a two to three more minutes. Remove from heat.
Once the mixture cools, take generous handfuls and flatten each into a chubby 4" diameter patty.
These can be cooked in batches on a lightly greased pan till browned and crisp on both sides. Serve with your favorite burger fixings!
See the recipe...
Thursday, February 21, 2008
Welcomed Home with Some Fried Ravioli
 Isn't that cute little whale-shaped ravioli adorable? I didn't plan it that way, and I tend to think that its the only one that turned out like that... but who cares! I might just go out and get all kinds of silly-shaped cookie cutters and get on with having all sorts of wild raviolis... bunny faces, shamrocks, tea cups, Abe Lincoln! Boowhahahahaaaa!
Ahem.
I'd asked my husband what he'd want to eat when he returned from his business trip a few weeks ago, and he requested these fried raviolis. I'd made them for our last two New Year's Day parties (and this last time, I forgot to photograph them until after everyone left!) The nice thing about these tasty little fellows is that they can be almost entirely prepared ahead of time. (Which makes them AWESOME for parties!) I was happy about his choice, too, because I knew that I could make them the night before - which would free up my time for fawning all over him! (Read: lay around and eat all the fancy Swiss chocolates he brought home!!!!!) (That, and a giant load of laundry!) Heh.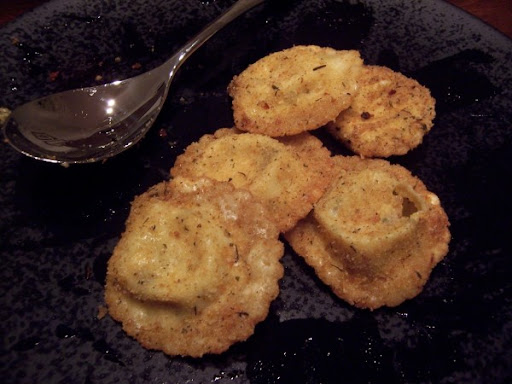 Strange shapes aside, one of my favorite things about frying ravioli is how they puff up. Something about their pillowy, crunchy-but-gooey goodness is so very dreamy. I am just as happy to pop them in my mouth as I am to sauce them - they're such a nice little snack on their own!
Don't get me wrong, the sauce is terrific, too! I almost always cheat and either use diced or crushed tomatoes in lieu of the whole ones. Unless it makes sense to, of course, I don't see the point in getting whole tomatoes just to take them out and cut them up. (Well, that and whenever I try to do so, I make an amazingly huge mess!) Even better still, I've been using fire-roasted tomatoes in place of normal. Feel free to mess around with YOUR tomatoes, too! :)
Maybe fried pasta doesn't float your boat? Head on over to Ruth's Presto Pasta Night Roundup and you'll be sure to find something delicious. (In fact, I'm positive you will!!) I am so excited for her - next week she'll be celebrating 52 straight weeks of pasta! (I can't think of a better way to spend a year!) Go Ruth!
Fried Ravioli with Hot Sausage Ragu
c/o Emeril Lagasse, 2001, via Food Network
http://www.foodnetwork.com/food/recipes/recipe/0,1977,FOOD_9936_18204,00.html
Ravioli:
1/2 cup fresh ricotta
1/4 cup grated mozzarella
1/4 cup grated provolone
1 egg yolk
1 teaspoon minced garlic
1 tablespoon chopped parsley
1/2 teaspoon salt
1/4 teaspoon ground black pepper
1 fresh pasta sheet, about 11 by 14-inches, cut into 2-inch squares (to make 32 squares)
1 large egg
2 tablespoons water
1/2 cup dry bread crumbs
1 1/2 teaspoons Essence, recipe follows
2 cups vegetable oil, for frying
Hot Sausage Ragu, recipe follows
In a bowl, combine the cheeses, egg yolk, garlic, parsley, salt, and pepper and mix well.
Place 16 of the pasta squares on a lightly floured surface. Place about 1 tablespoon of the cheese mixture into the center of each square. Lightly wet the edges with water with a fingertip, and top with a plain pasta square. Press to seal the edges.
Heat the oil in a pot over medium-high heat.
Beat the egg with the water. In a separate bowl, combine the bread crumbs with the Essence. Dip the ravioli in the egg wash and then into the bread crumbs, one at a time. Add in batches to the hot oil and fry until golden brown, about 2 minutes. Remove with a slotted spoon and drain on paper towels. Repeat with the remaining ingredients and serve hot with the Hot Sausage Ragu.
Hot Sausage Ragu:
2 teaspoons olive oil
1/2 pound hot Italian sausage (or 1/4 pound hot sausage and 1/4 pound sweet sausage
1/2 cup chopped yellow onions
3/4 teaspoon minced garlic
1/4 teaspoon crushed red pepper
1/4 teaspoon salt
1/4 teaspoon dried basil
1/8 teaspoon dried oregano
1/8 teaspoon ground black pepper
1 bay leaf
1 (15-ounce) can whole peeled tomatoes, chopped, juices reserved
1 (8-ounce) can tomato sauce
1 tablespoon tomato paste
1/4 cup dry red wine
1/4 cup heavy cream
Pinch sugar
In a medium pot, heat the olive oil over medium heat. Add sausage and cook, stirring, until brown and the fat is rendered, about 4 minutes. Add the onions, garlic, crushed red pepper salt, basil, oregano and black pepper, and bay leaf, and cook, stirring, until soft, 4 minutes. Add the tomatoes and their juices, tomato sauce, tomato paste, wine, cream, and sugar, and stir well. Bring to a simmer and cook, uncovered, stirring occasionally, until thick and the flavors are blended, about 30 minutes, adding water as necessary to keep from getting too thick.
Remove from the heat, and cover until needed.
Yield: about 2 1/2 cups
Friday, February 8, 2008
Firecracker Grilled Alaskan Salmon
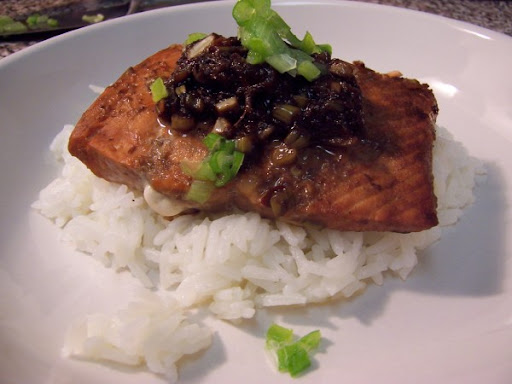 Once you read the recipe through, hopefully you'll smile at the photo above the way I do. That dark clump on top of the salmon? Yah, thats the sauce. I was a little absentminded and left it on too long. It still tasted great, but it wasn't the most photogenic of sauces. Serves me right, for all those times I muttered at too-runny sauces as they ran all over the plate. Can't win.
Dark, clumpy sauce aside, I was really happy with this meal. The marinade/sauce smells amazing and wasn't any trouble to prepare. Please note that the salmon has to soak in the marinade for a few hours... so plan accordingly. I didn't, the first night I wanted to make this, so we had it the next day instead. And even then, I had to run home at lunch to throw it all together. (There's that absentmindedness again!) Rather than use a grill, because I don't have one, I just used a grill pan. I placed a piece of aluminum foil over top when it called for covering.
Oh, and the sauce? I made extra of the marinade and reduced it. You may want to, too, just not as long as I did. :)
Firecracker Grilled Alaskan Salmon
c/o Whole Foods Market Online
http://www.wholefoodsmarket.com/recipes/seafood/salmon_firecracker.html
A blend of sweet and spicy, try this salmon next time you light up the grill. Since it has some sugar in the marinade, make sure to oil your grill well or wrap each fillet loosely in heavy foil and place directly on grill to avoid sticking.
4 Alaskan salmon fillets, 4–6 ounces each
1/4 cup peanut oil
2 tablespoons Soy sauce
2 tablespoons balsamic vinegar
2 tablespoons chopped green onions
1 1/2 teaspoons brown sugar
1 clove garlic, minced
1 tablespoon grated ginger
1/2 teaspoon red chili flakes (or more to taste)
1 teaspoon sesame oil
1/8 salt (if desired)
Place salmon fillets in a glass dish. Whisk together remaining ingredients and pour over salmon. Cover with plastic wrap and marinate in refrigerator 4–6 hours.
Remove salmon from marinade and place on a well-oiled grill 5 inches from coals. Grill for 8–10 minutes per inch of thickness, measured at the thickest part. Turn halfway through cooking. (You may also wrap and seal with foil to form a packet). Cook covered, 20–25 minutes on medium-hot grill or until fish flakes easily with a fork.
Per Serving (170g-wt.): 260 calories (120 from fat), 14g total fat, 2g saturated fat, 29g protein, 4g total carbohydrate (0g dietary fiber, 4g sugar), 80mg cholesterol, 800mg sodium
Wednesday, February 6, 2008
Bob's Your Uncle!
 We're all friends here, right?
Would anyone be willing to start a support group with me? The "Entirely Smitten with Jamie Oliver" support group? I liked him plenty before, when he was naked or motivating troubled youth or tromping through Italy... but I especially adore him at home. (And that Gennaro?? Can we have a sub-group for him?!?!) For both Jamie and Gennaro, I am done-in by their real-person-ness. As I watch Jamie at Home, I feel like I'm there, hanging out with him while he cooks. He doesn't put on a yum-face when he tastes something, he admits when it isn't quite right and how to fix it, he slops ingredients around... his kitchen is one I long to be in and one I long to have as my very own.
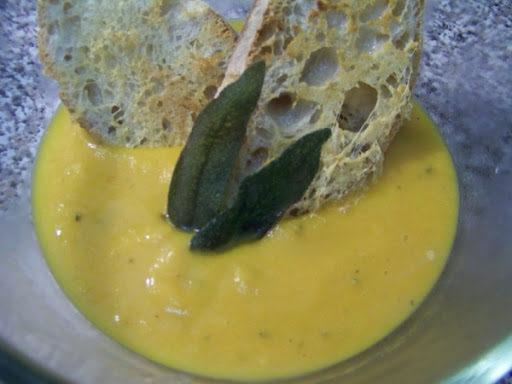
Something else I like - watching him prepare this particular soup, he used a pressure cooker. Now, I don't have one, but want one someday. The recipe he provides, however, assumes you don't have one - which is nice. No weird complicated math pressure/volume/time calculations needed. That Jamie, totally thoughtful.
I wasn't sure that this version of butternut squash soup could live up to the delicious wonder that is my friend Liane's butternut soup, but it surprised me. Jamie's soup is thick and luscious and is just delightful over the Parmesan toasts (and packs a dainty but noticeable heat). I particularly like how moist and sloppy the toast becomes. I had a bit of a struggle making the them. I couldn't get the Parmesan to stick nicely to the bread and then they smoked a bit as they heated up. Of course, I wasn't thinking about it when I dished it out, but a clear bowl made for a funny presentation. Doesn't it look like the soup is just floating there?
It's been a while since I've been so excited about a new cooking show. I hope Food Network schedules Jamie at Home for a good long while. Jamie Oliver has a lot he can teach to home cooks. Personally, I'm going to try to work "Bob's your uncle!" into my day-to-day conversations.
Superb Squash Soup with the Best Parmesan Croutons
c/o Jamie Oliver, Jamie at Home on Foodnetwork.com
http://www.foodnetwork.com/food/recipes/recipe/0,1977,FOOD_9936_105309,00.html
This fantastic soup is best made with varieties of squash that have dense, orange flesh, such as butternut or onion squash. It's important to use good chicken stock and season the soup well to bring out the nutty, sweet flavor of the squash. Once you've mastered this recipe, you can take the soup in different ways by adding pearl barley, dried pasta, or some chopped bacon. Even the smallest amount of dried porcini. P.S. I made this in my pressure cooker the other day, with really great results - it's so quick!
Olive oil
16 fresh sage leaves
2 red onions, peeled and chopped
2 sticks celery, trimmed and chopped
2 carrots, peeled and chopped
4 cloves garlic, peeled and chopped
2 sprigs fresh rosemary, leaves picked
1/2 fresh red chile, to taste, seeded and finely chopped
Sea salt and freshly ground black pepper
4 1/4 pounds butternut squash, onion squash, or musque de Provence, halved, deseeded and cut into chunks
2 quarts good-quality Chicken or vegetable stock
Extra-virgin olive oil
For the croutons:
Extra-virgin olive oil
16 slices ciabatta bread
1 chunk Parmesan, for grating
Put a very large saucepan on a medium heat and pour in a couple of glugs of olive oil.
Add the sage leaves and fry for around 30 seconds or until dark green and crisp. Quickly remove them with a slotted spoon to a bowl lined with paper towels - you'll use these for sprinkling over at the end. In the pan you'll be left with a beautifully flavored oil, so put it back on the heat and throw in your onion, celery, carrot, garlic, rosemary leaves, chile and a good pinch of salt and pepper. Cook gently for about 10 minutes until the vegetables are sweet and soft. Add the squash and the stock to the pan, bring to the boil and simmer for around 30 minutes.
While the soup is cooking, make your croutons. Drizzle a little olive oil over the ciabatta slices, and press some grated Parmesan onto each side. Place in a non-stick pan without any oil and fry until golden on both sides.
When the squash is soft and cooked through, whiz the soup with an immersion blender or pour it into a standard blender and pulse until you have a smooth puree* (but you can leave it slightly chunky if you like). Most importantly, remember to taste and season it until it's perfect. Divide the soup between your bowls, placing 2 croutons on top of each. Sprinkle with a few of your crispy sage leaves and drizzle with a swirl of good-quality extra-virgin olive oil.
*When blending hot liquids: Remove liquid from the heat and allow to cool for at least 5 minutes. Transfer liquid to a blender or food processor and fill it no more than halfway. If using a blender, release one corner of the lid. This prevents the vacuum effect that creates heat explosions. Place a towel over the top of the machine, pulse a few times then process on high speed until smooth.
Mexican-Style Chicken with Penne
 Yah, you know how I said I was going to learn to bake bread this week? Hasn't happened. What HAS happened is lots and lots of ice cream. (I blame Mr. Lebovitz.) Lest you think I've fallen into the arms of my boyfriend, Ice Cream, in my spouse's absence, I'd like to say that I meant to make Guinness ice cream for the Super Bowl, but it didn't happen... and since I already had my ice cream maker attachment in the freezer... I thought I'd take advantage of it. :)
I've made the executive decision to wait to photograph and share with you until my husband comes home. Otherwise, I might eat all the evidence. And it would be soooo worth it. (Should you feel the need for ice cream made at home, I can't suggest the Peanut Butter or Roasted Banana flavors enough.) To top them off, I'll make DL's Classic Hot Fudge later in the week. :)
Anyway, enough about ice cream - let's talk about Mexican-Style Chicken with Penne, shall we? This dish has made me a chicken thigh convert. I'd always shunned them, because thighs are dark and weird and usually hard to get to. I'm lazy, therefore, I like chicken breasts, right? Not anymore. The thigh meat was so tender and delicious, I considered reserving all the leftovers for my repeated weekday lunches. I didn't, though, I shared with Dave, cause thats the nice wife I am. (But I won't tell if you choose to hoard this.) This meal fed two adults, with seconds, and two lunches each.
The only changes I made were to add extra corn, an extra chipotle or two, and some extra spoonfuls of adobo. Those quantities are really up to you and your personal love/hate of smokey spiciness.
The whole thing came together really quickly and in a way that felt like cheating. Meaning, how is it that in almost no time at all, this amazing dinner ready for us to fall in love with? Science is crazy, sure, but this is magic. The cheese and cilantro are key, so even if you have to use a different cheese, don't leave it out.
*Edit: O yah! Pop over to Joey's site, 80 Breakfasts, for the HHDD #17: Pizza Roundup and your chance to vote!
Mexican-Style Chicken with Penne
c/o Food and Wine Magazine, February 2008
http://www.foodandwine.com/recipes/mexican-style-chicken-with-penne
Adding a small amount of canned chipotle chiles in adobo (available at most supermarkets) makes a basic tomato sauce smoky and complex. Finishing the dish with queso blanco and chopped cilantro leaves intensifies the Latin flavor.
3/4 pound penne rigate
5 tablespoons extra-virgin olive oil
1 pound skinless, boneless chicken thighs, cut into 1-inch dice
Kosher salt and freshly ground pepper
1 onion, cut into 1/4-inch dice
1 large garlic clove, minced
One 28-ounce can diced tomatoes, drained
1 large chipotle in adobo sauce, seeded and minced, plus 2 teaspoons adobo sauce
1/2 cup frozen corn
1/4 pound queso blanco or mozzarella cheese, coarsely grated (1 1/3 cups)
1/4 cup coarsely chopped cilantro leaves
Bring a large pot of salted water to a boil. Add the penne and cook until al dente. Drain the penne.
Meanwhile, in a large, deep skillet, heat 3 tablespoons of the olive oil. Season the chicken with salt and pepper, add it to the skillet and cook over moderately high heat until lightly browned, about 4 minutes. Add the onion and garlic and cook over moderate heat until the onion is softened and the chicken is cooked through, about 4 minutes. Add the diced tomatoes, chipotle and adobo sauce and cook until heated through, about 2 minutes. Add the corn, season with salt and pepper and cook until the corn is heated through, about 1 minute.
Add the penne and the remaining 2 tablespoons of olive oil to the sauce and toss to coat. Add 1 cup of the queso blanco and toss. Transfer the pasta to bowls, sprinkle with the remaining queso blanco and the cilantro and serve.
Friday, February 1, 2008
My Need to Mixtape
 I've been putting this entry off for a few days. I'd initially thought to attach it to an actual recipe entry, but then when I did so, the post went on and on... and really, was pretty confusing.
Why my need to mix-tape? (as silly as that sounds in this ipod age) My husband is going away on business travel tomorrow. For a week. Far away. To a whole different country. For a week. Gross.
Mind you, we're both in our early 30s, mature, secure, happy people (mostly). We've just never had a situation like this pop up before. We're also both more than happy to have our Own Time to do our Own Things... but for a whole week? In another country? Six hours ahead? Yikes. lol, I've been saying "we" a lot. I don't think my darling husband is as worked up about this as I am, at least not for the same reasons. He is the one that will be trapped on an airplane for 9 hours, not me. He'll be dealing with different languages and cultures and working 12 hour days while he's there - just to take another 9 hour flight home. Really, I have it easy. So I should shut my sappy trap and suck it up. :)
You and I both know that won't happen, though, will it? While I was out running errands, the idea of a mix-tape occurred to me. Remember doing that? A mix-tape was such an expression of self... we made them for ourselves, for our best friends, for our boy- or girl-friends... for family vacations or summer camp or to celebrate an awesome summer (I still have my "Summer of '97" tape in my car, and yes, it has MMMBop on it.) What also amuses me is that if I were to make one, for him to like it, it would have to consist almost entirely of Black Crowes music - and he has just about every cd they ever made... I'll have to put my thinking cap on.
But don't you worry about me. I have lots to do next week. I have our Green Dimes info to update, some movies from Netflix to watch, girlfriends to catch up with, muscles to work out, breadmaking to learn, a bathtub to clean... (maybe even a game to play with you guys) I'll be okay. But that doesn't mean I won't really miss my sweet husband. Be safe and hurry home, Love.


