Wednesday, October 31, 2007

Butter Beans with Parsley, Tomatoes and Chorizo

I wanted to like this more than I did. And I think its all my fault. I thought it was weird that only the chorizo got a turn in the pan... and I wanted to have warm beans and tomatoes... So... once the chorizo was browned a little, I tossed everything else into the pan. Do not do this at home. What ended up happening was all the chorizo oil got onto everything else.. so every bite tasted like it, regardless of what you put into your mouth. Now, if you like that sort of thing, feel free to replicate.

Now, what I would do differently is: Follow the instructions. Now that I've had some time to think about it, I think the differences in temperature would have been a nice contrast... or maybe I would heat the veggies in a separate pot... either way... don't let your chorizo oil ruin your dinner. Again, unless you're into that. ;)


Butter Beans with Parsley, Tomatoes and Chorizo
c/o Food and Wine Magazine, May 2007

1 14 oz can butter beans with their liquid
½ pound chorizo, halved lengthwise and sliced crosswise ¼ inch thick
3 tablespoons extra virgin olive oil
1 tablespoon sherry vinegar
1 pint cherry tomatoes, halved
¼ medium red onion, thinly sliced
1 cup coarsely chopped flat leaf parsley
Salt and freshly ground black pepper

In a small saucepan, heat the butter beans in their liquid. In a large skillet, cook the chorizo over high heat until it is lightly browned and most of the fat is rendered, about two minutes.

In a medium serving bowl, whisk the oil and vinegar. Stir in the tomatoes, onion and parsley. Drain the beans and chorizo and add them to the bowl. Season with salt and pepper and toss. Serve warm.

See the recipe...


Roasted Fish Fillets with Brown Butter Corn Sauce

This meal had us surrounded. I first read about the brown buttered corn on Molly's site, Orangette. She says she doubled the recipe for a party of 6, but doubled, this corn made three people very happy. Then I saw the fished-up version on a round-up on Apartment Therapy: The Kitchen... Or vice-versa... the dates of each article would imply that I found it on AP before Orangette... but I don't remember.. doesn't really matter. What does matter, is that this corn has made it around (and if the no knead bread or the snickerdoodle muffins are any indication, this lovely corn will be around for a while!!)

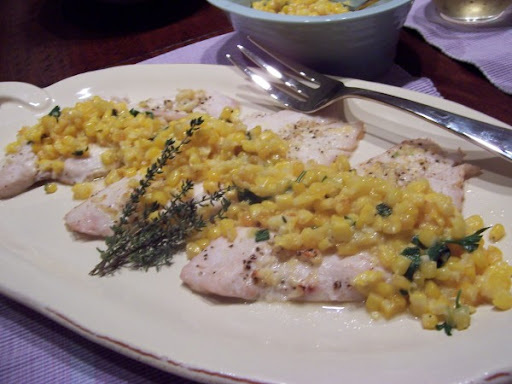
Now, with corn out of season, I used bagged frozen organic corn - two bags, in fact. A ton of butter, lots of thyme... This meal is another example of how just a few simple ingredients can make a lot of impact. The blitz in the blender with the lemon and garlic really made the corn pop. Really. Really pop. (Please make this and eat it.)

Now. I did struggle with the fish. Choosing the fish, to be specific. I took the suggested fish list with me to the grocery, and while there I pulled out my handy Seafood Watch Regional Guide to determine the best choice... Wegmans didn't have any striped bass... and the other two fish are in the naughty "avoid" column... so I went with the flounder because it didn't have the extra-naughty red (mercury) star next to it. I wish I knew more about fish to know what other fishes we could have had in its place, that would have fit in as well.

Yes, the fish was evil. However, it was really really tasty (jerks!!). The flavor was light and delicate and went so so beautifully with the corn sauce on top and side-corn. It baked merrily away in the oven while I prepared the corn and green beans.

I was extra stressed out about the naughty fish because my lovely and wise friend Marcie was over for dinner. She has suggested so many things to us... the friendly light bulbs, the re-usable grocery and produce bags, my rock-star hair dresser, the Amazing Race and Top Chef, Wasa crackers and my favorite farmer's market... so imagine my dismay when I'm having eco-Marcie for dinner, and I have to give her unsustainable fish. Thank goodness she forgave me!

I would love to make this again, but not until I know which fish would make a good substitute... if you have ideas - I GLADLY welcome them!


Recipe: Roasted Fish Fillets With Brown Butter Corn Sauce
c/o NY Times
http://www.nytimes.com/2007/09/05/dining/052arex.html

6 fish fillets such as striped bass, flounder or red snapper, each about 6 to 8 ounces
Kosher salt and freshly ground black pepper
2 1/2 tablespoons butter, softened
3 garlic cloves, minced
1 teaspoon grated lemon zest, optional
Brown buttered corn (recipe follows)
1/2 cup vegetable broth or water
2 tablespoons extra virgin olive oil
2 tablespoons freshly squeezed lemon juice, or to taste
Chopped fresh soft herbs (basil, mint, parsley, cilantro).

1. Preheat oven to 500 degrees. Season fillets with salt and pepper and place in a baking pan, skin-side down.

2. In a small bowl, mash together the butter, about two-thirds of the garlic, and the lemon zest if using. Smear on top of fish fillets. Roast until cooked through to taste, 7 to 12 minutes depending upon variety of fish and thickness of fillets.

3. Meanwhile, in a blender or food processor, purée half the brown buttered corn with broth or water, oil, lemon juice and remaining garlic. Stir in remaining corn. Serve sauce over fish, garnished with herbs.

Yield: 6 servings.


Recipe: Brown Buttered Corn
c/o NY Times
http://www.nytimes.com/2007/09/05/dining/051arex.html?_r=1&ref=dining&oref=slogin

3 ears corn, shucked
4 tablespoons butter
4 sprigs thyme, preferably lemon thyme
Coarse sea salt
Freshly ground black pepper
Chopped fresh soft herbs (basil, mint, parsley, cilantro), optional.

1. Break ears of corn in half and stand one half vertically on a cutting board. Using a sawing motion, run a knife between cob and kernels to remove kernels. Using back of knife, scrape denuded cob to release corn’s juices. Transfer kernels and juice to a bowl. Repeat with remaining corn.

2. Melt butter in a saucepan; add thyme. Let butter cook until you see golden brown specks in bottom of pan and butter smells nutty, about 5 minutes. Add corn, juices and a large pinch of salt and pepper; stir well and cover pot. Let cook until corn is tender, about 5 minutes.

3. Remove thyme sprigs, add more salt and pepper if desired, and serve hot, alone or as a side dish, garnished with herbs if desired.

Yield: 4 servings.

See the recipe...


Monday, October 29, 2007

Daring Baker Bostini Cream Pie


Do you know what it feels like to have 200+ new friends? Friends that ALL have similar interests? Similarly-interested friends that are supportive and hilarious and real and dreamy? If you're part of the Daring Bakers, you know it feels! I have been welcomed in as part of the October Class, and I couldn't be happier about it! I encourage you to go through that blogroll. Sure, you'll see a TON of Bostini Cream pies today, but stick around, each and every site has something scrumptious for you!

(I get to post a DB badge now, woohoo!)

Right, onto this challenge. The lovely Mary at Alpineberry, Hostess with the Mostest for October, chose for us this lovely Bostini Cream Pie. My first reaction was, "Huh? What's this? A typo??!?!" Not at all, my friends. The best way I can describe it is: The bostini cream pie is the boston cream pie's daintier cousin. Take one bowl of luscious vanilla custard, top with a lighter than air orange chiffon cake, smother sassily in chocolate.... it's ok, you can have a minute. :)

Now, I don't have any sexy ramekins. No trendy, time period custard cups...No presentable shot glasses... but I DO have a collection of cute teacups! Nice! I halved the recipe, which left me with 4 very generous fillings of teacups, that you see above. I took a couple of my new round cutters and sliced out some rounds of cake... I cut a round out of the middle, to make it a little silly, but to also give the chocolate somewhere to pool... and who can resist a pool of chocolate? In teacup, I even filled it with the cake-holes, so when chocolate glazed, it looks fun and bumpy.

The orange in the chocolate is so subtle as to be just a whisper on the tongue, and it played fantastically with both the custard and chocolate sauce. Dave and I enjoyed this happily two nights in a row (I didn't want to try out my first DB challenge on company - too much pressure!) You too, can make this at home - traipse on over to Mary's site for the recipe!!


Thanks again to the Daring Bakers for taking me in!! :)

See the recipe...


Sunday, October 28, 2007

Grilled Wild Boar Chops. You heard me - WILD BOAR!!!!

I picked up two big, thick wild boar chops from my butcher on a whim a few weeks ago. No plan for them, but I knew I could have a plan... some day... and I really liked the idea of being able to whip up a wild boar chop dinner on the fly. 'Cause like... who does that? :)

Well, we had the perfect occasion tonight. You see, today is our Second First Wedding Anniversary. If you recall, we had our First First Anniversary in Las Vegas in August... and today, a year ago, we had our second wedding in our church with our closest friends and family in attendance.

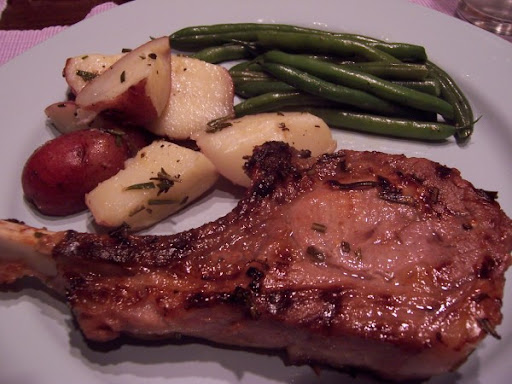
Now, we'd never had wild boar before. We like pork well enough, so I thought this wouldn't be too much of a stretch. I had no idea I would like these wild boar chops SO MUCH, though. The flavor of the meat is nice and delicate and not wild-animal-ish at all. The lemon/rosemary/garlic marinade didn't overwhelm it at all.

I served the chops with some buttered and rosemary red potatoes and green beans, both fresh from the morning's farmers market. We followed dinner with a lovely chocolate cake, but it gets its own post!!

I tried to work in a third wedding somewhere, but Dave wouldn't have it. I guess two is enough. ;)


Grilled Wild Boar Chops
c/o http://www.recipezaar.com/126240

4 servings
6 hours 5 hours prep

4 wild boar chops
3 meyer lemons, juiced
1 cup olive oil
2 tablespoons olive oil
¼ cup fresh rosemary, chopped
1 tablespoon garlic, minced
1 teaspoon kosher salt
1 teaspoon freshly ground black pepper

Salt and pepper the chops. Place chops in roomy, non-metal container so each chop lays flat.

Whisk all ingredients (sans chops) for marinade. Pour marinade over chops. Cover and refrigerate at least (4) hours, turning every hour or so.

Prepare grill/fire for direct heat on high. Sear chops on both sides for 2 minutes. Turn heat down or place chops on cooler part of grill for remaining cooking. Close lid and cook about 5 minutes on each side for medium rare.

Let chops rest at room temp for 10 minutes before serving.

See the recipe...


Friday, October 26, 2007

Goat Cheese Ravioli with Bell Peppers and Brown Butter

Obviously my brains have shut off... or else I would have posted this sooner... because we had it weeks ago! Maybe I saved it because all we were eating was pasta... wanted to spread it out... Except that that phase hasn't really stopped... we're still pasta-crazy! There are worse things to be.

Right. So. I won't lie, I made the ravioli some Sunday afternoon while the Mister watched football. Weeks ago. I might have had football on the radio, but its more likely I had my ipod going. I'm not sure what got into me, but I was in a mood, so I made my own dough and then rolled it out and then filled it. Oh wait, I know what it was... I got this multi-pack of cookie/biscuit cutters... (notice the cute little scalloped edge?)... Why make my own pasta when the recipe so happily calls for wonton wrappers? I don't like wonton-wrapper ravioli. I don't know if I'm just doing something wrong, but they come out all weird and squiggly... not my favorite. That, and I find the production of pasta to be soothing... all the repetitive actions... I can get lost in the process. And in the end, I had a big bag of ravioli for my freezer! Woo!

The ingredient list to flavor quotient was high. This dish was a breeze to prepare and tasted like it took me all day. I blistered the peppers on the stove and messed with them the evening before... popped them in the fridge until I needed them. Because of all that miscellaneous prep, this dinner was the ultimate fast food. Sauteed some veggies, browned some butter, boiled some water... bam bam bam, done and delicious. Yah, sure, I totally would eat my flip-flop if I tossed it in some brown butter... but still. You'll note that I left out the olives and chives... neither float my boat, and the meal didn't suffer for it.

I'm barely on time to submit this to the lovely Ruth at Once Upon a Feast for her Presto Pasta Night roundup this week... I can't wait to see what she has in store for us (now that I'm re-smitten with everything pasta!)


Goat Cheese Ravioli with Bell Peppers and Brown Butter
Bon Appetit, September 2007
http://www.epicurious.com/recipes/food/views/239796

Bell peppers:
2 small red bell peppers
2 small yellow bell peppers
1 small green bell pepper

2 tablespoons olive oil
1/2 cup chopped onion
1/2 cup diced seeded tomatoes
2 teaspoons red wine vinegar

Ravioli:
Cornmeal for sprinkling
8 ounces soft fresh goat cheese
1/3 cup grated Parmesan cheese plus additional for sprinkling
1/4 cup mascarpone cheese
2 tablespoons chopped assorted fresh herbs (such as basil, chives, mint, and tarragon)
18 wonton wrappers

4 tablespoons (1/2 stick) butter

Toasted pine nuts
Thinly sliced pitted Niçoise olives*
Chopped fresh chives

For bell peppers:
Char all peppers over gas flame or in broiler until blackened on all sides. Place in paper bag; seal and let stand at room temperature 15 minutes. Peel and seed peppers; chop.

Heat oil in large skillet over medium heat. Add onion and tomatoes and cook until onion begins to brown, about 4 minutes. Reduce heat to low; cook until vegetables are very soft and onion is brown, stirring often, about 15 minutes. Add chopped peppers and vinegar. Season with salt and pepper. DO AHEAD: Can be made 1 day ahead. Cover; chill.

For ravioli:
Lightly sprinkle rimmed baking sheet with cornmeal. Mix 8 ounces goat cheese, 1/3 cup Parmesan cheese, and next 2 ingredients in medium bowl. Arrange 6 wonton wrappers on work surface. Place 1 tablespoon cheese filling in center of each wrapper. Using fingertip, dampen edges of wrappers with water. Fold all 4 corners up to meet in center, forming pyramid shape; seal all 4 edges tightly. Pinch top to seal. Place on prepared baking sheet. Repeat with remaining wrappers and filling. DO AHEAD: Can be made 8 hours ahead. Cover and chill.

Cook butter in large skillet over medium heat until beginning to brown, stirring occasionally, about 4 minutes.

Cook ravioli in pot of gently boiling salted water until tender, about 4 minutes. Transfer ravioli to skillet with browned butter. Toss over medium heat.

Meanwhile, re-warm bell pepper mixture; divide among 6 plates. Using slotted spoon, top peppers on each plate with 3 ravioli. Drizzle with any remaining browned butter. Sprinkle with Parmesan, toasted pine nuts, olives, and chives.

*Brine-cured black olives; available at some supermarkets and at specialty foods stores and Italian markets.

See the recipe...


Sunday, October 21, 2007

Taste and Create: I Finally Don't Knead


I am late to the No Knead Bread party. Like, over a year late. I no longer qualify for being fashionable about it, either. O well. Better late than never!!!

How did I get here? Well, via Abby over at Plate Tectonics! We are participating in Taste & Create - an event in which we each pick a recipe from the other's blog, make it, and post about it! I waffled on what I was going to make - Abby had so many delicious things to choose from! Halloween being only a week away, I almost made her severed finger cookies... Yet... what I needed this weekend was the smell of baking bread... that o-so-comforting aroma permeating the apartment... Not to mention, I needed to see how fantastic this no knead bread was for myself!

I started the dough late Friday night. Sure, I'm still pretty new to yeast, but there are only three ingredients, what could I do wrong? Seriously people, this dough is a snap to make. And the way it smelled as it baked... omg. I could very well end up making this bread every weekend. Maybe.

Only one part frightened me. When I took the rolls out of the oven, they were rock hard... solid... stiff... and scary. I thought, "The whole world loves this recipe, how could I have killed it???!?!?!" But once they'd had a chance to settle, they softened. Not too much, though - they still retained a nice, chewy crust! Yay!

I can personally say that these rolls are terrific with just butter or with butter or jam. Tonight I will find out if they are as tasty with pasta (I'm sure they will be!) If you are another latecomer to this bread, consider this your invitation. These rolls are super easy and they smell and taste great!!

Thanks to Nicole for hosting this tasty little event. I look forward to next time!!

No-Knead Dinner Rolls
This recipe is adapted from Jim Lahey/Sullivan Street Bakery’s recipe published in the New York Times on November 8, 2006
Via Abby at Plate Tectonics
http://not-too-shabby.net/eats/?p=90

3 cups all-purpose or bread flour, more for dusting (I like Bob’s Red Mill white bread flour)
¼ teaspoon instant (“quick rise”) yeast
1¼ teaspoons salt
Cornmeal or wheat bran as needed

In a large bowl combine flour, yeast and salt. Add 1 5/8 cups water, and stir until blended; dough will be shaggy and sticky. Cover bowl with plastic wrap. Let dough rest at least 12 hours, preferably about 18, at warm room temperature, about 70 degrees.

Dough is ready when its surface is dotted with bubbles. Lightly flour a work surface and place dough on it; sprinkle it with a little more flour and fold it over on itself once or twice. Cover loosely with plastic wrap and let rest about 15 minutes.

Using just enough flour to keep dough from sticking to work surface or to your fingers, gently and quickly gather dough into a manageable lump. Divide ball into 12 equal size pieces, approximately the size of a large plum. (An easy way to do this is to cut it in half, then half again; then cut each of those pieces into thirds.) Using your fingers, tuck each piece into a ball shape. Generously coat a Silpat baking mat or a cotton towel (not terry cloth) with flour, wheat bran or cornmeal; put dough seam side down on towel and dust with more flour, bran or cornmeal. Be sure to space dough balls an inch or more apart so they don’t stick together as they rise. Cover with another cotton towel and let rise for about 2 hours. When they are ready, rolls will have significantly increased in size and will not readily spring back when poked with a finger.

About a half hour before baking, preheat your oven to 450 degrees. Get a nonstick 12-cup muffin pan and use aluminum foil to make a tented lid that fits around the pan. The tenting part is important—if the foil doesn’t rise well above the pan, your rolls will stick to it as they rise. You may need to join two pieces of foil. Set the foil “lid” aside and put the pan in the oven so that it, too, preheats.

When dough is ready, remove muffin pan from oven and quickly drop one dough ball into each cup. Cover with foil lid—and if you’re feeling frisky, spray some water under there just before covering (increasing the humidity under the foil tent). Bake 15-20 minutes, then remove foil and bake another 15 minutes, until rolls are beautifully browned. Cool on a rack.

Yields: 12 crusty, golden dinner rolls.


See the recipe...


Saturday, October 20, 2007

My "I Got Canned" Pancakes


Ok, ok, they aren't my pancakes. (Though you probably guessed that.) Sure, I made them, but the lovely Kickpleat at Everybody Likes Sandwiches provided the recipe. She only posted about them a few days ago, so I won't totally steal them. Click through to her site, you won't regret it.

These pancakes are delightful little things. I've really been into citrus zest lately... the luscious, clean scent and flavor really speaks to me. I know this is true for the rest of you, too, I think I just wasn't listening before. The pancakes are dainty and fresh, and just the thing to start me on the first day of the rest of my life. I topped them with a little butter and maple syrup, but then I had more un-topped, and I can't decide which way I like better. I'll def. have to make these again... ya know, for research.

I got canned, you ask? Sortof. I got the "you aren't a good fit with our firm" talk yesterday, and I have 30 days to find a new job. I knew I wasn't a good fit for the firm. Well, moreso, I knew the firm wasn't a good fit for me. At all. But this happening isn't an altogether bad thing. I've been miserable there for a long time, which has seeped into the other areas of my life (I've been totally disinterested in cooking and blogging, for one, and I LOVE both!!), so I feel free now. Liberated.

Check back in with me in 30 days, and we'll see if I feel the same way. :)

See the recipe...


Monday, October 15, 2007

You Do What You Can - But Can You Do More?


Another day I'd like to bring to your attention is... Today!

Today is Blog Action Day: The Environment. Today is about raising awareness. It's about those little things you and I and your next door neighbor can do to make this world a better place. It needn't be complicated. You don't need to be stressed out about it. You don't have to do a lot all at once. Just promise to do something. Start with a small ripple; make big waves.

Remember those Breck commercials? In 5 seconds of tv-time, that woman had a screen full of friends using that shampoo... and you know what, they all had great hair. (Work with me, here.)

Well, let's say you read my blog. And I tell you about what I'm trying to do to be more environmentally sound... and you think, "I can do that!"... so you do... and then you tell your mom or your coworker... and they do it too... Soon, we'll all have great hair! (And water, and air, and so forth.)

Let me start by saying I take no credit for any of the things I'm going to tell you. I'm a great follower... a copier of others... So when I hear a great idea from someone else, if it makes sense to me, I embrace it. I'll try to give props to those that earned it.

[Click through for more]


I want to say I've been trying for a while, but in a passive way. I would recycle when possible.. I'd try to turn lights off when I wasn't using them, I turn the water off when I brush my teeth.. But sometime last summer, I read a lot about CSA's. For those of you unfamiliar with the term, it stands for Community Sponsored Agriculture. I'd read about the super-fresh and interesting vegetables bloggers were getting each week, and I wanted that for myself! Thing is, each CSA takes subscribers early in the year - say, February. The subscriber submits payment and the CSA then takes those payments and gets their farming supplies for the season. You essentially pay it forward, with the hopes that they have a fruitful, productive season. So I'd missed my chance. I did, however, do a lot of research, so that when the time came, I could get in on the action. While I waited, I made weekly trips to my local farmers markets. You can too - find yours at Local Harvest. Joining a CSA means you will get veggies, fruit, eggs, flowers, and sometimes meats, that are local, often organic, and wholesome. You can feel good about the food you put on your table.

Let me tell you what I loved about being a part of a CSA this year. I looked forward to my pick-up every week. I never knew what would be in my re-used green bag, and often, I'd never purchased or prepared some of the vegetables. Before this summer, I never knew I liked Swiss chard. Now I have some seeds so I can try to grow my own!

My CSA season is over, so I'm back to the weekly farmers markets. I think I've mentioned before that I'm completely smitten with them. The quality and quantity of the produce and the friendliness of the growers keeps me going back.

When I go to the market or to the grocery store, I try to take my envirosax's in with me. In fact, I keep one in my purse at all times - just in case. What I also have, and what I wish I used more, are these neat little ecobags. I do use them at home, to store onions and the like in my pantry. Both were recommended to me by my friend Marcie. She tried to get me to switch to eco-friendly cleaners and toilet paper... but I haven't yet made the switch. (Maybe soon.)

We've also made the switch to organic, humanely raised meats - and really, I couldn't be happier about that. Yes, happier animals, raised in the way the animals were meant to be raised (running amok in grassy fields, feeling the sun on their backs) really do taste better. But they're also much easier on your conscience. We watched a very informative (and really scary) documentary last week, which only made me happier with our decision. That, and now we have a butcher. I always wanted a butcher.

Because I've already yammered on this long....We've changed out our light bulbs, we commute together to work more days than not, I try to use reusable water bottles and coffee mugs as much as possible. We also bring our lunches in reusable lunch bags.

Changes I'd like to make: I want to be even better about the shopping bags. Because I keep one in my purse, I'm good about using it for small purchases... but there have been a few times I've forgotten to bring the other bags in with me - and I keep them in my car for crying out loud! I couldn't make it too much easier on myself, but still I forget. I look forward to moving into our condo and to all of our new energy-star appliances. I look forward to our new car (someday - but it will be a hybrid.) I'd like to try out some of the newer household cleaners that aren't as full of creepy chemicals. I am also going to cut back on my magazine subscriptions. I get way too many, more than I can read. And what do I do? I go through and rip out the pages I want, tossing the rest into the trash. It's wasteful and silly, in this Internet age. My friend Marcie also suggests signing up with Green Dimes. Not only will they help you cut down on your daily junk mail, they plant trees for you. Winner!

Lastly, and I haven't really discussed it with Dave, is I want to look into offsetting our carbon footprint. It doesn't strike me as being terribly expensive, if anything, it seems like it's a bargain.

Okay, so if you're still reading (and I know that was a lot of ramble), this is easy. Get a reusable water bottle. See how you like it. Then maybe visit a farmers market regularly for your produce. Make friends with the farmers... feel the warm fuzzies... then maybe get the reusable grocery bag... you can do this. Start small, ease into it... see how it makes you feel.

You might be surprised.

See the recipe...