
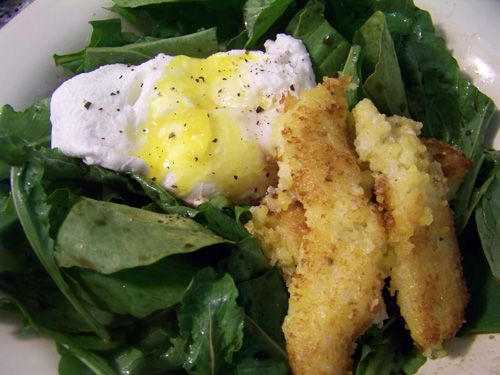
 Never been as angry at a dish as I was at this one. (I mean, as angry as you can get making dinner, I guess.) Either I don't know what I'm doing with polenta, or instructions to fry polenta are mean and evil. Polenta explodes... all those little bits of corn pop pop pop in the hot oil, causing much cussing and consternation. I had a dish towel covering the arm of my spatula hand, and a piece of aluminum foil in my other hand as a shield for the rest of me. Add the danger to the fact that the polenta rectangles don't stay in one piece, rendering themselves unpretty plate additions... bah. Hateful.
Other than that, I was pretty happy with dinner. The poached egg oozed dreamily over the lightly-dressed arugula and the polenta blobs provided nice texture and heft. Speaking of the polenta, this was the first time I'd made it with coconut milk and I was pleasantly surprised at how much I liked it. The coconut flavor was a nice twist - I wouldn't do it all the time, but it made for a nice change.
So. If you have an outfit made of silicone and gloves on, make this tasty salad for yourself!
Poached Eggs with Arugula and Polenta Fingers
c/o Bon Appetit Magazine, May 2008
From Oliver Maindroult of Urbane.
1 13.5 to 14 ounce can unsweetened coconut milk
½ cup water
½ cup polenta (coarse cornmeal)
1 tablespoon freshly grated Parmesan cheese
2 ½ tablespoons olive oil, divided
1 teaspoon coarse kosher salt
1 teaspoon white wine vinegar
4 large eggs
2 cups arugula
1 teaspoon balsamic vinegar
Fleur de sel
Butter 13x9x2-ince baking pan. Bring coconut milk and ½ water to a boil in heavy medium saucepan. Gradually whisk in polenta; reduce heat and simmer until polenta is very thick and tender, about 7 minutes. Mix in cheese. Pour polenta into half of pan; spread to form 9x6-inch rectangle. Press plastic wrap onto surface of polenta and chill until firm, about 1 hour. DO AHEAD: Can be made 1 day ahead. Keep refrigerated.
Preheat oven to 300°F. Turn polenta out onto cutting board. Cut into 3x1 –inch rectangles. Heat 2 tablespoons oil in large nonstick skillet over high heat. Working in batches, add polenta fingers; cook until golden, about 2 minutes per side. Transfer to baking sheet; keep warm in oven.
Add enough water to large skillet to reach depth of 2 inches; bring to simmer. Mix in 1 teaspoon coarse salt and white wine vinegar. Crack each egg into separate custard cup. Slide eggs into water and cook until whites are set but centers are still runny, about 3 minutes.
Meanwhile, toss arugula with ½ tablespoon oil and balsamic vinegar in medium bowl; divide among 4 plates.
Top each salad with poached egg. Break yolks with tip of knife. Sprinkle with fleur de sel. Serve with polenta.
Tuesday, June 24, 2008
Poached Eggs with Arugula and Polenta Fingers

Thursday, May 1, 2008
Roast Chicken with Watercress
 I always hesitate when it comes to posting following a Daring Bakers challenge. I enjoy the process so much, the sneakiness, the anticipation... that I feel like a kid a few days after Christmas... you know what I mean? It all starts over each month, but it weirds me out the few days after.
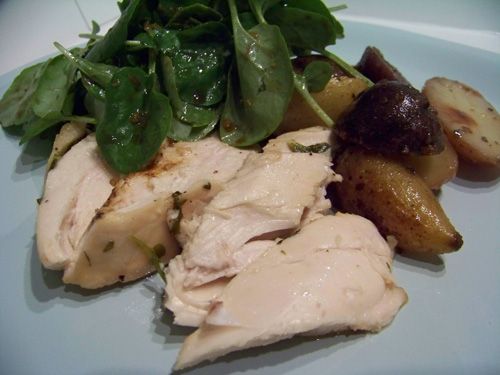
To get back in the saddle, I bring you a meal I made last Saturday. A meal I am really excited about. I don't often roast chickens... I don't often roast any whole birds, if we're going off specifics here. I don't know why this recipe spoke to me, but I am pleased that it did. Growing up, my grandmother would often roast chickens, and I really loved how the smell filled the house. My hope was to replicate that memory.
I read the reviews of this recipe online and followed their tweak recommendations (and added a couple of my own.) The recipe as written in Bon Appetit provided no direction for dressing the watercress. A reviewer suggested a lemony balsamic vinaigrette, and I suggest using it as well. The brightness of the dressing was quite refreshing atop the peppery watercress.
Rather than baste with chicken juices, I basted with extra butter. Gluttonous, I know, but if you knew how clutzy I am, and how unconducive to juice-basting my roasting rack was, you too would avoid using the chicken jus. That, and I like a butter-crisped skin. Who doesn't? The chicken roasted for about 85 minutes, even though it was just a 3.5 pounder. I would imagine it took longer because of all the oven-opening I did just to smear butter all over it. Heh. The butter/garlic/watercress under the skin did a beautiful job of flavoring the meat. I wouldn't have thought the watercress could do it - I don't know why - but the sharp pepperiness was definitely there in the chicken.
Don't you worry, though. I put that chicken jus to work! I boiled some small jeweled potatoes. When roasted, I removed the chicken to rest and placed the roasting pan on the stove, over medium heat. To the pan, I added the cooked potatoes. I don't know why I did it - I was just standing there, staring at the jus, and then the potatoes and then back again... and I had to throw them in. And whoa... these tasty potatoes alone are enough reason for me to roast more chickens! The spuds picked up the meaty goodness of the jus and soaked it in and they were amazing. Amazing.
This little chicken dish made my whole weekend. I'd been feeling crummy all week, the weather was poopy over the weekend, and this meal really hit the spot. The chicken, watercress and potatoes were terrific, but so was the comforting feel of the apartment once dinner was ready.
Adapted from: Bon Appétit Magazine, May 1993
http://www.epicurious.com/recipes/food/views/1821
You can turn this into a main-course salad for brunch, lunch or a warm-weather supper by simply drizzling vinaigrette over the sliced chicken and watercress.
Servings: Serves 4.
Chicken:
1 onion, sliced
6 garlic cloves, sliced
1 4-pound chicken
1 large bunch watercress, trimmed (and by large, I mean really large. Get two if the bunches aren't big)
2 garlic cloves, minced
1/2 cup (1 stick) unsalted butter, divided, room temperature
¼ cup olive oil
Dressing:
Balsamic vinegar
1 lemon, juice and zest
Olive oil
Salt and freshly ground black pepper
Preheat oven to 350°F.
Place onion and garlic inside chicken cavity. Slide fingertips between chicken breast skin and meat to loosen skin. Mix garlic and 1/4 cup butter, and stuff with half of watercress (chopped) under skin. Tie chicken lets together. Place chicken in roasting pan. Rub olive oil over chicken. Season with salt and pepper.
Bake chicken until juices run clear when thickest part of thigh is pierced, basting every 15 minutes with pats of butter, about 1 hour 15 minutes. Transfer chicken to platter. Let stand 10 minutes.
Whisk dressing ingredients together and toss with remaining watercress. Top salad with sliced chicken and serve.
Thursday, April 17, 2008
Mahi-mahi with Blood Orange, Avocado, and Red Onion Salsa
Today was one of those days. I felt like I was herding cats. Every time I thought I had a handle on something, a new situation arose. Not that my job is brain surgery or rocket science, far from it actually... but today... whoa.
The best part of my day was this meal. I love how fresh fish combined with fresh, clean-flavored ingredients make me feel like I'm eating "spa food." You know what I'm talking about... a refreshing plate you'd have after your aromatherpy hot stone mud massage with rose petals.
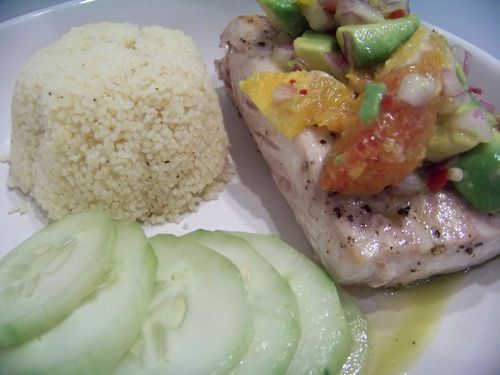
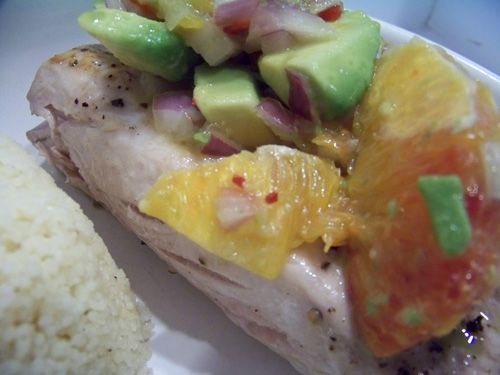
Because, believe me, that is how I felt when eating this. The fish was so simply done with salt and pepper that the salsa really had the opportunity to shine. The sweet-tartness of the blood orange combined with the creamy avocado and the zingy red pepper in a way that tasted like fate... as though blood oranges, avocado, and red onion are grown only to be friends. No fussiness, very little effort, just happiness.
I took a reader's suggestion (in the comments of the Bon Appetit recipe online) and served this with plain couscous and a cucumber salad. I sliced the cucumber and tossed it with blood orange olive oil and pomegranite vinegar (I know, right? Could this have been more perfect?), but any vinegar/oil/citrus would do well.
I can't explain it, and I feel weird even typing it, but this dinner made my day. It was exactly what I needed.
Mahi-mahi with Blood Orange, Avocado, and Red Onion Salsa
Adapted from: Bon Appétit Magazine, February 2005
http://www.epicurious.com/recipes/food/views/231590
1 blood orange, Cara Cara orange, or regular orange
1/2 cup 1/3-inch cubes avocado
1/3 cup chopped red onion
2 teaspoons minced red jalapeño
2 teaspoons fresh lime juice
2 teaspoons olive oil
2 6-ounce mahi-mahi fillets
1 large cucumber, sliced
2 cups prepared couscous
Using small sharp knife, cut peel and white pith from orange. Working over small bowl, cut between membranes to release segments. Add avocado, onion, jalapeño, and lime juice to oranges in bowl; stir gently to blend. Season salsa to taste with salt.
Heat oil in heavy medium skillet over medium-high heat. Sprinkle fish with salt and pepper. Add fish to skillet and sauté until brown and cooked through, about 5 minutes per side.
Place 1 fillet on each of 2 plates. Spoon salsa atop fish and serve with cucumber slices and couscous.
>> Orange you sweet: Although they look like regular navel oranges, Cara Cara oranges are tinged pink on the inside and taste a little sweeter. You'll find them at some supermarkets and farmers' markets.
Tuesday, March 11, 2008
Fusilli Pasta with Burrata Cheese, Spinach, Lemon, and Toasted Almonds
 This was a very spontaneous dish. Dave and I had popped into Balducci's for a few things (very few, or else I'm not allowed to go very often!) and I happened to see that they had some burrata in the cheese case. I'd never had it before and I've always wanted to try. Was it last Summer or Fall that it was all the craze?
Well, burrata in hand, we looked up what to make with it and got cracking. With the new laptop, it was really awesome to have it open to the recipe in the kitchen. Ah, technology.
Now, I'm keeping an open mind, but I didn't love the burrata. This won't make any sense to you, but I don't really like cheese as a whole. It's the smell. I like some cheeses in things, and I like fresh mozzarella in a Caprese salad, and I adore pizza and the like... but I have to wash my hands after I grate Parmesan because I don't like the way my hands smell (not that I wouldn't wash them anyway, of course!) So, less-stinky cheeses are cool, more stinky, not so much. I really wanted to like the burrata because I love fresh mozz... the burrata was stinky in a way I couldn't make friends with. The creamy texture was really great, I'll admit that... but I also picked around any clumps I couldn't just mix in. O well. At least it looked pretty.
Now, the REST of it I liked. The perfectly cooked pasta, tossed in the lemonybutterygarlicy goodness, tossed with the toasted almonds and spinach... dreamy.
Campanelle Pasta with Burrata Cheese, Spinach, Lemon, and Toasted Almonds
c/o Bon Appetit Magazine, December 2004
http://www.epicurious.com/recipes/food/views/231293
Burrata is a luscious Italian cheese made by mixing cream and unspun mozzarella curds together (for a texture similar to ricotta): the mixture is then inserted into the center of a ball of fresh mozzarella. It can be found in some supermarkets, at specialty foods shops, and at Italian markets. Substitute fresh mozzarella if you can't find burrata.
1 pound campanelle (trumpet-shaped pasta) or fusilli (spiral-shaped pasta)
2 tablespoons (1/4 stick) butter
1/3 cup olive oil
2 large garlic cloves, minced
1/4 cup lemon juice
1 teaspoon finely grated lemon peel
1 6-ounce package baby spinach (about 4 cups)
3/4 cup sliced almonds, toasted
1 pound burrata cheese, cut into 1-inch chunks
Cook pasta in large pot of boiling salted water until tender but still firm to bite, stirring occasionally.
Meanwhile, melt butter with oil in heavy large skillet over medium heat. Add garlic; sauté until soft, about 2 minutes. Add lemon juice and lemon peel. Drain pasta; transfer to large bowl. Place spinach and almonds atop hot pasta. Pour hot lemon mixture over spinach. Toss until spinach is wilted, about 1 minute. Divide pasta among plates. Top with burrata cheese, sprinkle with salt and pepper, and serve.
Friday, January 11, 2008
Pappardelle with Squash, Mushrooms, and Spinach
 You know that feeling you get, when you know you've blown something off long enough that you feel so guilty that you keep blowing it off because maybe then you won't have to fess up to it? I'll admit that its that feeling that mightily contributed to my failing out of college (as I'd skip class a few too many times but feel to sheepish to return). You'd think I'd have a handle on that feeling by now, being an official grown-up and all... but no. Here it has happened again. :)
I also didn't make any resolutions last week, which is new for me. I don't know if I've ever mentioned it, but I only started really cooking because of a New Years resolution. You see, it was what... 2000?... when I met my husband... I knew how to cook a few things... like Chicken Kate or Chicken Mom or Salisbury Steak from a Box and the like. (I rocked that food from a box, lemme tell ya!) Anyway. I met Dave the summer of 2000. By that winter, I was smitten with him (long before, actually). I really really wanted to cook for him. I made him the two Chickens... I even made him a purple banana cream pie (I can save that for another day). But then I'd exhausted my non-box foods. What is a girl to do?
What I did is make a resolution: I would buy a new cookbook every month and learn to make at least one thing from said book. I was pretty ramped up at the beginning and got a whole bunch of books at once... but still. I stuck with it. I learned to cook. I asked my friends and coworkers for recipes. I fed my husband. And you know what? I found great joy in filling his belly... in putting a smile on his face... and that propelled me forward.
Sure, its a sappy story. What it has to do with the pasta we had for dinner last week, I have no idea. But what I wanted was a nice, healthy, delicious dinner to help push me forward again. To snap me out of my blogging sheepishness and get back to sharing our meals with you. Because you know what? A lot of what we eat COMES from you - hence the blog name - and I like the fact that in sharing what I make, I celebrate what the food blogosphere has to offer! Because, seriously, you have MAD SKILLS!!! :)
Now, a little bit about this recipe from Bon Appetit magazine: Aside from all the butter, I could happily eat this on a regular basis. I felt like a nutritional rockstar the night we had this. So many veggies! And because each veg was a different kind and color, I got the feeling that we might not need our multi-vitamin that night. I'd made the pappardelle myself a few days prior and I was really pleased with the results.
Pappardelle with Squash, Mushrooms, and Spinach
c/o Bon Appetit Magazine, November 2007
http://www.epicurious.com/recipes/food/views/240429
12 ounces pappardelle or fettuccine pasta
1/2 cup (1 stick) butter, divided
3 cups 1/2-inch cubes butternut squash (from 1-pound squash)
8 ounces fresh shiitake mushrooms, stemmed, caps sliced
1 1/2 tablespoons chopped fresh sage
1 5- to 6-ounce package baby spinach
3/4 cup grated Parmesan cheese, divided
Cook pasta in large pot of boiling salted water until tender but still firm to bite, stirring occasionally. Drain, reserving 1 cup pasta cooking liquid.
Meanwhile, melt 1/4 cup butter in large skillet over medium-high heat. Add squash and cook until almost tender, stirring often, about 6 minutes. Add mushrooms, sage, and remaining 1/4 cup butter; sauté until mushrooms are soft and squash is tender, about 8 minutes. Add spinach; stir until wilted, about 2 minutes. Stir in 1/2 cup cheese. Season with salt and pepper. Add pasta to sauce in skillet. Toss to coat, adding pasta cooking liquid by 1/4 cupfuls if dry. Sprinkle with 1/4 cup cheese.
Sunday, October 14, 2007
National Meatloaf Day: Buffalo Meatloaf with Spinach and Roasted Baby Potatoes
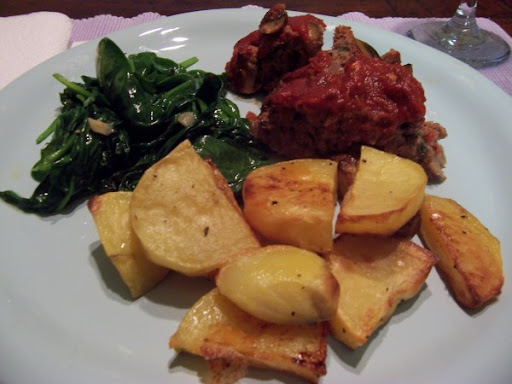 Did you know that Thursday, October 18th, is National Meatloaf Day? (not to be confused with Meat Loaf.) I bet you didn't. (But if you're a food blogger, you probably did. You get credit.) I feel its my obligation to keep you informed. I totally forgot to mention that it was National Recess week a few weeks ago, and I also forgot to share that sweet potato greens fight cardiovascular disease in hamsters... I'm failing my public! But not this time!! (I would do any-thing for youuuuuuuu...)
The folks at Serious Eats (created by Ed Levine) declared 10/18 Meatloaf Day, and frankly, I'm disappointed we don't get the day off from work!!
To show my support, I present to you this lovely buffalo meatloaf with veggies from Bon Appetit magazine. The loaf was delightfully easy to make, was moist and delicious, and super healthy! Buffalo is generally better for you than beef (lower fat and calories), and with the addition of mushrooms to the mix, you can be happy to serve this to your family. The potatoes were simply roasted, and the spinach wilted with garlic... the flavors were straightforward and wholesome.
I will say that if you are making this meal for more than two people, you're going to want to use more than 1 pound of potatoes. I couldn't find any baby yukons, so I sliced up two large ones... and I think it was the perfect amount for us. I can't wait to have my leftovers for lunch, and I will def. save this recipe for future use.
Buffalo Meatloaf with Spinach and Roasted Baby Potatoes
Bon Appetit Magazine, September 2007
http://www.epicurious.com/recipes/food/views/239814
1 pound baby Yukon Gold or Dutch yellow potatoes
5 tablespoons olive oil, divided
1 1/2 cups chopped crimini (baby bella) mushrooms
1 cup chopped red onion
1 tablespoon chopped fresh sage
1 tablespoon chopped fresh thyme
1 pound ground buffalo meat
1 large egg
3/4 cup tomato sauce, divided
1/2 cup panko (Japanese breadcrumbs)*
1/2 teaspoon salt
1/2 teaspoon cracked black pepper
1/4 teaspoon dried crushed red pepper
1 garlic clove, pressed
2 5-ounce bags fresh spinach
Preheat oven to 375°F. Toss potatoes with 1 tablespoon oil in medium bowl. Place on 13x9-inch rimmed baking sheet or roasting pan. Sprinkle with salt. Roast 20 minutes.
Meanwhile, heat 2 tablespoons oil in medium skillet over medium heat. Add mushrooms and onion; sauté until mushrooms are beginning to brown and onion is translucent, about 4 minutes. Remove from heat; mix in sage and thyme. Cool slightly.
Mix buffalo, mushroom mixture, egg, 1/2 cup tomato sauce, panko, salt, and pepper in large bowl. Push potatoes to sides of baking sheet; shape buffalo mixture into 6x3-inch loaf in center of sheet. Roast 30 minutes. Combine 1/4 cup tomato sauce and red pepper in small bowl. Pour over top of meatloaf. Roast 20 minutes longer. Remove from oven; let rest while preparing spinach.
Heat remaining 2 tablespoons oil and garlic in large pot over medium-high heat. Add spinach, and toss until wilted, about 3 minutes. Season to taste with salt. Slice meatloaf; serve potatoes and spinach alongside.
*Available in the Asian foods section of some supermarkets and at Asian markets.
Sunday, July 8, 2007
Goat Cheese-Arugula Ravioli with Tomato-Pancetta Butter
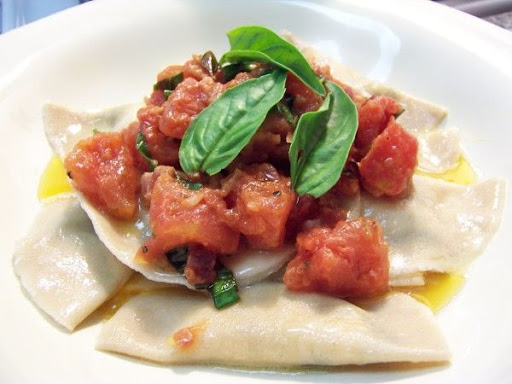
 Presto Pasta Night, hosted by the lovely Ruth at Once Upon a Feast, is something I wish I participated in more. We have had a crazy amount of pasta dinner this last week, so I think I might save a couple for future weeks! Sneaky! :)
These ravioli were glorious. Yep, glorious. The filling was creamy and delicious and the sauce was fresh and lively. (And c'mon, pancetta is fantastic in almost everything.) I only made half the called-for filling, since I knew I wouldn't be able to fill all my remaining pasta rounds. I wish I had made the whole thing. I had wonton wrappers, but I sometimes find them too squidgy for ravioli.... but I would have made do, this filling was so tasty. I think the reason it worked so well for me is because I adore goat cheese and arugula. Mostly goat cheese. I even have a kit to try to make my own at home (which I should get to later this week), so I might be able to keep us into a steady supply.
Anyway, we enjoyed these ravioli far more than the beet ones, but only because goat cheese and arugula appeal to us more than beets. To each their own. :)
Goat Cheese-Arugula Ravioli with Tomato-Pancetta Butter
Bon Appetit Magazine, March 2001
http://www.epicurious.com/recipes/recipe_views/views/104784
Ravioli
2 tablespoons olive oil
3 large shallots, minced
8 ounces arugula, chopped (about 8 cups)
6 ounces soft fresh goat cheese (such as Montrachet), crumbled
1/2 cup (about 1 1/2 ounces) freshly grated Parmesan cheese
Nonstick vegetable oil spray
42 (about) wonton wrappers (from one 12-ounce package)
2 large egg whites, whisked just until foamy
Tomato-Pancetta butter
6 ounces thinly sliced pancetta or bacon, coarsely chopped
1/4 cup (1/2 stick) butter
6 large plum tomatoes, quartered, seeds and membranes discarded, tomatoes diced
1 teaspoon chopped fresh thyme
For serving:
5 tablespoons butter, melted
12 fresh basil leaves
Fresh thyme sprigs
Make ravioli: Heat oil in heavy large skillet over medium heat. Add shallots; sauté 10 minutes. Add arugula; toss until wilted but still bright green, about 3 minutes. Transfer arugula mixture to large bowl and cool. Mix in goat cheese and Parmesan cheese. Season filling with salt and pepper.
Line 2 baking sheets with heavy-duty foil; spray foil with nonstick spray. Place 4 wonton wrappers on work surface; cover remaining wrappers with plastic to prevent drying. Lightly brush entire surface of each wrapper with egg white. Spoon 1 generous teaspoon filling into center of each wrapper. Fold wrappers diagonally in half, forming triangles. Press edges firmly to seal. Arrange ravioli on prepared sheets. Repeat with remaining wrappers and filling. (Can be made ahead. Cover with plastic and chill up to 1 day; or cover with plastic, then heavy-duty foil, and freeze up to 1 week. If frozen, do not thaw before cooking.)
Make tomato-pancetta butter: Cook chopped pancetta in large skillet over medium-high heat until crisp and brown. Using slotted spoon, transfer pancetta to paper towel; drain. Set aside. Pour off all but 1 tablespoon drippings from skillet. Add butter to drippings in skillet; melt over medium-high heat. Add tomatoes and thyme; sauté until tomatoes are tender, about 5 minutes. Season with salt and pepper. (Can be made 2 hours ahead. Let stand at room temperature.)
Cook and serve ravioli: Place melted butter in large bowl. Cook half of ravioli in large pot of boiling salted water until just tender, about 4 minutes for fresh or 5 minutes for frozen. Using large strainer, transfer ravioli to colander and drain; place in bowl with butter and toss to coat. Cover to keep warm. Cook remaining ravioli in same pot of boiling water. Drain and add to bowl of buttered ravioli. Toss gently to coat. Divide ravioli among bowls. Rewarm tomato butter over medium heat. Add reserved pancetta and basil; sauté 1 minute. Spoon sauce over ravioli; garnish with thyme.
Makes 4 to 6 servings.
Friday, July 6, 2007
Beet Ravioli with Poppy Seed Butter
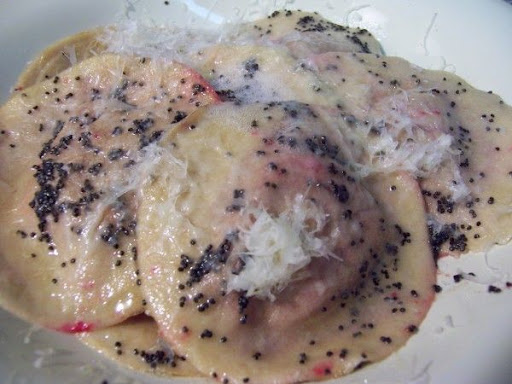 First we were on a little vacation (but that doesn't mean we didn't eat) and then I was a bit under the weather... so my posts have been piling up! I'll try to double-post the next few days to catch up!
This month's Weekend Cookbook Challenge, created by Sara at I Like to Cook, is Red and White:

So grab a recipe that has a red or white ingredient. Or use a cookbook with a red cover. Or cook a recipe by Betty White!I made this dish last Saturday night. We'd gotten a bunch of beets in our CSA shipment the Wednesday before, so this seemed like the ideal entry. I'd looked though my cookbooks and over the internet for a good-looking beet recipe. This was important because I'd only cooked with beets once before, and they played a bit part in a wine sauce. I really wanted the beets to be the star of the show.
Doing so was a gamble, because I'd never really had beets before (the canned variety frightened me). Dave didn't have much experience with them either, so this was a big deal. The comments section of the recipe stressed the importance of the poppy seeds, too, so I made sure to grab some from the store.
What can I tell you about this dish....? I roasted the beets the evening before (with the zucchini and radishes) so I saved time on Saturday. The filling and dough were both really easy to make. Either I didn't make enough filling, or else the dough just makes twice as much, so I had lots extra egg pasta (which you'll see again soon in another ravioli recipe).
I will say that I really almost enjoyed the filling pre-stuffing it into the ravioli. But I think this dish is maybe better suited to being an appetizer or beginning pasta course... because the earthiness became too much after a while. Unless, of course, you love beets. If this is you, then make this pasta. If you have beet-loving family or friends, invite them over, because this dish is very pleasing to the eye... just.... beetly overpowering. O, and the poppy seeds really were key, as they provided a nice crunch to each bite.
Beet Ravioli with Poppy Seed Butter
Bon Appetit Magazine, May 2005
http://www.epicurious.com/recipes/recipe_views/views/232091
2 large red or golden beets (about 14 ounces)
1/2 cup fresh whole-milk ricotta cheese
2 tablespoons dried breadcrumbs
1 1/4 pounds Fresh Egg Pasta
1/2 cup (1 stick) butter
1 tablespoon poppy seeds
Freshly grated Parmesan cheese
Preheat oven to 400°F. Wrap beets individually in foil; place on baking sheet. Roast until tender when pierced with knife, about 1 hour. Open foil carefully (steam will escape). Cool. Peel beets; finely grate into medium bowl. Add ricotta cheese and season to taste with salt and pepper. Stir in breadcrumbs.
Roll Fresh Egg Pasta dough into sheets according to recipe. Place 1 dough sheet on work surface. Using 3-inch round biscuit cutter, cut sheet into 7 rounds. Transfer rounds to lightly floured baking sheet; cover with plastic wrap. Repeat with remaining dough for total of 56 rounds.
Sprinkle 2 smooth kitchen towels with flour. Place 8 pasta rounds on work surface, keeping remaining dough covered with plastic. Place small bowl of water next to work surface. Spoon 1 teaspoon beet filling onto half of each round. Dip fingertip into water and dampen edge of 1 round. Fold dough over filling, pushing out as much air as possible and pressing edges firmly to seal. Transfer to prepared towels. Repeat with remaining rounds. (Can be prepared 1 week ahead. Transfer to rimmed baking sheet and place in freezer until frozen solid, about 6 hours. Transfer ravioli to resealable plastic bags.)
Melt butter in large skillet over medium heat and stir in poppy seeds; keep warm. Working in batches, cook ravioli in large pot of boiling salted water until cooked through, stirring often, about 2 minutes. Using slotted spoon, transfer to skillet with melted butter; toss to coat. Divide ravioli among 8 plates; sprinkle with Parmesan.
Market Tip
The flavor, color, and texture of roasted fresh beets is incomparable, so don't even consider using the canned variety. When choosing beets, select bunches with bright, glossy leaves attached.
Makes 8 first-course servings.
Wednesday, June 27, 2007
Spaghettini with Spicy Escarole and Pecorino Romano
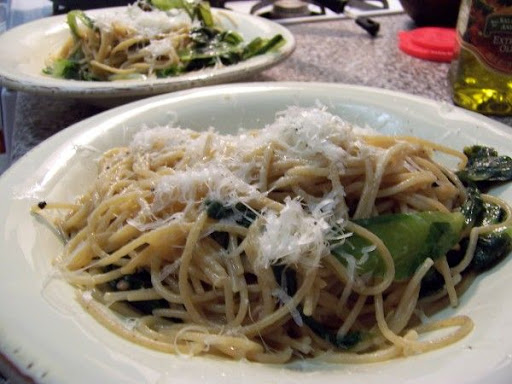 This recipe was super-easy to assemble, and pulled it from the epicurious.com website so that I could use the head of escarole that came in this week's CSA.
That being said, I have a hard time being chatty about it because I didn't really like it. I wouldn't take my opinion on it, because my husband liked it enough to go back for thirds! (and the recipe got good reviews on the website) I found the escarole really bitter and the anchovies were maybe a little weird, and it could have used more red pepper flakes. So. With that laundry list, next time, I'll maybe blanch the escarole first, use less anchovy paste, and more pepper flakes.
I have hope for it, and I'm willing to try again... it just didn't ring my bell.
Spaghettini with Spicy Escarole and Pecorino Romano
http://www.epicurious.com/recipes/recipe_views/views/233933
4 tablespoons extra-virgin olive oil, divided
3 anchovy fillets, chopped
1/4 teaspoon dried crushed red pepper
2 garlic cloves, minced
1 1/2 pounds escarole (about 1 large head), cut into 1- to 2-inch strips
1 cup water
1 pound spaghettini
Freshly grated Pecorino Romano cheese
Heat 2 tablespoons oil in heavy large saucepan over medium heat. Add anchovies and dried crushed red pepper; stir 1 minute. Add garlic; stir 30 seconds. Stir in escarole. Add 1 cup water, cover pan, and reduce heat to low. Cook until escarole is tender, about 5 minutes. Season to taste with salt and pepper.
Meanwhile, cook pasta in large pot of boiling salted water until tender but still firm to bite. Drain pasta, reserving 1 cup cooking liquid.
Add pasta to escarole mixture and stir over low heat to combine, adding cooking liquid by tablespoonfuls to moisten if necessary. Stir in remaining 2 tablespoons oil. Divide pasta among shallow bowls, sprinkle with cheese, and serve.
Makes 4 to 6 servings.
Sunday, June 24, 2007
Baked Polenta with Swiss Chard and Cheese
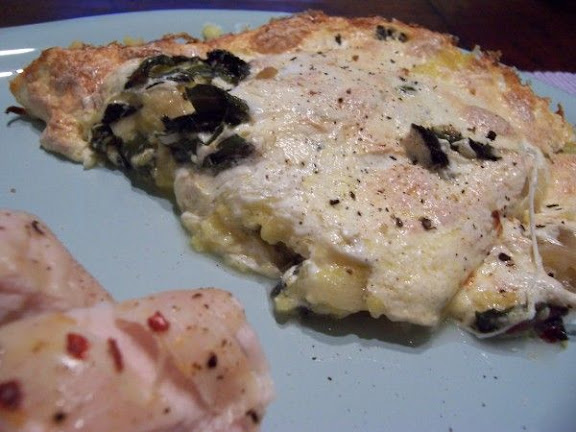 My CSA Farmer, Ellen, includes a little bulletin with each delivery. The very first week, she asked that we learn to like swiss chard, as we'd be seeing it a lot throughout the course of the summer. I'd neither purchased nor knowingly consumed swiss chard, so I had no preconceived notions on it. First impression - its enormous. People should warn you. I mean, I could fan myself with one, should the AC go out. Whilst I'm fed cool grapes.... I digress. Friends with chard, got it.
I've noticed a trend with the two chard recipes I've used thus far - both had ricotta cheese. I don't know if that means something... it could just be that I gravitate to ricotta cheese.
At any rate, this dish is polenta based, and its built in layers, like a lasagne. I credit (blame) my friend Stephanie with our new-found-love of polenta. I don't how how I got by 31 years without it. The creamy polenta was mixed with the ricotta and layered with the sauteed swiss chard and fresh mozzarella cheese, once repeated. Baked in the oven and then given a chance to rest and meld. Please please please give it the resting period. If you don't, it will ooze all over and not hold up enough to be scooped out. Trust me. (As someone that's only recently learned to wait. ;) )
I didn't do anything fancy with the chicken breasts we had along with the polenta/ricotta/chard casserole, just roasted in the same oven with salt, pepper, and red pepper flakes. I purposefully neglected the chicken, thinking that the mix of flavors in the polenta would make up for it - and I was right!
Baked Polenta with Swiss Chard and Cheese
Bon Appetit Magazine, November 2002
http://www.epicurious.com/recipes/recipe_views/views/107270
2 tablespoons extra-virgin olive oil
1 large white onion, thinly sliced
2 garlic cloves, minced
1/4 teaspoon dried crushed red pepper
1 pound Swiss chard, thick stems and ribs removed, leaves cut crosswise into 1/2-inch-wide strips 3 1/2 cups water
1 teaspoon salt
1 cup polenta (coarse cornmeal) or yellow cornmeal 1 cup part-skim ricotta cheese
2 large eggs
2 cups coarsely grated low-fat mozzarella cheese (about 8 ounces)
Preheat oven to 350°F. Lightly oil a 2-quart glass baking dish. Heat oil in a heavy large deep skillet over medium heat. Add onion; sauté until tender, about 15 minutes. Stir in garlic and crushed red pepper, then chard; cover and cook until chard is tender, stirring occasionally, about 8 minutes. Uncover; stir until any excess liquid in skillet evaporates. Season with salt and pepper.
Meanwhile, bring 3 1/2 cups water and salt to boil in heavy large saucepan. Gradually stir polenta into boiling water. Reduce heat to medium-low; simmer until polenta is very thick, stirring frequently, about 10 minutes. Remove from heat.
Whisk ricotta and eggs in bowl; whisk in 1 cup hot polenta. Stir ricotta mixture into polenta in saucepan. Spread half of polenta mixture in baking dish. Spread half of chard mixture over. Sprinkle with half of mozzarella. Repeat layering with remaining polenta, chard, and cheese. Bake until puffed and brown on top, about 45 minutes. Cool 30 minutes.
Makes 8 servings.
Per serving: calories, 259; total fat, 12 g; saturated fat, 5 g; cholesterol, 79 mg


 Posts
Posts

