Showing posts with label eating well magazine. Show all posts

Tuesday, June 10, 2008

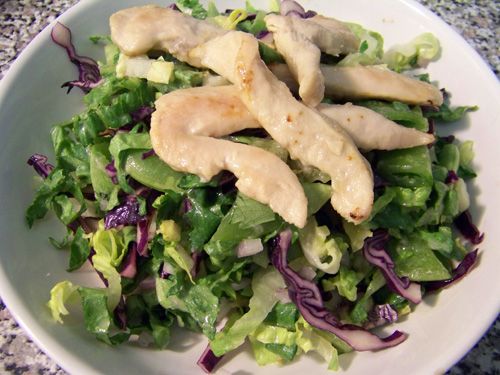
Coconut-Lime Chicken & Snow Peas Salad

I wish I could say that I've been on some kind of world-tour (or maybe following Bon Jovi around on HIS tour!), and that's why I haven't been blogging. I wish. And not just because it would be cool, but because it is way more interesting than the real answer: I've been lazy. Still cooking, still photographing, even still uploading said photos and recipes into Blogger.... just too lazy to share. I know, right? Silly! I can't promise to be back on track, but I'll certainly try - and this salad is the perfect way to get started.

Why? Because it's wicked H-O-T outside. So hot, I feel like the word "hot" should be a dirty word. Seriously - it's only early June! This is ridiculous! If your heat index is anything like mine (105°), you will love this salad. Now, you will have to use the oven, but not for very long, and you don't need to stand over it, I promise.

Whisk together the dressing, set some aside, and toss the chicken in. Bake it for 20 minutes and you're done with the heat. Chop up the lettuce, cabbage (great color, btw), peas and herbs and toss with the dressing. Top with the chicken. Relax with your tasty, healthy, not hot dinner. Sigh with relief.

Great flavor, this salad has. Usually, I shun lite coconut milk... it isn't as thick or as coconut-y as its full-fat kin. That said, the lite really is perfect for this salad. I think the more flavored regular coconut milk would have been too overwhelming and too thick for a salad dressing.

While I followed the recipe as-was, you may want to increase your chicken to a full pound. Four ounces each didn't seem like very much, especially considering the amount of actual salad. I have every intention of making this again, and I will use more chicken. Your call, really. The salad is great on its own, it doesn't need the chicken, but it makes the salad a bit more substantial and dinner-ready.


Coconut-Lime Chicken & Snow Peas Salad
Eating Well Magazine, Online Version
http://www.eatingwell.com/recipes/coconut_chicken_pea_salad.html

Makes 2 servings

1 cup lite coconut milk (see Tips for Two)
¼ cup lime juice
2 tablespoons brown sugar
½ teaspoon salt
8 ounces chicken tenders
4 cups shredded romaine lettuce
1 cup shredded red cabbage
1 cup sliced snow peas
3 tablespoons minced fresh cilantro
2 tablespoons minced red onion

Preheat oven to 400°F.

Whisk coconut milk, lime juice, sugar and salt in an 8-by-8-inch glass baking dish. Transfer 1/4 cup of the dressing to a large bowl; set aside. Place chicken in the baking dish; bake until cooked through, about 20 minutes.

Meanwhile, add lettuce, cabbage, snow peas, cilantro and onion to the large bowl with the dressing; toss to coat. Divide between 2 plates.

Transfer the chicken to a cutting board and thinly slice. Arrange the chicken slices on top of the salads. Drizzle 1 tablespoon of the coconut cooking liquid over each of the salads.

The dressing (Step 2) will keep for up to 2 days.

Tips for Two: Refrigerate leftover coconut milk for up to 4 days or freeze for up to 2 months. Use to make extra Coconut-Lime Dressing; drizzle on sliced fresh fruit; use as some of the liquid for cooking rice; make a Pineapple-Coconut Frappe.

Per serving: 186 calories; 3 g fat (1 g sat, 0 g mono); 67 mg cholesterol; 14 g carbohydrate; 29 g protein; 4 g fiber; 191 mg sodium; 473 mg potassium.

See the recipe...


Friday, April 4, 2008

Southwestern Tofu Scramble


I won't lie, I chose this dish because it gave me an excuse to get more tortillas. I love tortillas and I will take any excuse to eat them. I think I confessed once that I used to eat leftover spaghetti in tortillas in college. I am currently under the spell of the whole wheat flour tortillas that Whole Foods carries in their bakery department. Glorious, they are. I've been eating them with hummus and peanut butter (not together) and just plain.

This recipe was a lovely way to fill those tortillas, let me tell you. The more we have it, the more I just adore tofu. It is a perfect flavor chameleon, super healthy and just so versatile! I had never "scrambled" tofu before and I was a little nervous. I know they're supposed to take on the texture of scrambled eggs, and in a way they did, but with the cumin and chili powder flavoring the tofu, it seemed more taco-filling-esque than scrambled-egg-y.

The zucchini was a nice touch, as it added a good texture difference and healthy chew. Of course I over-did it with the corn, but so what! I like corn! There isn't much chopping to this dinner, so it is perfect for a weeknight. (That, and we had a good amount left over, which made a terrific lunch the next day!) Pick out your favorite salsa, grate some cheese, and you're good to go.

I feel like I say this every time I make tofu, too, but this is another good Introductory Tofu Recipe... my husband happily gobbled this up!


Southwestern Tofu Scramble
c/o Eating Well Magazine, April 2008
http://www.eatingwell.com/recipes/southwest_tofu_scramble.html

Cooking crumbled firm tofu in a skillet approximates the fluffy texture of scrambled eggs in this vegetable-studded, vegetarian main dish. Enjoy it for breakfast, lunch or dinner. Serve with steamed corn tortillas, some extra salsa and black beans.

Makes 4 servings, about 3/4 cup each

3 teaspoons canola oil, divided
1 14-ounce package firm water-packed tofu, rinsed and crumbled
1 1/2 teaspoons chili powder
1 teaspoon ground cumin
1/2 teaspoon salt, divided
1 small zucchini, diced
3/4 cup frozen corn, thawed
4 scallions, sliced
1/2 cup shredded Monterey Jack cheese
1/2 cup prepared salsa
1/4 cup chopped fresh cilantro


Heat 1 1/2 teaspoons oil in a large nonstick skillet over medium heat. Add tofu, chili powder, cumin and 1/4 teaspoon salt and cook, stirring, until the tofu begins to brown, 4 to 6 minutes. Transfer to a bowl.

Add the remaining 1 1/2 teaspoons oil to the pan. Add zucchini, corn, scallions and the remaining 1/4 teaspoon salt. Cook, stirring, until the vegetables are just tender, about 3 minutes. Return the tofu to the pan and cook, stirring, until heated through, about 2 minutes more. Remove from the heat and stir in cheese until just melted. Top each serving with 2 tablespoons salsa and 1 tablespoon cilantro.

Per serving: 202 calories; 12 g fat (4 g sat, 5 g mono); 13 mg cholesterol; 12 g carbohydrate; 13 g protein; 3 g fiber; 501 mg sodium; 422 mg potassium.

See the recipe...


Thursday, March 27, 2008

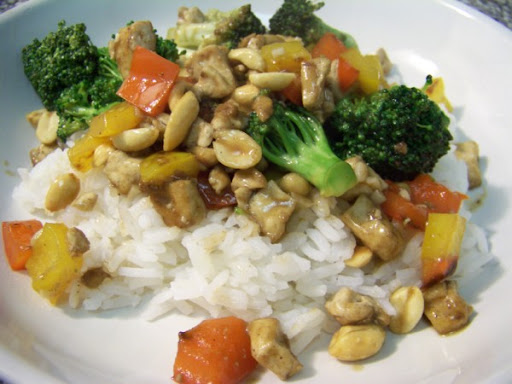
Kung Pao Tofu

Nevermind. I take back everything I said. I no longer want to make friends with my neighbors. In fact, I have a bucket-full of strong words for my neighbors. I hope they ALL stub their toes during their middle-of-the-night bathroom breaks, that they accidentally use salt instead of sugar in their baked goods, and that they sip some soured milk. A pox on my neighbors.

Why? Well, they had my car towed. I am sure they didn't all band together to do it, but SOMEONE did, and I'm chuffed about it. Tired and zoned out, I parked a spot to the left of my numbered spot. Rather than knock on my door or call me or have the leasing office call me, they called the (super-rude) towing company. I came out of my apartment to an empty spot and just stood there. (At least it happened at home - I frequently have nightmares in which my car is stolen while I'm in the grocery store or mall or something - and in my dreams, it's much scarier.) Anyway, it isn't like I'm new - we've been here 5 years and have always had the same spot. I should have looked. I just wish whoever called me in had had some common courtesy. Live and learn, I suppose.

I'm sorry for the rant. I hope I can make it up to you with this lovely version of home-made take-out. I've been really enamored lately with my issue of Eating Well Magazine (and you'll seen more from it shortly - I have some posts saved up!) I know that whatever I make from it will be healthy and delicious - and not to mention quick! I had never tried any "Chinese" food at home, and this recipe seemed like a nice starting point.

This would be another good dish to use, too, if you've wanted to break into tofu but have been squidgy about it. The tofu is flavored nicely by the five-spice powder and the oyster sauce, and since it's sauteed in the pan for a while before it is added to the veggies and sauce, it isn't the least bit squishy. I served the kung-pao over jasmine rice, but I'm sure the noodles would be terrific as well. This dish was really satisfying and I'll happily make it again. My Darling Picky Eater seemed happy with it as well, and asked that I look for a tofu-and-broccoli recipe next!


Kung Pao Tofu
c/o Eating Well Magazine, March/April 2008
http://www.eatingwell.com/recipes/kung_pao_tofu.html

You won’t be tempted to reach for another take-out menu again after trying this easy vegetarian remake of the popular Chinese classic. Serve with Chinese noodles.

Makes 4 servings, about 1 cup each

1 14-ounce package extra-firm water-packed tofu, rinsed
1/2 teaspoon five-spice powder, divided (see Shopping Tip)
1 tablespoon canola oil
1/2 cup water
3 tablespoons oyster-flavored or oyster sauce (see Shopping Tip)
1/2 teaspoon cornstarch
12 ounces broccoli crowns, trimmed and cut into bite-size pieces (4 cups)
1 yellow bell pepper, cut into 1/2-inch dice
1 red bell pepper, cut into 1/2-inch dice
1 tablespoon minced fresh ginger
1 tablespoon minced garlic
2 tablespoons unsalted roasted peanuts
2 teaspoons hot sesame oil (optional)

Pat tofu dry and cut into 1/2-inch cubes. Combine with 1/4 teaspoon five-spice powder in a medium bowl.

Heat canola oil in a large nonstick skillet over medium-high heat. Add tofu and cook, stirring every 1 to 2 minutes, until golden brown, 7 to 9 minutes total. Transfer to a plate.

Meanwhile, whisk water, oyster sauce, cornstarch and the remaining 1/4 teaspoon five-spice powder in a small bowl.

Add broccoli, yellow and red bell pepper to the pan and cook, stirring occasionally, until beginning to soften, about 4 minutes. Add ginger and garlic and cook, stirring, until fragrant, about 30 seconds. Reduce heat to low, add the oyster sauce mixture and cook, stirring, until thickened, about 30 seconds. Return the tofu to the pan along with peanuts and stir to coat with sauce; stir in hot sesame oil (if using).

Per serving: 197 calories; 11 g fat (2 g sat, 4 g mono); 0 mg cholesterol; 16 g carbohydrate; 12 g protein; 5 g fiber; 622 mg sodium; 517 mg potassium.

TIP: Shopping tips: Be sure to use “oyster-flavored” sauce (it’s oyster-free) to make this vegetarian; both it and oyster sauce are found in the Asian-food section or at Asian markets. Five-spice powder is a blend of cinnamon, cloves, fennel seed, star anise and Szechuan peppercorns. Look for it in the spice section or with other Asian ingredients.


See the recipe...


Tuesday, March 25, 2008

Brown Rice and Goat Cheese Cakes

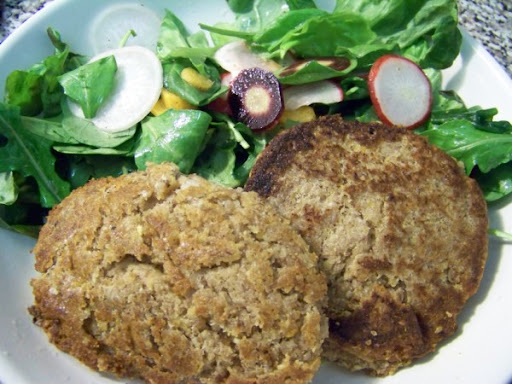
You know you've been memorable when your husband lovingly refers to a dinner as those "cakes that looked like pressed cow turds." I countered with the fact that they didn't seem dark enough for that, so maybe sun-bleached ones. Sorry, moving on. :)

When I get the cooties, all I can manage to eat is rice, so I make a lot of rice. Like, a lot. Usually brown, and since it takes so long to make, I tend to make way more than I need, because I def. don't want to mind a pot of rice for 50 minutes any more than I have to. Now, this has led to a herd of extra baggies of rice in my freezer. You'd think that when I get sick, I would just reach into the freezer for a bag, but I don't. I make more. You cannot argue with a sick person.

This meal wasn't intended to use them up, because like I said, I practically forget that rice is in there - until it drops on my foot - but it worked out that way. I was hungry for these, but not in the mood for the 50-minute rice action, and that much-underused light-bulb flickered on... "no need to worry, dearie, you have rice already!" Rad. (This is a wonderful thing, too, because I almost always have goat cheese and pecans at home, too, so I'll be able to throw these together in a pinch!)

I probably over-did it with the food processor, because the mix wasn't so much on the grainy side, but that didn't seem to matter. Formed, fried, and baked and they were quite tasty. Dave made the comment that these would make great veggie-burgers, and I have to agree. The rice gives it a nice chew, but the goat cheese kept them moist.

I served these with our new favorite salad. Let me tell you how we came upon it.

Dave and I visited with his parents in Phoenix in December. We went to Quiessence Restaurant & Wine Bar, located at The Farm at South Mountain. We'd arrived early and had a chance to tour the property. I was just smitten with row after row of vegetables, the noisy chickens, the citrus trees, heavy with fruit. The farm seemed to be a little piece of heaven, right there in an active and bustling city. Quiessence prides itself on its use of local, sustainable ingredients, and it shows. The meal we shared there was the best meal of my life. Seriously. The attention to detail, the marriage of flavors without complication... I cannot wait to go back.

Dave and I each had their root vegetable salad. It consisted of many varieties of sliced radish, carrot, and arugula, all tossed in a light vinaigrette. We asked the server to find out what was in it, and she listed radishes we'd never heard of: Easter Egg, French Breakfast, Icicle, Watermelon... I knew then that we'd have to find them.

I was able to find the Easter Egg radishes and some very colorful carrots to pull this together at home. (My favorite are the purple carrots - they're green in the middle!!) Topped with a little olive oil and a splash of whichever O Vinegar we're in the mood for, and we're happy salad eaters.

I've never grown radishes, carrots, or arugula at home, but this summer, I'm going to try. :)


Brown Rice and Goat Cheese Cakes
c/o Eating Well Magazine, April 2008
http://www.eatingwell.com/recipes/rice_goat_cheese_cakes.html

Medium-grain brown rice has a toothsome texture and nutty flavor that complement creamy, earthy goat cheese in these elegant cakes. Serve over salad greens as a main course.

Makes 6 servings

3/4 cup medium-grain brown rice
1 1/2 cups water
4 teaspoons extra-virgin olive oil, divided
6 medium shallots, chopped
2 medium carrots, shredded using the large holes of a box grater
1/2 cup toasted pecans (see Tip)
3 ounces goat cheese
1 large egg white
1/2 teaspoon dried thyme
1/2 teaspoon salt
1/2 teaspoon freshly ground pepper

Bring rice and water to a boil in a medium saucepan. Reduce heat to low, cover, and simmer at the lowest bubble until the water is absorbed and the rice is tender, 30 to 50 minutes (see Test Kitchen Note). Remove from the heat and let stand, covered, for 10 minutes.

Meanwhile, heat 2 teaspoons oil in a large skillet over medium heat. Add shallots; cook, stirring often, until soft, 2 to 3 minutes. Add carrots, reduce the heat to low and cook, stirring often, until softened and the shallots are lightly browned, about 4 minutes. Remove from the heat.

Preheat oven to 400°F.

Transfer the cooked vegetables and rice to a large food processor. Add pecans, goat cheese, egg white, thyme, salt and pepper. Pulse until well blended but still a little coarse. Scrape into a large bowl. With wet hands, form the mixture into six 3-inch patties (about 1/2 cup each).

Heat the remaining 2 teaspoons oil in a large nonstick skillet over medium heat. Add the patties and cook until well browned, 3 to 4 minutes per side. Transfer to a baking sheet and bake until an instant-read thermometer inserted into the middle registers at least 160°F, 10 to 15 minutes.

TIP: Tip: Spread pecans on a baking sheet and bake at 350°F, stirring once, until fragrant, 7 to 9 minutes.

Test Kitchen Note: Perfectly cooked rice is not simple. In fact, it’s something that we struggle with occasionally in the Test Kitchen. To have the most success cooking whole-grain rice, we recommend using a pan with a tight-fitting lid, cooking on your coolest (or simmer) burner and making sure the rice is simmering at the “lowest bubble.” While testing the recipes that use less than 1 cup of dry rice, we found that the cooking time varied greatly depending on what stove we used. Although whole-grain rice usually requires 50 minutes of cooking, we found smaller volumes of rice were sometimes done in as little as 30 minutes (and burned at 50 minutes). So, when cooking a small batch of rice, start checking it after 30 minutes to make sure it doesn’t burn.

Make ahead tip: Cover and refrigerate for up to 3 days. Serve cold or reheat.

Per serving: 250 calories; 14 g fat (3 g sat, 7 g mono); 7 mg cholesterol; 26 g carbohydrate; 7 g protein; 3 g fiber; 274 mg sodium; 250 mg potassium.

See the recipe...


Wednesday, March 12, 2008

Fragrant Fish Soup = Not a Chicken

I almost impulse-bought a rotisserie chicken.

Most times, it's the gum or candy bars, batteries or spare lint rollers that people buy as they wait in the check-out aisle. Not me. I get chickens. See, Wegmans is smart. They have a hot chicken display right there where the wee soda fridge's go. And they smell sooooo good. Omg. Sometimes I just can't help myself. This time, though, I remained strong. (Mostly because I couldn't think of a way to incorporate it into our week's meals on such short notice!)

Instead, we had this lovely Fragrant Fish Soup, found in the latest issue of Eating Well Magazine. Let me tell you, "fragrant" is the perfect word for this soup. The melding of the lemony jasmine rice with the pungent mint, fresh carrots and dainty green onions... delightful! I breathed deep and my stomach growled.

I'd never plated soup (bowled soup?) in this manner before - with the island of rice in the center, broth like a moat around it. I didn't mess up anything extra doing it, and I thought it added so much to the presentation. Sure, it's nothing new, but it made me happy. :)

You can probably already guess that I really liked this soup. I enjoyed the play of textures between the delicate fish, the soft rice, the nice chew of the carrots... and I could happily eat this again and again (and I did for lunch the next day!). That said, Dave claimed it was "missing something," but couldn't place what, other than to say it just needed MORE of everything on top. He could be on to something, for sure, but I was happy with it as it was.


Fragrant Fish Soup
c/o Eating Well Magazine, April 2008
http://www.eatingwell.com/recipes/fragrant_fish_soup.html

Lemony rice, delicately flavored broth and gently poached tilapia are topped with a colorful blend of vegetables and herbs. The aromatic mint provides fresh and complex flavor.

Makes 4 servings, about 1 1/4 cups each

1 cup jasmine rice
2 cups water
Zest and juice of 1 lemon
4 cups reduced-sodium chicken broth or vegetable broth
1 pound tilapia fillets or other firm white fish (see Tip)
4 cups bite-size pieces arugula or watercress (about 1 bunch), tough stems removed
1 cup finely shredded carrots
1/4 cup very thinly sliced fresh mint
2 scallions, finely chopped

Combine rice and water in a medium saucepan. Bring to a simmer over medium heat; cover and cook until the water is absorbed, about 20 minutes. Stir in lemon zest and juice.

Meanwhile, bring broth to a simmer in another medium saucepan over medium-high heat. Reduce the heat so the broth remains steaming, but not simmering. Add fish and cook until just tender, about 5 minutes. Remove and break into bite-size chunks.

Divide the lemony rice among 4 bowls. Top with equal portions of the fish, arugula (or watercress), carrot, mint and scallions. Ladle 1 cup of the warm broth into each bowl and serve.

TIP: Tip: Look for U.S. farm-raised tilapia, which is usually grown in closed farming systems that limit pollution and prevent escapes. Some Central and South American tilapia is farmed in this manner as well, but avoid tilapia from China and Taiwan, mostly farmed in open systems.

Per serving: 239 calories; 3 g fat (1 g sat, 1 g mono); 62 mg cholesterol; 25 g carbohydrate; 29 g protein; 2 g fiber; 230 mg sodium; 572 mg potassium.

See the recipe...


Tuesday, July 17, 2007

Grilled Chicken & Polenta with Nectarine-Blackberry Salsa

If you're a regular reader of this blog, you'll have noticed my adoration of polenta. I don't think I'd ever really experienced it before this past April, but I've tried to fit it in as much as possible since. When I'm on my own for dinner, I used to have a bowl of cereal... now I whip up some polenta instead. Almost just as easy, but so yummy!! (I'll still indulge in a bowl of Peanut Butter Puffins, don't worry!)

This is the first time I'd cooked with pre-made polenta. I love that the whole tube only had 140 calories!!! The recipe called for plain polenta, but my Wegmans didn't carry plain (weird!), so I used sun-dried tomato.

We rent and thusly don't own a grill, but my square grill pan stood in nicely. I couldn't fit everything onto the pan, as the recipe instructs, so I started with the nectarines and chicken. I figured that the chicken needed to rest a bit before slicing, and the polenta didn't need to long in the pan. Worked out well.

I smooshed the blackberries down, as Dave doesn't care for their texture whole, which made the whole salsa purple - which I found pretty. :)

Now, I was a little worried, as the inclusion of fruit actually IN our dinner is a new concept for us, but each ingredient did their job beautifully. The crusty goodness of the outside of the polenta married nicely with its creamy interior. The juicy fruit made friends with both polenta and chicken. And all together in one bite was heaven.

This recipe comes from Eating Well magazine (link below), which I find to be a really fantastic resource for seasonal, healthy recipes. If you haven't checked it out already, grab it the next time you're at the bookstore. You won't be disappointed. :)


Grilled Chicken & Polenta with Nectarine-Blackberry Salsa
Eating Well Magazine, August 2007
http://www.eatingwell.com/recipes/chicken_salsa_polenta.html

1 tablespoon plus 1 teaspoon canola oil, divided
1 tablespoon ground cumin
1 teaspoon kosher salt, divided
3/4 teaspoon freshly ground pepper
1 16- to 18-ounce tube prepared plain polenta
1 pound boneless, skinless chicken breast, trimmed
2 nectarines, halved and pitted
1 pint blackberries, coarsely chopped
2 tablespoons chopped fresh cilantro
1 tablespoon lime juice
Hot sauce to taste
Preheat grill to medium-high.

Combine 1 tablespoon oil, cumin, 3/4 teaspoon salt and pepper in a small bowl. Rub 1 teaspoon of the mixture all over polenta. Rub the rest into both sides of chicken. Cut the polenta crosswise into 8 slices. Rub the cut sides of nectarine halves with the remaining 1 teaspoon oil.

Oil the grill rack. Place the chicken, polenta slices and nectarines on the grill. Grill the polenta until hot and slightly charred, 3 to 4 minutes per side. Transfer to a clean plate; tent with foil to keep warm. Grill the nectarines, turning occasionally, until tender, 6 to 8 minutes total. Grill the chicken, until cooked through and no longer pink in the middle, 6 to 8 minutes per side. Transfer the chicken and nectarines to a cutting board. Coarsely chop the nectarines. Let the chicken rest for 5 minutes, then thinly slice.

While the chicken rests, combine the chopped nectarines, blackberries, cilantro, lime juice, hot sauce and the remaining 1/4 teaspoon salt in a medium bowl. Layer the polenta, chicken and fruit salsa on 4 plates and serve.

Makes 4 servings.

Per serving: 317 calories; 8 g fat (1 g sat, 4 g mono); 63 mg cholesterol; 34 g carbohydrate; 27 g protein; 6 g fiber; 694 mg sodium; 458 mg potassium.

See the recipe...


Saturday, June 16, 2007

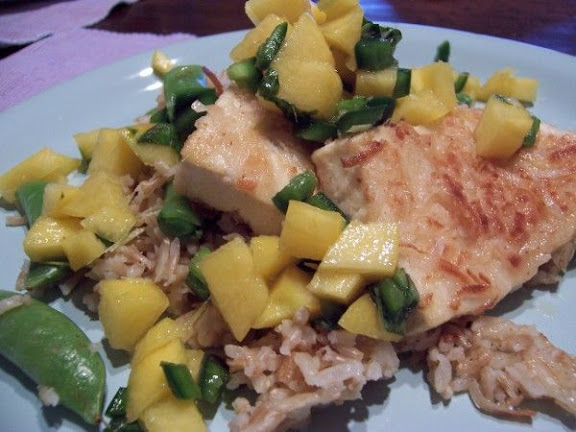
Coconut-Crusted Tofu with Peach-Lemongrass Salsa

I printed this recipe in March, hopeful that I'd get to it eventually. I think that's about when I started giving tofu a chance, sneaking it into our meals.

Thank goodness for this dinner. Between our breakfast, pizza and a churro from Costco for lunch, Maggie Moo ice cream in the afternoon... I'm sure you see where I'm going with this. Today was a classically bad-eating Saturday. (I did really like that churro, though!)

I made some brown basmati to go-with, and I steamed some CSA sugar snap peas during the last ten minutes of the rice. (I feel very sneaky.) I do wish that the coconut had adhered better to the tofu, and Dave suggested more jalapenos for the salsa. Overall, it was a nice healthy dinner, that assuaged a little ice cream guilt.

Coconut-Crusted Tofu with Peach-Lemongrass Salsa
Eating Well Magazine, June/July 2006
http://www.eatingwell.com/recipes/coconut_tofu_peach.html

3 medium peaches, peeled, pitted and diced
1-2 jalapenos, preferably red, seeded and minced
1 2-inch piece fresh lemongrass, minced, or 1 teaspoon dried (see Note)
1 tablespoon chopped fresh basil
1 tablespoon brown sugar
1 tablespoon rice-wine vinegar
¾ teaspoon salt, divided
½ cup unsweetened flaked coconut
2 tablespoons flour
2 tablespoons cornstarch
1 14-ounce package extra-firm water-packed tofu, drained
2 tablespoons canola oil, divided

Preheat oven to 400°F. Set a wire rack on a large baking sheet.

Combine peaches, jalapenos, lemongrass, basil, brown sugar, vinegar and 1/4 teaspoon salt in a medium bowl; toss to combine.

Mix coconut, flour and cornstarch in a shallow dish. Cut the block of tofu lengthwise into 8 thin steaks. Pat the tofu slices dry with a paper towel, sprinkle with the remaining 1/2 teaspoon salt, then press both sides of each tofu steak into the coconut mixture.

Heat 1 tablespoon oil in a large nonstick skillet over medium-high heat. Add 4 tofu steaks and cook until golden brown, about 2 minutes per side, adjusting heat as necessary to prevent scorching. Transfer the tofu steaks to the rack-lined baking sheet and place in the oven to keep warm. Heat the remaining 1 tablespoon oil in the skillet over medium-high heat; cook the remaining tofu steaks until golden brown, about 2 minutes per side. Serve the tofu with the peach salsa.

Makes 4 servings.

Per serving: 251 calories; 16 g fat (4 g sat, 9 g mono); 0 mg cholesterol; 19 g carbohydrate; 11 g protein; 3 g fiber; 491 mg sodium; 313 mg potassium.

See the recipe...


Thursday, May 10, 2007

Chicken & Asparagus with Melted Gruyere

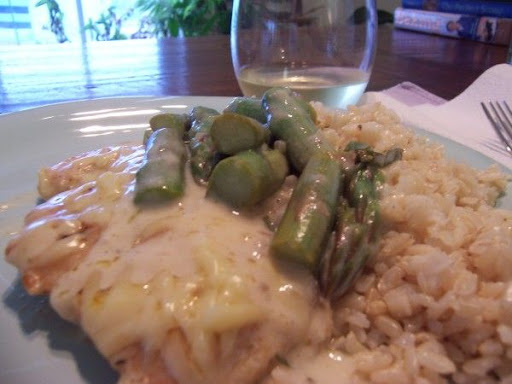
If my stomach were bigger, I would have had seconds. (I think I just had big firsts.) As it was, I made sure to eat up every last sauced piece of rice. I might have even licked the plate. (but I didn't, I promise.)

There wasn't much to tonight's dinner. Nothing fancy, but altogether perfect. Dave randomly picked out a wonderful Iron Horse Chardonnay, and upon reading its tasting notes, it was the most perfect wine we could have had in and with our meal.

I will confess, I tasted the sauce before I added everything back into the pan, and I wasn't impressed with it. Something magical happened when I put the asparagus and chicken back in, because dinner was awesome. (I cannot stress this enough.)

Even better, because its from Eating Well Magazine, its even healthy! Rock on!


Chicken & Asparagus with Melted Gruyere
Eating Well Magazine, June 2007
http://www.eatingwell.com/recipes/chicken_asparagus_gruyere.html

8 ounces asparagus, trimmed and cut into 1-inch pieces
2/3 C reduced-sodium chicken broth
2 Tsp.s plus ¼ C all-purpose flour, divided
4 boneless, skinless chicken breasts (1-1 ¼ pounds), trimmed
¼ Tsp. salt
½ Tsp. freshly ground pepper
1 Tbsp. canola oil
1 shallot, thinly sliced
½ C white wine
1/3 C reduced-fat sour cream
1 Tbsp. chopped fresh tarragon
2 Tsp.s lemon juice
2/3 C shredded Gruyère cheese

Place a steamer basket in a large saucepan, add 1 inch of water and bring to a boil. Add asparagus; cover and steam for 3 minutes. Uncover, remove from the heat and set aside.

Whisk broth and 2 teaspoons flour in a small bowl until smooth. Set aside.

Place the remaining 1/4 cup flour in a shallow dish. Sprinkle chicken with salt and pepper and dredge both sides in the flour, shaking off any excess.

Heat oil in a large skillet over medium heat. Add the chicken and cook until golden brown, 3 to 4 minutes per side, adjusting heat as needed to prevent scorching. Transfer to a plate and cover to keep warm.

Add shallot, wine and the reserved broth mixture to the pan; cook over medium heat, stirring, until thickened, about 2 minutes. Reduce heat to medium-low; stir in sour cream, tarragon, lemon juice and the reserved asparagus until combined. Return the chicken to the pan and turn to coat with the sauce. Sprinkle cheese on top of each piece of chicken, cover and continue cooking until the cheese is melted, about 2 minutes.

See the recipe...