
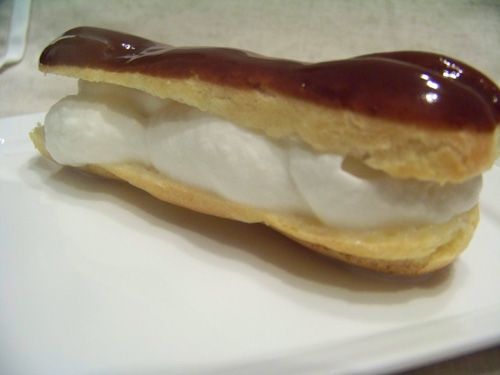
 I wanted to love you... I really did. From the very first announcement of the August Daring Bakers challenge, I wanted to rekindle this romance... but it just wasn't meant to be. It wasn't you, my dear eclair, it was me. I shouldn't have expected my first attempt to measure up to my childhood food memory... it was folly. I'm happy to try another date... just give me time to figure out what happened.
 You see, I used to love eclairs. My grandpa would come home with a box of them every so often, and I was always so excited. They weren't even fancy - I want to say they were Entenmanns - but they didn't have the traditional pastry cream filling - oh no, it was much lighter and daintier. (I've since learned that this mystery filling is creme Chantilly - a fancied-up whipped cream.) I shy away from eclairs now, because I know I won't like the filling and I don't want to be disappointed.
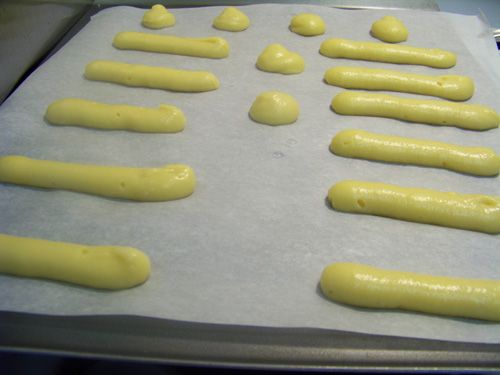 We were allowed to swap out either the filling or the glaze (but something had to stay chocolate - I'm not complaining!), so I wanted to try my hand at a Chantilly cream. Where I got the idea to flavor it with lavender is anyone's guess. I wasn't sure if chocolate and lavender could be friends, but I wanted to try. As someone I polled said, how could something NOT be friends with chocolate?
Yes, yes, I waited until the absolute last day to get my challenge on. My kitchen ennui held me back, for starters. I also realized late in the month that my pastry bag, tip, and coupler had been thrown out and I needed to find a new one. When? Oh, yesterday. Ha! My new one is much fancier, so I shouldn't complain.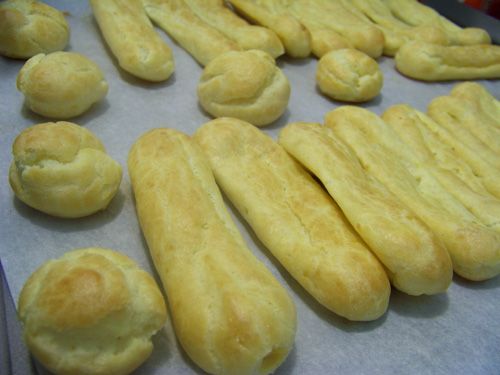 After yoga this morning, I pulled the choux pastry together and popped them in the oven. I didn't catch the part in the thread that suggested a longer baking time (to avoid deflation), so... well... my puffs aren't so puffy anymore. They WERE, I promise, but they all sank. I have to say, there aren't many things as sad as a flat cream puff. :) They needed time to cool and dry out, so I saved completion until after dinner.
At which point I steeped some lavender syrup (recipe courtesy of Chockylit), prepared the chocolate sauce and glaze. I then whipped the cream and added the syrup. Now, I think I must have mis-measured, because there seemed to be a high syrup-to-cream ratio that left the resulting cream really really soft. Like, really soft. Tasty as all get-out (and not the least bit soapy, as I'd feared), but just a little too giving in a pastry. (Read: it squishes right out when you bite in to the eclair - messy messy!!)
Are lavender and chocolate friends? Heck yes. Would I like to combine them in various other ways? Double yes! (I can't say that lavender will be the new pistachio in OPF-land, though.) Would I made this recipe again? Probably not. The sunken puffs were demoralizing and I found the chocolate glaze overly sweet. Overall, this was a good experience, and I'm more than happy to make more eclairs and cream puffs, just maybe with a different recipe (no disrespect to Pierre Hermes.) Many thanks to Meeta and Tony for yet another terrific challenge!!
For eleventy-billion more versions of Mr. Hermes' eclairs, check out the Daring Bakers Blogroll.
Pierre Hermé’s Chocolate Éclairs
Recipe from Chocolate Desserts by Pierre Hermé
(makes 20-24 Éclairs)
• Cream Puff Dough (see below for recipe), fresh and still warm
1) Preheat your oven to 375 degrees F (190 degrees C). Divide the oven into thirds by
positioning the racks in the upper and lower half of the oven. Line two baking sheets with
waxed or parchment paper.
2) Fill a large pastry bag fitted with a 2/3 (2cm) plain tip nozzle with the warm cream puff dough.
Pipe the dough onto the baking sheets in long, 4 to 41/2 inches (about 11 cm) chubby fingers.
Leave about 2 inches (5 cm) space in between each dough strip to allow them room to puff.
The dough should give you enough to pipe 20-24 éclairs.
3) Slide both the baking sheets into the oven and bake for 7 minutes. After the 7 minutes, slip the
handle of a wooden spoon into the door to keep in ajar. When the éclairs have been in the
oven for a total of 12 minutes, rotate the sheets top to bottom and front to back. Continue
baking for a further 8 minutes or until the éclairs are puffed, golden and firm. The total baking
time should be approximately 20 minutes.
Notes:
1) The éclairs can be kept in a cool, dry place for several hours before filling.
Assembling the éclairs:
• Chocolate glaze (see below for recipe)
• Chocolate pastry cream (see below for recipe)
1) Slice the éclairs horizontally, using a serrated knife and a gently sawing motion. Set aside the
bottoms and place the tops on a rack over a piece of parchment paper.
2) The glaze should be barely warm to the touch (between 95 – 104 degrees F or 35 – 40
degrees C, as measured on an instant read thermometer). Spread the glaze over the tops of
the éclairs using a metal icing spatula. Allow the tops to set and in the meantime fill the
bottoms with the pastry cream.
3) Pipe or spoon the pastry cream into the bottoms of the éclairs. Make sure you fill the bottoms
with enough cream to mound above the pastry. Place the glazed tops onto the pastry cream
and wriggle gently to settle them.
Notes:
1) If you have chilled your chocolate glaze, reheat by placing it in a bowl over simmering water,
stirring it gently with a wooden spoon. Do not stir too vigorously as you do not want to create
bubbles.
2) The éclairs should be served as soon as they have been filled.
Pierre Hermé’s Cream Puff Dough
Recipe from Chocolate Desserts by Pierre Hermé
(makes 20-24 Éclairs)
• ½ cup (125g) whole milk
• ½ cup (125g) water
• 1 stick (4 ounces; 115g) unsalted butter, cut into 8 pieces
• ¼ teaspoon sugar
• ¼ teaspoon salt
• 1 cup (140g) all-purpose flour
• 5 large eggs, at room temperature
1) In a heavy bottomed medium saucepan, bring the milk, water, butter, sugar and salt to the
boil.
2) Once the mixture is at a rolling boil, add all of the flour at once, reduce the heat to medium
and start to stir the mixture vigorously with a wooden spoon. The dough comes together very
quickly. Do not worry if a slight crust forms at the bottom of the pan, it’s supposed to. You
need to carry on stirring for a further 2-3 minutes to dry the dough. After this time the dough
will be very soft and smooth.
3) Transfer the dough into a bowl of a mixer fitted with the paddle attachment, or using your
handmixer or if you still have the energy, continue by hand. Add the eggs one at a time,
beating after each egg has been added to incorporate it into the dough.
You will notice that after you have added the first egg, the dough will separate, once again do
not worry. As you keep working the dough, it will come back all together again by the time you
have added the third egg. In the end the dough should be thick and shiny and when lifted it
should fall back into the bowl in a ribbon.
4) The dough should be still warm. It is now ready to be used for the éclairs as directed above.
Notes:
1) Once the dough is made you need to shape it immediately.
2) You can pipe the dough and the freeze it. Simply pipe the dough onto parchment-lined baking
sheets and slide the sheets into the freezer. Once the dough is completely frozen, transfer the
piped shapes into freezer bags. They can be kept in the freezer for up to a month.
Chocolate Pastry Cream
Recipe from Chocolate Desserts by PierreHermé
• 2 cups (500g) whole milk
• 4 large egg yolks
• 6 tbsp (75g) sugar
• 3 tablespoons cornstarch, sifted
• 7 oz (200g) bittersweet chocolate, preferably Velrhona Guanaja, melted
• 2½ tbsp (1¼ oz: 40g) unsalted butter, at room temperature
1) In a small saucepan, bring the milk to a boil. In the meantime, combine the yolks, sugar and cornstarch together and whisk in a heavy‐bottomed saucepan.
2) Once the milk has reached a boil, temper the yolks by whisking a couple spoonfuls of the hot milk into the yolk mixture.Continue whisking and slowly pour the rest of the milk into the tempered yolk mixture.
3) Strain the mixture back into the saucepan to remove any egg that may have scrambled. Place the pan over medium heat and whisk vigorously (without stop) until the mixture returns to a boil. Keep whisking vigorously for 1 to 2 more minutes (still over medium heat).Stir in the melted chocolate and then remove the pan from the heat.
4) Scrape the pastry cream into a small bowl and set it in an ice‐water bath to stop the cooking process. Make sure to continue stirring the mixture at this point so that it remains smooth.
5) Once the cream has reached a temperature of 140 F remove from the ice‐water bath and stir in the butter in three or four installments. Return the cream to the ice‐water bath to continue cooling, stirring occasionally, until it has completely cooled. The cream is now ready to use or store in the fridge.
[bNotes:[/b]
1) The pastry cream can be made 2‐3 days in advance and stored in the refrigerator.
2) In order to avoid a skin forming on the pastry cream, cover with plastic wrap pressed onto the cream.
3) Tempering the eggs raises the temperature of the eggs slowly so that they do not scramble.
Chocolate Glaze
Recipe from Chocolate Desserts by Pierre Hermé
(makes 1 cup or 300g)
• 1/3 cup (80g) heavy cream
• 3½ oz (100g) bittersweet chocolate, finely chopped
• 4 tsp (20 g) unsalted butter, cut into 4 pieces, at room temperature
• 7 tbsp (110 g) Chocolate Sauce (recipe below), warm or at room temperature
1)In a small saucepan, bring the heavy cream to a boil. Remove from the heat and slowly begin to add the chocolate, stirring with a wooden spoon or spatula.
2) Stirring gently, stir in the butter, piece by piece followed by the chocolate sauce.
Notes:
1) If the chocolate glaze is too cool (i.e. not liquid enough) you may heat it briefly
in the microwave or over a double boiler. A double boiler is basically a bowl sitting over (not touching) simmering water.
2) It is best to glaze the eclairs after the glaze is made, but if you are pressed for time, you can make the glaze a couple days ahead of time, store it in the fridge and bring it up to the proper temperature (95 to 104 F) when ready to glaze.
Chocolate Sauce
Recipe from Chocolate Desserts by Pierre Hermé
(makes 1½ cups or 525 g)
• 4½ oz (130 g) bittersweet chocolate, finely chopped
• 1 cup (250 g) water
• ½ cup (125 g) crème fraîche, or heavy cream
• 1/3 cup (70 g) sugar
1) Place all the ingredients into a heavy‐bottomed saucepan and bring to a boil, making sure to stir constantly. Then reduce the heat to low and continue stirring with a wooden spoon until the sauce thickens.
2) It may take 10‐15 minutes for the sauce to thicken, but you will know when it is done when it coats the back of your spoon.
Notes:
1) You can make this sauce ahead of time and store it in the refrigerator for two weeks. Reheat the sauce in a microwave oven or a double boiler before using.
2) This sauce is also great for cakes, ice-cream and tarts.
Sunday, August 31, 2008
Dare to Bake a Food Memory?
Thursday, August 28, 2008
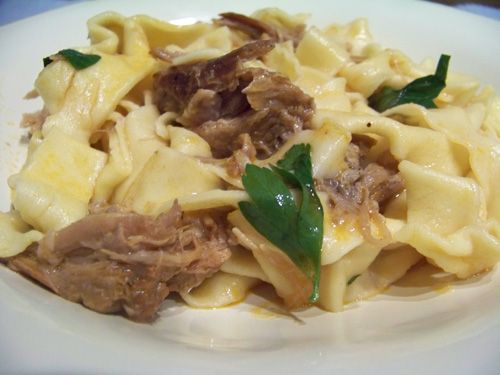
Smokey Pork Pappardelle
 Alright, so. My excuse didn't stick. It's been weeks and I'm still on the outs with the kitchen. My foot is better, I've been to the gym every day but one since my last post (and incidentally, am as light as I've ever been as an adult) and I've even tried cooking a bit. It's a measure of how checked out I am, though, that I didn't take one measly photo. Blah.
What is carrying me through? Well, let me tell you about my freezer. Because sauce is so.... saucy... we are often left with more than enough leftover for multiple dinners. Out of the freezer and into the pot and we can have a delicious home-cooked dinner in a matter of minutes. I cannot wait to have a garage that I can put a giant freezer in - seriously. (This is how I know I'm grown-up now, I long for appliances.) I am more than happy to make some pasta while the sauce reheats - I find it soothing.
So. Three hours in the oven. Don't worry about it. Pop it in and wander off. You won't go far, believe you me, because the smell coming from your oven will intoxicate you. Seriously. It's meaty and deep yet sweet... and feels just like home. I really like that the sauce is strained, because bits other than pork would have been out of place. Smooth sauce, tender pork, and home made pasta - really can't go wrong.
The recipe will probably feed 6 at once, but in our case, we ended up with three meals.
Smokey Pork Pappardelle
c/o Food & Wine Magazine, July 2008
http://www.foodandwine.com/recipes/smoky-pork-pappardelle
For the luscious meat sauce here, Gerard Craft braises pork with apples and honey, which adds some unexpected sweetness. Another surprise: He finishes the pasta with a sprinkling of smoked salt.
One 2-pound piece of boneless pork shoulder
Smoked sea salt
2 tablespoons canola oil
1 Granny Smith apple, cut into 1-inch dice
1 medium onion, cut into 1-inch dice
1 carrot, cut into 1-inch dice
1 celery rib, cut into 1-inch dice
2 garlic cloves, crushed
3 thyme sprigs
1/2 cup tomato paste
1 cup dry white wine
2 cups chicken stock or low-sodium broth
1/3 cup Champagne vinegar
3 tablespoons honey
3 tablespoons mascarpone cheese
Freshly ground pepper
1 pound pappardelle
1 tablespoon chopped flat-leaf parsley
Extra-virgin olive oil, for drizzling
Preheat the oven to 300°F. Season the pork with 1 1/2 tablespoons of smoked salt. In a medium, enameled cast-iron casserole, heat the canola oil until shimmering. Add the pork and cook over moderately high heat, turning, until browned on all sides, 15 minutes. Transfer the pork to a plate.
Add the apple, onion, carrot, celery, garlic and thyme to the casserole and cook over moderate heat until beginning to brown, about 6 minutes. Add the tomato paste and cook, stirring, until it deepens in color, about 2 minutes. Add the wine and bring to a boil. Add the chicken stock, vinegar and honey and bring to a simmer. Add the pork, cover and transfer the casserole to the oven. Braise the pork for about 3 hours, turning once halfway through, until very tender.
Transfer the pork to a plate. Strain the sauce into a large bowl, gently pressing on the solids. Pour the sauce back into the pot. Using 2 forks, shred the pork; discard any large pieces of fat. Transfer the shredded pork to the sauce and stir in the mascarpone. Season the sauce with smoked salt and pepper. Cover and keep warm.
Meanwhile, in a large pot of boiling salted water, cook the pappardelle until al dente. Drain the pasta and transfer to the casserole with the sauce. Toss the pasta with the sauce and the parsley over moderate heat until well coated, about 1 minute. Transfer the pasta to warm bowls. Drizzle with olive oil, sprinkle with smoked salt and serve.
Make ahead: The sauce can be refrigerated for up to 3 days.
Wine: Craft’s smoky-sweet pappardelle will pair well with a red that has enough rich fruit not to be overwhelmed by the dish’s luxurious flavors. Southern Italy seems to specialize in reds of that nature, especially the flat, warm vineyards of Puglia and its primary grape variety, Negroamaro. Try the peppery 2005 Li Veli Pezzo Morgana Salice Salentino or the figgy 2006 La Corte Salice Salentino.
Friday, August 15, 2008
Bacon, Double A and T Sandwiches
 I have lost my vim. Have you seen it? I am sure I've left it in a good place...
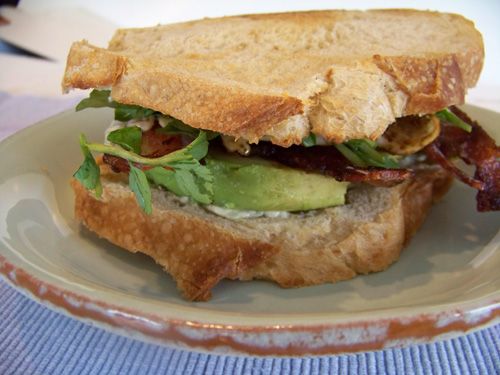
I could say it was the weekend I pulled together my last Daring Baker's challenge - when I did the challenge, tried making homemade chicken stock for the first time, whatever we were eating that weekend AND preparing to have friends over for dinner the next night. I could easily blame that weekend (and I mostly do), because I haven't been in the mood to cook since (but believe me, I've tried anyway, and nothing has tasted right). As I was telling Dave, I need to get a wife to make ME dinner for a while, and then I'll be right as rain. But then I went and sprained my foot. And because of that, couldn't go to the gym, which has left me lethargic. Luckily, I have had two very nice days in a row at the gym, so things are on the up-and up!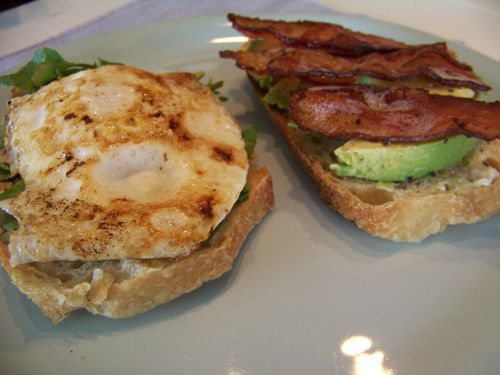 While I made these sandwiches for dinner in early July, and these photos are of the sandwiches I re-made the next morning for breakfast, I think they would be perfect to break me out of my funk. Seeing as how avocados, arugula and bacon are three of my favorite foods, I don't see why not. Added the second go round is a nice over-easy egg... I know, sneaky of me - but it was breakfast after all!! The mayo was a really nice touch - something I wouldn't have thought of on my own, but was glad to have. You'll end up with plenty for more than the two sandwiches it's supposed to dress, but that's ok, cause you can just make more sandwiches!
I cannot say enough good things about this cookbook. It has become my new go-to book for dinner, and I have made almost a dozen things (if not more) and have yet to be disappointed. The recipes are creative and easy to prepare - and are just plain delicious. Prepare yourselves to see many more of Jeanne Kelley's creations - I have a stockpile!
Enjoy your weekend!!
Bacon, Double A and T Sandwiches
c/o Blue Eggs and Yellow Tomatoes, by Jeanne Kelley
http://www.amazon.com/Blue-Eggs-Yellow-Tomatoes-Recipes/dp/0762431830/ref=pd_bbs_sr_1?ie=UTF8&s=books&qid=1215393679&sr=1-1
Adding the double-A – arugula and avocado – to the traditional BLT makes the perfect sandwich! Any leftover mayonnaise can be saved for later use on other sandwiches.
Yield: 2 sandwiches
Mayonnaise:
½ cup mayonnaise, preferably organic
2 tablespoons Dijon mustard
1 green onion, minced
1 garlic cloves, minced
Sandwiches:
6 slices (about 6 ounces) applewood-smoked bacon
4 slices country-style white or sourdough bread
1 avocado, sliced
1 large tomato, sliced
Salt and pepper
1 cup arugula leaves, lightly packed
To make the mayonnaise: Combine the mayonnaise ingredients in a small bowl. (Can be made several days ahead. Cover and refrigerate.)
To assemble the sandwiches: Cook the bacon to desired crispiness in a heavy, large skillet. Drain well.
Lightly toast the bread. Spread two pieces of toast with a thin layer of the mayonnaise. Top with avocado and tomato slices, dividing them evenly. Sprinkle the tomatoes with salt and pepper to taste. Arrange 3 slices of bacon atop the tomatoes. Divide the arugula between the sandwiches. Spread the remaining slices of toast with the mayonnaise and place atop the sandwiches. Press the sandwiches gently to compress. Cut each sandwich in half and serve.


