
 Today was my first day at the new job, so we had leftovers! Yay leftovers!
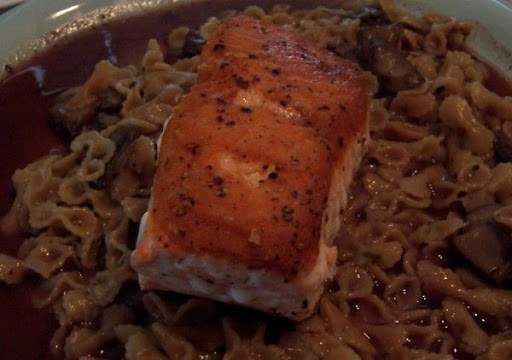
Let me tell you about our tasty dinner last night, and by default, our yummy leftovers! We'd watched this particular episode (Newport, Rhode Island) of Giada's Weekend Getaway on the Food Network last week, and made a note to print out this recipe. While I don't remember much else from the episode other than the wee little cars, I do remember this crispy salmon! :)
The red wine sauce nicely compliments the meaty fish, and the pasta came out nice and creamy (which is odd, considering the small amount of actual cream - I blame the butter!). You'll notice that the pasta we had isn't orzo, but mini-bowtie. For some reason, my Wegmans doesn't carry orzo (weird, right?), so I looked for another small-ish pasta. Mini-bowtie might not have been ideal, but they are wicked cute. And the little bows held the sauce quite nicely!
Worth noting: This makes a TON of pasta. Either make it for company or be prepared for leftovers. Also, this also creates a TON of dirty saucepans. If you have a designated dishwashing-husband, like me, this might not be so bad.
Crispy Salmon with Mushroom Orzo and Red Wine Sauce
From Asterisk Restaurant, in Newport, R.I.
C/o Giada’s Weekend Getaway on Food Network
http://www.foodnetwork.com/food/recipes/recipe/0,1977,FOOD_9936_36483,00.html
7 tablespoons olive oil, divided
1 large onion, sliced
2 cups dry red wine
2 cups canned beef broth
8 fresh thyme sprigs
2 bay leaves
1 pound orzo
6 shallots, minced
1 pound mushrooms, sliced
5 cups canned low-sodium chicken broth
1/2 cup whipping cream
2 tablespoons chopped fresh tarragon leaves
Salt and freshly ground black pepper
6 (5-ounce) skinless boneless salmon fillets
1/4 cup unsalted butter, cut into pieces
In a large saucepan, heat 2 tablespoons of olive oil over medium heat. Add onions and saute for 5 minutes. Add wine, beef broth, thyme and 1bay leaf. Boil until liquid is reduced by 1 cup, about 35 minutes. Strain sauce into a small saucepan.
Preheat oven to 350 degrees F. Place orzo on a rimmed baking sheet. Bake until golden brown, for about 20 minutes.
Heat 2 tablespoons of oil in another heavy large saucepan over medium-high heat. Add shallots. Saute for 4 minutes. Add mushrooms. Saute until golden, about 10 minutes. Add orzo, chicken broth, and 1 bay leaf. Bring to a boil. Reduce heat to medium-low. Cook uncovered until orzo is tender and broth is absorbed, while stirring often, about 20 minutes. Add cream and tarragon. Simmer for 5 minutes, stirring occasionally. Season with salt and pepper.
Heat 3 tablespoons oil in a heavy large nonstick skillet over medium-high heat. Sprinkle salmon with salt and pepper. Add to skillet and saute just until cooked through, about 3 minutes per side.
Bring sauce to simmer. Add butter, whisk just until melted. Season with pepper. Spoon orzo onto 6 plates. Place salmon fillets on top of orzo. Serve with sauce.
Monday, July 30, 2007
Crispy Salmon with Mushroom Orzo and Red Wine Sauce
Sunday, July 29, 2007
Blogging By Mail
 I want to be Anne when I grow up! Not only did she delightfully feed my sweet tooth, but she's got cards and tags, stickers, and littler cards all with her logo on them! I need a logo so I can make all these wonderful things, too!
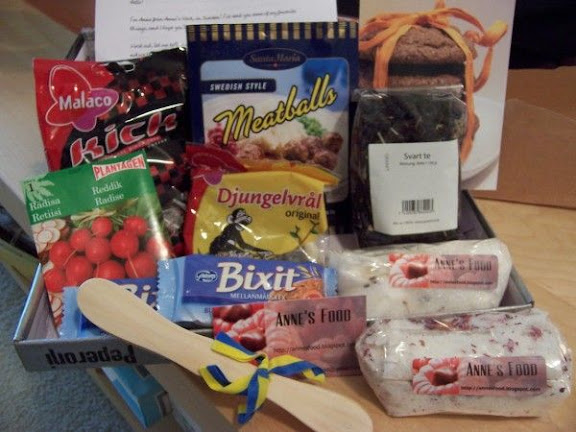
First things first! The lovely Stephanie over at Dispensing Happiness coordinated this exciting event: Blogging by Mail: A Few of My Favorite Things. I couldn't wait until this event started, because the idea of 60 packages of joy zipping around the Earth really charmed me.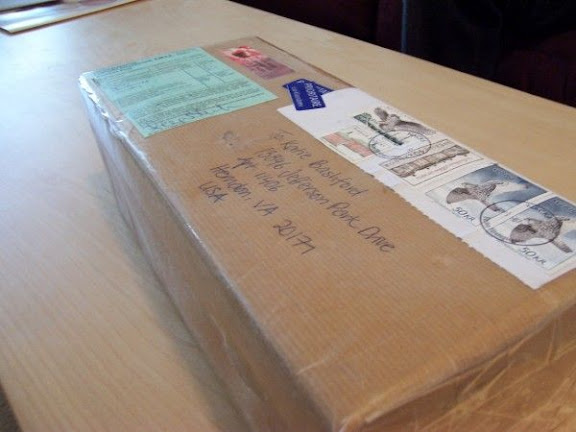 My package arrived and I couldn't wait to tear into it! I'd never gotten a package from Sweden before! I had to stop myself to take a picture before I ripped the paper off... I think I hid the cut for the photo above. ;)
Anne included a friendly note explaining all of her tasty treats! First up is Brio - which sadly, was NOT in the main photo above, because I think I'd gotten into them before I arranged everything, and I didn't get them back in time... but trust me, they're yummy, chewy little caramels. (and I LOVE caramels!)
Also in the box were two types of licorice candies: Kick and one that translates into "Jungle Howl." The kicks were a mellower version of black licorice, and the howling ones took licorice to a whole new level. She warned me that the Jungle Howl were an acquired taste, and I would have to agree. :) They reminded me of what black licorice would taste like if it had soaked in the ocean for a while... I don't know if its accurate, though. :)
Next up are some lovely cookies and tea! Anne included two lovely little packages of Bixits. The cookies are oat-y and have little dried blueberry bits mixed in. I have had one package already and loved it so much, I'm saving the second on for just the right time. I might just have to break them out when I try the honey and lime black tea she sent along, as she suggested it, and I want to be able to try everything as its meant to be eaten!
I cannot wait to try the two home-made sugars Anne included in this shipment: Rose-cardamom and Lavender-vanilla!!!! Anne's sister even picked the rose petals herself! I love it!
Now, if you've been paying attention this summer, you know we've been trying to grow things on our porch. And when I say "things" I mean lots of peppers. Well! The peppers had better get used to some company, because Anne included a package of radish seeds! She has been growing them herself and really enjoys it - and now I can try to, as well! Dave and I had our first roasted radishes a few weeks ago, so this is a perfect way to encourage more radish recipes!
Speaking of recipes, the next to last item in the package is a terrific Swedish meatball mix and recipe!! I have never made them, but I practically hover over them when I find them in public, so this is another awesome, perfect inclusion!
Lastly are the two, beautiful Swedish butterknives that Anne picked up on vacation in Dalarna. I couldn't be more excited about these knives - they have a great smoothness and gentle curves... (I have a thing for wooden spoons, too).
Thank you, Anne, so much, for this charming delivery! I appreciate the thought you put into it, and I couldn't be happier (even with those jungle howl chews!)
And thanks again to Stephanie, for coordinating this fun event. Without gushing too much, I think Blogging by Mail is an excellent way for us to get a window into each other's lives and I can't wait until the next round!
Variation of a Favorite
 Don't worry, I'm not in a ditch. :)
I've had a pretty distracting, tiring week. I wrapped up my old job and I start my new one tomorrow, and because they're letting me keep my anniversary week off at the end of August, I didn't take any time off between positions... so last week was full of errands... and at the end of the day, I didn't have the energy to sit in front of the computer. My apologies!
But enough of that!
My darling husband is something of a genius lately. Suggesting recipes or tweaks, and while he doesn't do any of the actual cooking, I've decided that he's onto something most of the time, so I go with it.
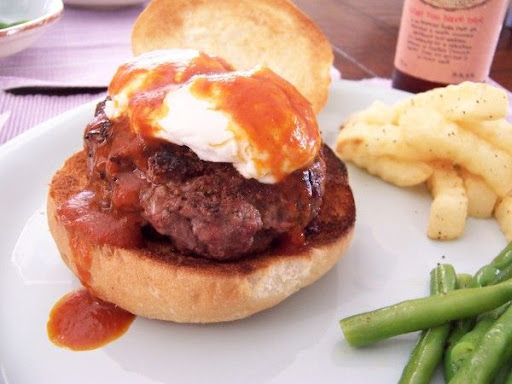
This is one of those occasions. We are big fans of Bobby Flay's black pepper crusted steak with goat cheese and chile sauce. The batch of sauce makes about five dinners worth, so we have little baggies of it in the freezer. And because we're on this Eat the Freezer kick, Dave wondered aloud to me if the goat cheese/sauce combo would work well on a burger... because we had a couple packages of ground beef... I thought it sounded worth trying!
I didn't do too much to the meat, just mixed in some Worcestershire sauce, made patties, then crusted it with the same black pepper/salt/cumin mix that the steak recipe calls for. I seared them on the stove and then finished them in the oven.
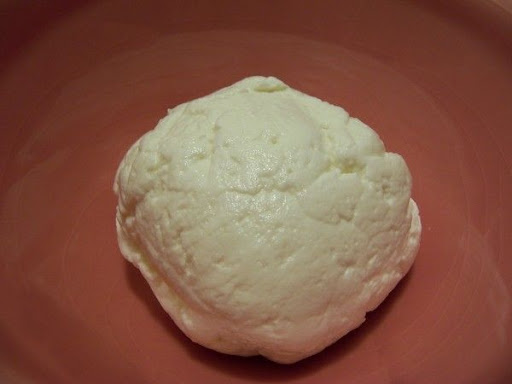
A few minutes before they were done, I spooned a little home made goat cheese (I got the kit from New England Cheese Making Supply Company) (which was really easy to make, btw) on top of each burger.
 Burgers with cheese went back into the oven until the cheese got smooshy. Meanwhile, I toasted the buns in the broiler (and didn't burn any this time). To finish, we spooned some of the chile sauce (heated) onto the burger and bun. I served with some green beans (we'd gotten a ton from our CSA) and some oven fries.
Last thoughts: I married a wonderful man. This dinner was a lovely variation of a meal we adore, and its almost even nicer, because we didn't have to spend the money on actual steaks! I highly recommend making this chile sauce, because I'm sure we're going to try to find more ways to eat it.
See the recipe...Tuesday, July 24, 2007
Roast Pork Loin with Shiitake and Leek Compote
 Ok, so.
We've had this frozen pork loin in our freezer forever. Probably more than a year, to be honest. The only way I'd ever made pork loins before was really complicated, and I cringed at having to make it that way again, so I tried to pretend the loin wasn't in there. And for a long time, I succeeded.
Until my husband got it in his head that we had to eat everything in the freezer. And that "everything" includes the pork loin. Dread. I did not want to make that herb covered, prosciutto-wrapped monster. Yes, it was delicious, but more effort than I was interested in.
Queue the husband again. I sent him to the interweb to find a nice looking recipe with good feedbacks. And if my darling is good at anything, he's good at the internet search (he's really good at a lot of things, I promise.) This lovely recipe from Gourmet magazine was the result. Quick, delicious, and so so easy to prepare.
I will admit my scepticism, though. Why? The mushrooms smelled. Bad. Stinky bad. I tried to put it out of my head, knowing that they wouldn't smell like that later, and that it was just my aversion to earthiness.
One more interesting tidbit about The Hubs. He was home yesterday, watching tv, and he saw an episode of Tyler Florence doing something with leeks. And he learned that leeks are really dirty. So he's telling me how I need to do this-this-and-that with the leeks because Tyler said blah blah blah about them. O boy. :)
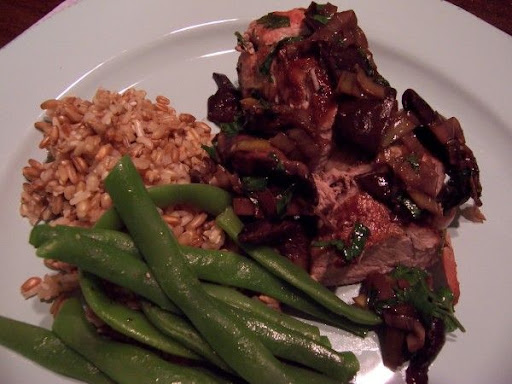
My package of loin ended up being two thinner loins, so I prepped and browned them the same way I would have had they been one bigger one. The leeks and mushrooms browned and I added the stock and wine and popped the loins back in and then into the oven it all went. Because the loins were smaller, they only took about 30 minutes to get to the right temperature, which was nice, because we were starving! :) I think the wine/leek/mushroom combo was lovely, and I think next time, I'm going to make double the "compote," because I think we're going to have to fight over the tiny bit of leftovers.
I served this tasty dinner with some Kashi pilaf and some CSA beans (which were bigger and fuzzier (in a way I'm not sure I like) than green beans). My brilliant friend Marcie recommended the pilaf, and it was whole-grained and delicious. (If a little extra chewy, but that was my fault.)
Gourmet Magazine, January 1995
http://www.epicurious.com/recipes/recipe_views/views/10016
1 large leek (white and pale green parts only)
a 1-pound center-cut boneless pork loin
1 tablespoon plus 1 teaspoon chopped fresh parsley leaves
1 teaspoon unsalted butter or olive oil
1/2 pound fresh shiitake mushrooms, stems discarded and caps cut into 1/2-inch slices
1/2 teaspoon salt
1/2 cup dry red wine
1/2 cup beef broth
Garnish: fresh parsley sprigs
Cut leek crosswise into 1/2-inch slices and in a bowl soak in water to cover, agitating occasionally to dislodge any sand, 5 minutes. Lift leek out of water and drain in a colander.
Trim any fat from pork. Season pork with salt and pepper and pat with 1 tablespoon chopped parsley. In a 10-inch oven-proof non-stick or cast-iron skillet heat butter or oil over moderately high heat until hot but not smoking and brown pork loin, turning it. Transfer pork to a plate.
Preheat oven to 425°F.
In fat remaining in skillet cook mushrooms and leek with salt over moderately high heat, stirring occasionally, until liquid mushrooms give off is evaporated, about 5 minutes. Add wine and broth and bring to a boil. Put pork on vegetables in skillet and roast in middle of oven 40 minutes, or until a thermometer inserted in center of pork registers 160°F.
Transfer pork to a cutting board and let stand 10 minutes. If vegetable compote is too liquid, cook over high heat, stirring occasionally, until almost all liquid is evaporated. Stir remaining teaspoon chopped parsley into compote.
Slice pork thin and serve, garnished with parsley, with compote. Each serving: 216 calories, 8 grams fat (33% calories from fat).
Serves 4.
Monday, July 23, 2007
Pan-Fried Chicken with Oregano-Buttered Beans
 It kills me that I made this at the beginning of July and am only posting about it now. Kills me!!
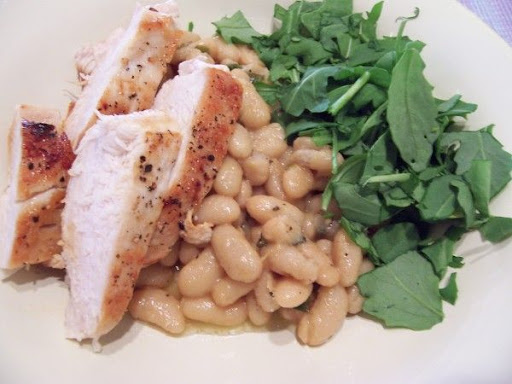
This is such a simple meal to prepare, and the ingredients work something like magic. Seriously. Magic. The chicken roasted happily in the oven, the beans heated on the stove and turned into a creamy, lemony, oregano happiness. I have a thing for arugula, too, and its pepperiness lent beautifully to the chicken and beans. So simple, I don't even know how to better describe it all... creamy, friendly, bright, peppery.... does that do it?
This has been our dinner only the one time, but I know that its something that's going to make it into my Recipe File for Life. Seriously.
Pan-Fried Chicken with Oregano-Buttered Beans
Donna Hay Magazine, Issue 32
4 chicken breasts (7 oz. each)
olive oil for brushing
sea slat and cracked black pepper
3 ½ oz. unsalted butter
2 tablespoons lemon juice
½ cup oregano leaves
14 oz. can cannelloni beans, drained and rinsed
1 bunch (3 ½ oz) arugula leaves, trimmed
Brush the chicken with oil and sprinkle with salt and pepper. Heat a large non-stick frying pan over medium heat. Add the chicken and cook for 3-4 minutes each side or until cooked through. Remove from the pan and set aside.
Add the butter, lemon juice oregano and beans to the pan and cook for a further 2 minutes or until the beans are warm and the butter is golden brown. Slice the chicken and arrange with the oregano-buttered beans and rocket to serve.
Serves 4.
Roasted Fennel with Parmesan
 This a little something I made a couple of weeks ago. We'd gotten one fennel bulb in our CSA that week, and I wanted to do something super-fennelly with it, not just mix it into something else. Why? Well... I'm less experienced with fennel, so I wanted to get a feel for the flavor and texture on its own, so I'd have a better idea of what it was adding to recipes.
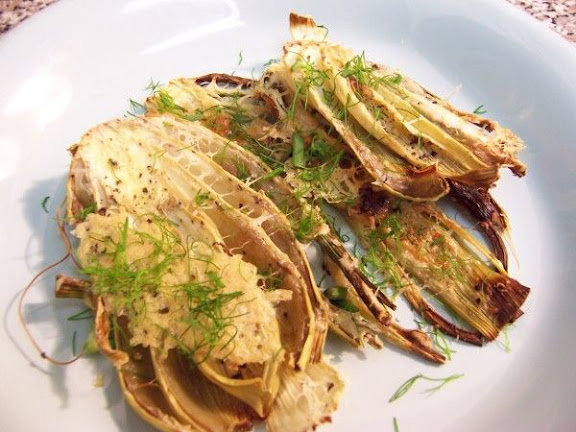
That said, this recipe calls for 4 fennel bulbs and I had just the one. No matter! I sliced the bulb thinly, into about 4 pieces. I'd made something else as the main (and I can't remember for the life of me what that was), so this was just for kicks.
I didn't expect to enjoy it as much as I did, because if you know fennel, you know how sharp the flavor is. And with only parm and black pepper on it, it was indeed super-fennelly. Dave didn't care for them, so I got to have his slices, too.
If you love fennel, this makes a really interesting side (or snack, even). I don't know if I'll do this again, but it definitely served its educational purposes.
Roasted Fennel with Parmesan
From Giada’s Family Dinners, by Giada De Laurentiis
c/o Food Network
http://www.foodnetwork.com/food/recipes/recipe/0,,FOOD_9936_30476,00.html?rsrc=search
4 tablespoons olive oil
4 fennel bulbs, cut horizontally into 1/3-inch thick slices, fronds reserved
Salt and freshly ground black pepper
1/3 cup freshly shredded Parmesan
Preheat the oven to 375 degrees F.
Lightly oil the bottom of a 13 by 9 by 2-inch glass baking dish. Arrange the fennel in the dish. Sprinkle with salt and pepper, then with the Parmesan. Drizzle with the oil. Bake until the fennel is fork-tender and the top is golden brown, about 45 minutes. Chop enough fennel fronds to equal 2 teaspoons, then sprinkle over the roasted fennel and serve.
Friday, July 20, 2007
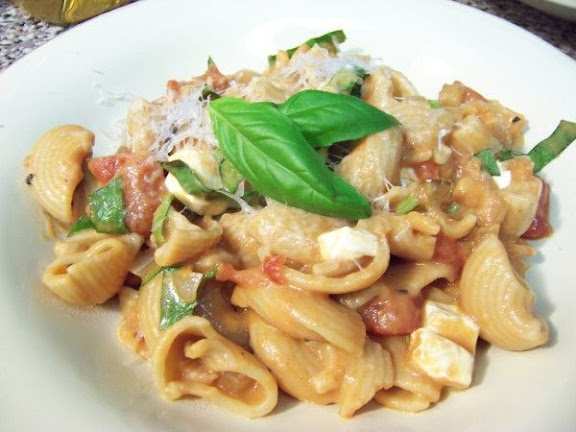
Rigatoni with Sweet Tomatoes, Eggplant and Mozzarella
 I hope I get this into Ruth in time! I'll type like the wind!
For this week's Presto Pasta Night, I went to the lovely Jamie Oliver. (To be honest, I think I went though every cookbook I had, looking for interesting eggplant recipes - Jamie won.) This recipe can be found in his Family Dinners book, which I love. This particular cookbook is really useful for sneaking extra vegetables into meals, and I like the stealth factor. With our CSA this summer, its been a great resource for using up all these extra veggies!!
This pasta meal reheated nicely, made a great lunch. I highly recommend it, and I'll absolutely make this again if we get more eggplant in our CSA.
Rigatoni with Sweet Tomatoes, Eggplant and Mozzarella
From Jamie’s Dinners: The Essential Family Cookbook
http://www.amazon.com/Jamies-Dinners-Essential-Family-Cookbook/dp/1401301940/ref=pd_bbs_2/103-9319028-2617441?ie=UTF8&s=books&qid=1183997400&sr=1-2
1 firm ripe pink, black or white eggplant
extra virgin olive oil
2 cloves garlic, peeled and sliced
1 onion, peeled and finely chopped
2 14 oz. cans of good-quality plum tomatoes
1 tablespoon balsamic vinegar
sea salt and freshly ground black pepper
optional: 1-2 fresh or dried chillies, chopped or crumbled
a bunch or fresh basil, leaves ripped and stalks sliced
4 tablespoons heavy cream
1 lb rigatoni or penne
7 oz cow’s milk mozzarella
1 piece of Parmesan cheese, for grating
Remove both ends of the eggplant and slice it into ½ inch slices, then slice these across and finely dice into ½ inch cubes. Some people prefer to season their eggplant with salt and let it sit for a while in a colander to draw out the bitterness, but I don’t really do this unless I’m dealing with a seedy, bitter eggplant. This dish is really best made using a firm silky one.
Now put a large saucepan on the heat and drizzle in 4 to 5 tablespoons of extra virgin olive oil. When it’s hot, add the cubes of eggplant, and as soon as they hit the pan, stir them around with a spoon so they are delicately coated with the oil and not soaked on one side only. Cook for about 7 or 8 minutes on a medium heat. Then add the garlic and onion. When they have a little color, add the canned tomatoes and the balsamic vinegar. Stir around and season carefully with salt and pepper. At this point, if you wanted to give the dish a little heat you could add some chopped fresh or crumbled dried chilli, but that’s up to you. Add the basil stalks, and simmer the sauce nice and gently for around 15 minutes, then add the cream.
While the sauce is simmering, bring a large pan of salted water to the boil and add the pasta. Cook according to the package instructions until it is soft but still holding its shape, then drain it, saving a little of the cooking water. I like to put the pasta back into the pot it was cooked in with a tiny bit of the cooking water and a drizzle of olive oil and move it around so it becomes almost dressed with the water and oil.
At this point add the lovely tomato sauce to the pasta. By now the eggplant will have cooked into a creamy tomatoey pulp, which is just yum yum yum! (Jamie’s words) Season carefully to taste with salt and pepper. When all my guests are sitting around the table, I take the pan to the table, tear up the mozzarella and the fresh basil, and fold these in nicely for 30 seconds. Then very quickly serve into bowls. By the time your guests start to eat, the mozzarella will have started to melt and will be stringy and gorgeous and really milky-tasting. Just lovely with the tomatoes and eggplant. Serve at the table with a block of Parmesan cheese and a grater so that everyone can help themselves.
Wednesday, July 18, 2007
Barbacoa de Borrego (Lamb Shoulder Slow Roasted...)
 When am I going to learn? When am I going to realize that its probably not a good idea to have the oven on for 4 hours, slowly braising meat (spicy meat, at that) when its 95 degrees outside? I was so hot and sweaty, I wasn't sure I'd be able to enjoy dinner!!
But I was wrong! It was hot and spicy and dreamy! We're spicy food lovers, my husband especially. If you are, too, you'll enjoy this dish. Its hot in a way that makes your forehead sweat, but doesn't cause an uncomfortable burn in your mouth. Its hot, sure, but not a heat you'll regret. I promise. But don't hold it against me.
I will say that I had a couple of changes. First, I only had 4 ancho chiles (instead of 6) and I didn't have any mezcal (or tequila, for substitution), and I don't think I had the mezcal the first time I made this dinner, either. If you have it, use it, but it won't suffer if you don't.
We had this with flour tortillas (corn would be good, too) and the same poblano rice from our Easter dinner. Two nights later, we had the leftovers, and I think they were almost better than the firstovers. ;) We even had extra that I put into the freezer.
Something I'm proud of: all the produce (and even the lamb cubes), save for the banana leaves, came from either my CSA or the local Farmer's Market. Local food has been something of a recent quest for us, and this dinner made good use of that. The local produce is fresher, spicier, and less expensive than the grocery store, and I for one am not looking forward to winter - even if the oven being on for 4 hours makes sense! :)
Barbacoa de Borrego
Lamb Shoulder Slow Roasted in Banana Leaves with Ancho-Guajillo Chile Sauce
From Dona Tomas: Discovering Authentic Mexican Cooking, by Thomas Schnetz and Dona Savitsky
for the Ancho-Guajillo Chile Sauce:
6 dried ancho chiles
6 dried guajillo chiles
5 tablespoons canola oil
2 white onions, coarsely chopped
5 cloves garlic
1 tablespoon dried oregano
1 quart water
Kosher salt
3 lbs lamb shoulder, cut into 3-inch pieces
Kosher salt
Freshly ground black pepper
¼ cup canola oil
2 to 3 large banana leaves
1 white onion, coarsely chopped
1 carrot, coarsely chopped
¼ cup mezcal
7 whole cloves
7 whole allspice berries
3 to 4 cups chicken broth
To make the sauce, place a dry skillet over medium heat. Add the ancho and guajillo chiles and toast for 2 to 3 minutes, pressing them into the pan and turning occasionally with tongs to prevent burning, until the skins begin to brown and the chiles become soft and flexible and give off their spicy aroma. While the chiles are still hot, remove the stems and seeds and submerge in a bowl of hot water for about 30 minutes to rehydrate.
Place a sauté pan over high heat and add 3 tablespoons of the oil. Add the onions and sauté, stirring occasionally, for 3 to 4 minutes, until softened. Decrease the heat as necessary to prevent browning. Transfer the onions to a blender. Heat the remaining 2 tablespoons oil in the pan over low heat and add the garlic. Slowly roast for 7 to 10 minutes, until lightly browned. Transfer the garlic without the oil to the blender with the onion.
Drain the chiles and add to the blender with the oregano, water, and salt to taste. Puree on high speed until smooth and incorporated. Adjust the seasoning with salt as necessary. Use immediately or cover and refrigerate for up to 1 week; be sure to whisk well before using.
Season the lamb well with salt and pepper. Heat a 12-inch braising pan over high heat and add the oil. Place the meat in the braising pan in an even layer and sear for 3 to 5 minutes, until caramelized on the bottom. Decrease the heat to medium-high and turn the meat over. Cook the second side for 7 to 10 minutes, until browned. Remove the meat from the pan and wipe out any residual oil. Allow the pan to cool for 5 minutes.
Preheat the oven to 300°F. Line the braising pan as thoroughly as possible with a large banana leave (you may need to cut or tear the leaf to make it conform to the pan). Cover the leave with the onion and carrot and evenly layer the meat over the vegetables. Sprinkle the meat with the mezcal, cloves, and allspice. Add about 1 quart of the sauce so that the lamb is half submerged. Top with 3 or more cups of the chicken broth, so the lamb is fully submerged. Cover the whole assembly with another layer of banana leaf, then cover the pan with a lid or aluminum foil. Roast for 3 to 4 hours, until the meat is tender, piercing with a metal skewer or small knife to check for doneness.
Transfer the entire braising pan to the stove top. Remove the upper layer of banana leaf and discard. With tongs, gently remove the pieces of lamb and set aside on a serving platter. Remove the bottom and side pieces of banana leaf and discard.
Heat the braising liquid over high heat. Skim off the layer of floating fat and cook for 20 to 30 minutes, until reduced by about one-third and the sauce begins to thicken. When the proper consistency is achieved, taste and adjust the seasoning with salt and pepper as necessary. Generously spoon the sauce over the meat before serving.
Tuesday, July 17, 2007
Grilled Chicken & Polenta with Nectarine-Blackberry Salsa
 If you're a regular reader of this blog, you'll have noticed my adoration of polenta. I don't think I'd ever really experienced it before this past April, but I've tried to fit it in as much as possible since. When I'm on my own for dinner, I used to have a bowl of cereal... now I whip up some polenta instead. Almost just as easy, but so yummy!! (I'll still indulge in a bowl of Peanut Butter Puffins, don't worry!)
This is the first time I'd cooked with pre-made polenta. I love that the whole tube only had 140 calories!!! The recipe called for plain polenta, but my Wegmans didn't carry plain (weird!), so I used sun-dried tomato.
We rent and thusly don't own a grill, but my square grill pan stood in nicely. I couldn't fit everything onto the pan, as the recipe instructs, so I started with the nectarines and chicken. I figured that the chicken needed to rest a bit before slicing, and the polenta didn't need to long in the pan. Worked out well.
I smooshed the blackberries down, as Dave doesn't care for their texture whole, which made the whole salsa purple - which I found pretty. :)
Now, I was a little worried, as the inclusion of fruit actually IN our dinner is a new concept for us, but each ingredient did their job beautifully. The crusty goodness of the outside of the polenta married nicely with its creamy interior. The juicy fruit made friends with both polenta and chicken. And all together in one bite was heaven.
This recipe comes from Eating Well magazine (link below), which I find to be a really fantastic resource for seasonal, healthy recipes. If you haven't checked it out already, grab it the next time you're at the bookstore. You won't be disappointed. :)
Grilled Chicken & Polenta with Nectarine-Blackberry Salsa
Eating Well Magazine, August 2007
http://www.eatingwell.com/recipes/chicken_salsa_polenta.html
1 tablespoon plus 1 teaspoon canola oil, divided
1 tablespoon ground cumin
1 teaspoon kosher salt, divided
3/4 teaspoon freshly ground pepper
1 16- to 18-ounce tube prepared plain polenta
1 pound boneless, skinless chicken breast, trimmed
2 nectarines, halved and pitted
1 pint blackberries, coarsely chopped
2 tablespoons chopped fresh cilantro
1 tablespoon lime juice
Hot sauce to taste
Preheat grill to medium-high.
Combine 1 tablespoon oil, cumin, 3/4 teaspoon salt and pepper in a small bowl. Rub 1 teaspoon of the mixture all over polenta. Rub the rest into both sides of chicken. Cut the polenta crosswise into 8 slices. Rub the cut sides of nectarine halves with the remaining 1 teaspoon oil.
Oil the grill rack. Place the chicken, polenta slices and nectarines on the grill. Grill the polenta until hot and slightly charred, 3 to 4 minutes per side. Transfer to a clean plate; tent with foil to keep warm. Grill the nectarines, turning occasionally, until tender, 6 to 8 minutes total. Grill the chicken, until cooked through and no longer pink in the middle, 6 to 8 minutes per side. Transfer the chicken and nectarines to a cutting board. Coarsely chop the nectarines. Let the chicken rest for 5 minutes, then thinly slice.
While the chicken rests, combine the chopped nectarines, blackberries, cilantro, lime juice, hot sauce and the remaining 1/4 teaspoon salt in a medium bowl. Layer the polenta, chicken and fruit salsa on 4 plates and serve.
Makes 4 servings.
Per serving: 317 calories; 8 g fat (1 g sat, 4 g mono); 63 mg cholesterol; 34 g carbohydrate; 27 g protein; 6 g fiber; 694 mg sodium; 458 mg potassium.
Monday, July 16, 2007
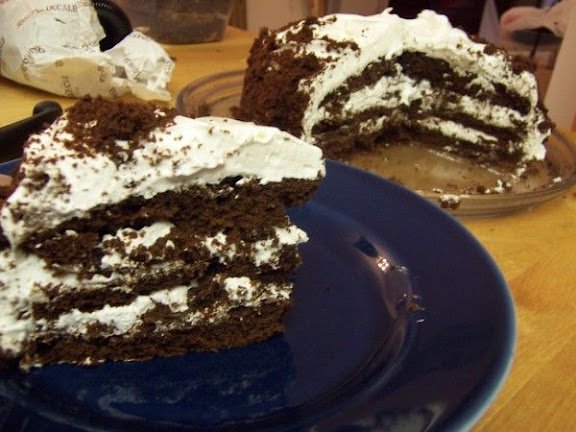
Devil’s Food White-out Cake
 Checking through my old posts, I realized I never posted about my mom's birthday cake! And her birthday was May 28th! My apologies, Mom! :)
I'm sure you can guess who the cake belongs to - the always fabulous Dorie Greenspan! I watched this cake make its rounds on other blogs and when my book arrived in the mail, this beautiful cake was on the cover. With my mom's bday coming up, and her only request that the cake be chocolate, I knew I had to try it out for myself.
Cake aside, I really enjoy how Dorie's recipes read. You can imagine here there with you, in your kitchen, giving you pointers... telling you not to worry at what your batter looks like, that its SUPPOSED to look like that! Its been a while since I've baked anything, I can promise you that my next date with my oven, I'll bring Dorie along with me as a chaperone.
The cake came together without a hitch. Thank goodness she tells you what the batter looks like, or else I would have totally flipped out. And not in a good way. I gotta say, when the frosting came together (I've never made marshmallow anything before) and I tasted it, I actually let out a little "whup!" of joy, and I ran a spoonful into my husband so he could whup too. It was perfectly creamy and marshmallowey and perfect. Yay!
One thing I would like to try with the marshmallow - one of our new fav. restaurants has a dessert I love... Its a super-fudgy brownie topped with a layer of marshmallow, and they broil it just to melt the fluff and goo it up.... I need to be able to make this delish dessert at home...
Anyway, make this cake. Its fantastic and you'll love it. Give into the peer pressure!
Devil’s Food White-out Cake
From: Baking: From My Home to Yours, by Dorie Greenspan
http://www.amazon.com/Baking-Home-Yours-Dorie-Greenspan/dp/0618443363/ref=pd_bbs_sr_1/002-6815521-7348005?ie=UTF8&s=books&qid=1180888595&sr=8-1
For the cake:
1 1/3 cups all-purpose flour
½ cup unsweetened cocoa powder
¾ teaspoon baking soda
½ teaspoon baking powder
¼ teaspoon salt
1 ¼ sticks (10 tablespoons) unsalted butter, at room temperature
½ cup (packed) light brown sugar
½ cup sugar
3 large eggs, at room temperature
1 teaspoon pure vanilla extract
2 ounces bittersweet chocolate, melted and cooled
½ cup buttermilk or whole milk, at room temperature
½ cup boiling water
4 ounces semisweet or milk chocolate, finely chopped, or 2/3 cup store-bought mini chocolate chips
For the filling and frosting:
½ cup egg whites (about 4 large)
1 cup sugar
¾ teaspoon cream of tartar
1 cup water
1 tablespoon pure vanilla extract
Getting ready: Center a rack in the oven and preheat the oven to 350 degrees F. Butter two 8-x-2-inch round cake pans, dust the insides with flour, tap out the excess and line the bottoms with wax or parchment paper. Put the pans on a baking sheet.
To make the cake: Sift together the flour, cocoa, baking soda, baking powder and salt.
Working with a stand mixer, preferably fitted with a paddle attachment, or with a hand mixer in a large bowl, beat the butter on medium speed until soft and creamy. Add the sugars and continue to beat for another 3 minutes. Add the eggs one by one, beating for 1 minutes after each addition. Beat in the vanilla; don’t be concerned if the mixture looks curdled. Reduce the mixer speed to low and mix in the melted chocolate. When it is fully incorporated, add the dry ingredients alternately with the buttermilk, adding the dry ingredients in 3 additions and the milk in 2 (begin and end with the dry ingredients); scrape down the sides of the bowl as needed and mix only until the ingredients disappear into the batter. At this point, the batter will be thick, like frosting. Still working on low speed, mix in the boiling water, which will thin the batter considerably. Switch to a rubber spatula, scrape down the bowl and stir in the chopped chocolate. Divide the batter evenly between the two pans and smooth the tops with the rubber spatula.
Bake for 25 to 30 minutes, rotating the pans at the midway point. When fully bakes, the cakes will be springy to the touch and a thin knife inserted into the centers will come out clean. Don’t worry if the tops have a few small cracks. Transfer the cake pans to a rack and cool for about 5 minutes, then run a knife around the sides of the cakes, unmold them and peel off the paper liners. Invert and cool to room temperature right side up. (The cooled cakes layers can be wrapped airtight and stored at room temperature overnight or frozen for up to 2 months.)
When you are ready to fill and frost the cake, inspect the layers. If the cakes have crowned, use a long serrated knife and a gentle sawing motion to even them. With the same knife, slice each layer horizontally in half. Set 3 layers aside and crumble the fourth layer; set the crumbs aside.
To make the filling and frosting: Put the egg whites in a clean, dry mixer bowl or in another large bowl. Have a candy thermometer at hand.
Put the sugar, cream of tartar and water in a small saucepan and stir to combine. Bring the mixture to a boil over medium-high heat, cover the pan and boil 3 minutes. Uncover and allow the syrup to boil until it reaches 242 degrees F on the candy thermometer. While the syrup is cooking, start beating the egg whites.
When the syrup is about 235 degrees F, begin beating the egg whites on medium speed with the whisk attachment or with a hand mixer. If the whites form firm, shiny peaks before the syrup reaches temperature, reduce the mixer speed to low and keep mixing the whites until the syrup catches up. With the mixer at medium speed, and standing back slightly, carefully pour in the hot syrup, pouring it between the beater(s) and the side of the bowl. Splatters are inevitable – don’t try to scrape them into the whites, just carry on. Add the vanilla extract and keep beating the whites at medium speed until they reach room temperature, about 5 minutes. You should have a smooth, shiny, marshmallowy frosting. Although you could keep it in the fridge in a pinch, it’s really better to use it right now.
To assemble the cake: Put a bottom layer cut side up on a cardboard cake round or on a cake plate protected by strips of wax or parchment paper. Using a long metal icing spatula, cover the layer generously with frosting. Top with a second layer, cut side up, and frost it. Finish with the third layer, cut side down, and frost the sides and top of the cake. Don’t worry about smoothing the frosting – it should be swirly. Now, cover the entire cake with the chocolate cake crumbs, gently pressing the crumbs in to the filling with your fingers.
Refrigerate the cake for about 1 hour before serving. (If its more convenient, you can chill the cake for 8 hours or more; cover it loosely and keep it away from foods with strong odors.)
Wednesday, July 11, 2007
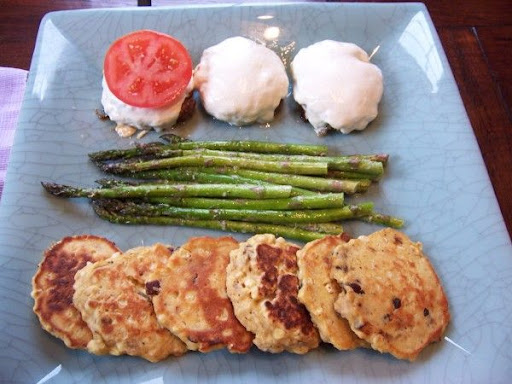
Happy 4th of July!! (a week late!)
 If you know me, you know its been a bit weird around here lately. I had this post ready to go last week, but then I had surgery (small, I'm fine) and everything went to pot (not pot pot, just ya know, how the saying goes). Anyway, better late than never, right?
For the 4th of July, we revisited Michel Richard's lamburgers. Rather than go with frozen organic fries, we had roasted asparagus with parmesan and these lovely corn and mushroom fritters.
I continued my love affair with roasted asparagus. I think I could eat them everyday. Certainly not with my morning cereal or anything, but if you've had them, I'm sure you understand where I'm coming from.
As far as the fritters, I thought they were a lovely way to use some farmers market corn and some fresh mushrooms. I might have thought them a little too... mushroomy... but Dave thought they rocked, so I must have been off that day. They reheated nicely, as we had them again the next night, so I imagine they might be a good dish to bring along to a BBQ party or picnic, reheating without any trouble.
Again, sorry for the lateness. :)
Corn and Shiitake Fritters
Food & Wine Magazine, July 2007
http://www.foodandwine.com/recipes/corn-and-shiitake-fritters
3 ears of corn, shucked
1 large egg
1/4 cup milk
1/2 cup plus 1 tablespoon vegetable oil
3 large shiitake mushrooms (2 ounces), stems discarded and caps cut into 1/2-inch dice
1/4 cup diced sweet onion
3/4 cup all-purpose flour
1 teaspoon baking powder
1 1/2 teaspoons kosher salt
1/2 teaspoon freshly ground pepper
Cut the corn kernels from the cobs and transfer half of them to a blender. Using the dull side of a knife, scrape the pulp from the cobs into the blender. Add the egg and milk; puree until smooth.
In a very large nonstick skillet, heat 1 tablespoon of the oil. Add the shiitake and onion and cook over high heat, stirring occasionally, until lightly browned, about 5 minutes. Add the remaining corn and cook, stirring, for 1 minute. Scrape the mixture onto a plate and freeze just until no longer hot, about 5 minutes.
In a bowl, whisk the flour, baking powder, salt and pepper. Stir in the puree, then fold in the corn kernels, shiitake and onion.
Wipe out the skillet and add the remaining 1/2 cup of oil. When it is hot, add eight level 1/4-cup mounds of batter to the skillet and spread them to a 1/2-inch thickness. Fry over moderately high heat, turning once, until the fritters are golden and crusty, about 4 minutes. Drain on paper towels and serve warm.
AND!!
Roasted Asparagus with Parmesan
Everyday Food Magazine, issue unknown
2 bunches (1 ½ lbs) asparagus
1 tablespoon olive oil
salt and freshly ground black pepper
¼ cup finely grated parmesan cheese
Preheat oven to 450°F. Trim tough ends from the asparagus.
On a rimmed baking sheet, toss asparagus with olive oil, season with coarse salt and ground pepper. Spread in an even layer. Sprinkle with parmesan cheese.
Roast until asparagus is tender and cheese is melted, 10 to 15 minutes. Serve immediately.
Serves 4.
Per serving: 91 calories, 5.4 g fat, 6.2 g carbs, 2.5 g fiber
Tuesday, July 10, 2007
Cucumber Soup with Grilled Shrimp and Basil
 Yowza, its hot. Hot outside and hot inside. Our air conditioning is on the fritz. (again) I've had to be a little fussy at our leasing office, so hopefully it will be completely repaired this afternoon.
In the meantime, I have the perfect dinner to combat the heat and pretend I'm at the spa. Cold cucumber soup (that only requires a blender to prepare) topped with grilled shrimp. Our CSA delivery last week had some beautiful cucumbers included, and I wanted to try something a little more fun with them, rather than slice them into a salad. I did the shrimp in a pan on the stove, and I squeezed the almost-spent limes from the soup on top. I also used greek yogurt for the first time, and I'm smitten. Its so thick and tasty!
The recipe claims to serve 4, but it made about 2.5 servings for us. Would make an excellent starter, but I was really happy letting it stand on its own. Feel free to do as I did and use basil instead of dill (unless you prefer dill, of course!)
Just a little something about the cookbook: I cannot rave enough about how great the South Beach: Taste of Summer cookbook is. If you enjoy the Quick and Easy book, you will love this one, too. The recipes aren't complicated, the ingredients are always fresh and delicious, and super-good for you, to boot. What I love about it, too, is that nothing in this book looks or tastes like you are on a diet - which takes the stress out of dieting.
Be like me and beat the heat with some fresh and re-freshing cucumbers!
Cucumber Soup with Grilled Shrimp and Basil
Adapted from: The South Beach Diet Taste of Summer Cookbook
http://www.amazon.com/South-Beach-Taste-Summer-Cookbook/dp/1594864454/ref=pd_bbs_sr_1/002-6815521-7348005?ie=UTF8&s=books&qid=1181262545&sr=8-1
2 large cucumbers, peeled and roughly chopped
¾ cup cold water
1 cup low-fat or nonfat plain yogurt
1 tablespoon fresh lime juice
¼ teaspoon salt
¼ teaspoon freshly ground black pepper
¾ pound large shrimp, peeled and deveined
¼ cup chopped fresh basil
In a blender, combine cucumbers and water; puree for 30 seconds. Add yogurt, lime juice, salt and pepper; puree until smooth.
Lightly coat a grill or grill pan with cooking spray and heat to medium-high. Grill shrimp just until pink, about 1 minute per side.
Divide soup among 4 bowls, top with shrimp and basil, and serve.
Makes 4 (1 cup) servings.
Nutritional stuff per serving: 140 calories, 2.5 fat, 1 g sat. fat, 19 g protein, 9 g carbs, 1 g fiber, 300 mg sodium
Monday, July 9, 2007
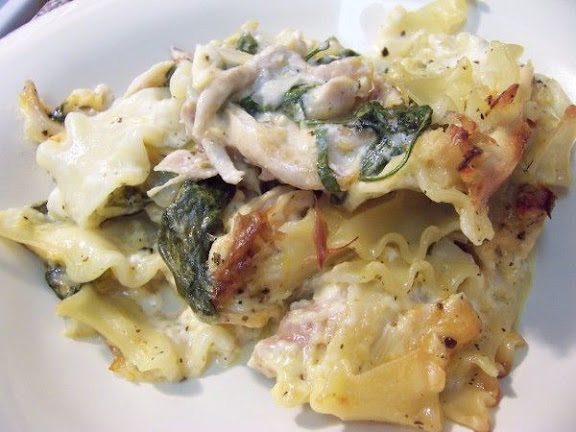
Creamy Mac, Chicken and Cheese
 Feeling a little under the weather, I made this for dinner this past Friday night. I love this meal. Love love love it. This is what I imagine I would make for people that were home-bound sick or freshly babied or something. Its certainly what I would want if I was in either situation (hinthint). What's really cool about it is that it reheats beautifully, so we had this for lunch both days of the weekend.
I normally make it with bowtie, but I couldn't find any in the organic section this time around. While I can't remember the specific name of the pasta I did use, it looks like little, broken-up versions of lasagna noodles.... if that helps!
Doesn't really matter which pasta you go with, because it all marries together with the creamy, cheese sauce, the chicken (I use meat pulled from a store-bought rotisserie chicken), and the spinach. I love that spinach is included, because then you get the added vegetable element. Sure, its only a few ounces, but it counts!
Don't leave out the hot sauce. It gives it a little kick that you can't quite place without giving it any heat.
When you're feeling blue, or you know someone that is, make this casserole!! You or they will brighten right up!
Creamy Mac, Chicken, and Cheese
From: Fresh Every Day, by Sara Foster
http://www.amazon.com/Fresh-Every-Day-Recipes-Fosters/dp/1400052858/ref=pd_bbs_1/102-6030309-2846555?ie=UTF8&s=books&qid=1183816883&sr=8-1
2 tablespoons unsalted butter, plus more for buttering baking dish
½ pound short bite-sized pasta, such as penne, ziti, shells, bow ties, or orecchiette
2 teaspoons sea salt, plus more to taste
2 tablespoons olive oil
1 large yellow onion, diced
3 garlic cloves, minced
2 cups milk
2 cups heavy cream
3 ½ cups cooked shredded chicken(from 3 ½ to 4-lb roasted chicken)
2 cups shredded sharp Cheddar cheese (about 8 ounces)
½ cup Parmesan cheese (about 1 ½ ounces)
8 ounces fresh spinach, washed, stems
removed, and drained (about 4 cups)
2 tablespoons chopped fresh marjoram leaves or 2 teaspoons dried
1 to 2 tablespoons hot sauce (Tabasco or Texas Pete)
1 teaspoon freshly ground black pepper, plus more to taste
Preheat the oven to 350°F. Lightly butter a 9x13-inch baking dish.
Bring a large pot of lightly salted water to a boil. Add the pasta, stir, and cook until al dente. Drain in a colander and transfer the pasta to a large bowl. Drizzle with 1 tablespoon of the olive oil and toss to coat.
Melt the butter with the remaining olive oil in a large skillet over medium heat. Add the onion and cook, stirring occasionally, for 3 to 4 minutes, until translucent. Add the garlic and cook for 1 minute longer, stirring constantly so the garlic doesn’t brown.
Stir in the milk and the cream, reduce the heat to low, and simmer, stirring occasionally, until the sauce is reduced by half and is thick enough to coat the back of a spoon, about 20 minutes (has taken me a bit longer, both times)
Remove the sauce from the heat and add the chicken, Cheddar, Parmesan, spinach, marjoram, hot sauce, 2 teaspoons salt, and 1 teaspoon pepper. Stir until the cheeses have melted and the spinach is wilted. Pour into the bowl with the pasta and toss to coat the pasta with the sauce. Taste for salt and pepper and season with more to taste.
Transfer the pasta to the prepared baking dish, scraping all the sauce out of the bowl with a rubber spatula, and bake for about 45 minutes or until the sauce is bubbling around the edges and the pasta is slightly brown on top. Let the pasta rest for about 10 minutes before serving. Serve warm.
Serves 8 to 10
Sunday, July 8, 2007
Goat Cheese-Arugula Ravioli with Tomato-Pancetta Butter
 Presto Pasta Night, hosted by the lovely Ruth at Once Upon a Feast, is something I wish I participated in more. We have had a crazy amount of pasta dinner this last week, so I think I might save a couple for future weeks! Sneaky! :)
These ravioli were glorious. Yep, glorious. The filling was creamy and delicious and the sauce was fresh and lively. (And c'mon, pancetta is fantastic in almost everything.) I only made half the called-for filling, since I knew I wouldn't be able to fill all my remaining pasta rounds. I wish I had made the whole thing. I had wonton wrappers, but I sometimes find them too squidgy for ravioli.... but I would have made do, this filling was so tasty. I think the reason it worked so well for me is because I adore goat cheese and arugula. Mostly goat cheese. I even have a kit to try to make my own at home (which I should get to later this week), so I might be able to keep us into a steady supply.
Anyway, we enjoyed these ravioli far more than the beet ones, but only because goat cheese and arugula appeal to us more than beets. To each their own. :)
Goat Cheese-Arugula Ravioli with Tomato-Pancetta Butter
Bon Appetit Magazine, March 2001
http://www.epicurious.com/recipes/recipe_views/views/104784
Ravioli
2 tablespoons olive oil
3 large shallots, minced
8 ounces arugula, chopped (about 8 cups)
6 ounces soft fresh goat cheese (such as Montrachet), crumbled
1/2 cup (about 1 1/2 ounces) freshly grated Parmesan cheese
Nonstick vegetable oil spray
42 (about) wonton wrappers (from one 12-ounce package)
2 large egg whites, whisked just until foamy
Tomato-Pancetta butter
6 ounces thinly sliced pancetta or bacon, coarsely chopped
1/4 cup (1/2 stick) butter
6 large plum tomatoes, quartered, seeds and membranes discarded, tomatoes diced
1 teaspoon chopped fresh thyme
For serving:
5 tablespoons butter, melted
12 fresh basil leaves
Fresh thyme sprigs
Make ravioli: Heat oil in heavy large skillet over medium heat. Add shallots; sauté 10 minutes. Add arugula; toss until wilted but still bright green, about 3 minutes. Transfer arugula mixture to large bowl and cool. Mix in goat cheese and Parmesan cheese. Season filling with salt and pepper.
Line 2 baking sheets with heavy-duty foil; spray foil with nonstick spray. Place 4 wonton wrappers on work surface; cover remaining wrappers with plastic to prevent drying. Lightly brush entire surface of each wrapper with egg white. Spoon 1 generous teaspoon filling into center of each wrapper. Fold wrappers diagonally in half, forming triangles. Press edges firmly to seal. Arrange ravioli on prepared sheets. Repeat with remaining wrappers and filling. (Can be made ahead. Cover with plastic and chill up to 1 day; or cover with plastic, then heavy-duty foil, and freeze up to 1 week. If frozen, do not thaw before cooking.)
Make tomato-pancetta butter: Cook chopped pancetta in large skillet over medium-high heat until crisp and brown. Using slotted spoon, transfer pancetta to paper towel; drain. Set aside. Pour off all but 1 tablespoon drippings from skillet. Add butter to drippings in skillet; melt over medium-high heat. Add tomatoes and thyme; sauté until tomatoes are tender, about 5 minutes. Season with salt and pepper. (Can be made 2 hours ahead. Let stand at room temperature.)
Cook and serve ravioli: Place melted butter in large bowl. Cook half of ravioli in large pot of boiling salted water until just tender, about 4 minutes for fresh or 5 minutes for frozen. Using large strainer, transfer ravioli to colander and drain; place in bowl with butter and toss to coat. Cover to keep warm. Cook remaining ravioli in same pot of boiling water. Drain and add to bowl of buttered ravioli. Toss gently to coat. Divide ravioli among bowls. Rewarm tomato butter over medium heat. Add reserved pancetta and basil; sauté 1 minute. Spoon sauce over ravioli; garnish with thyme.
Makes 4 to 6 servings.
Friday, July 6, 2007
Beet Ravioli with Poppy Seed Butter
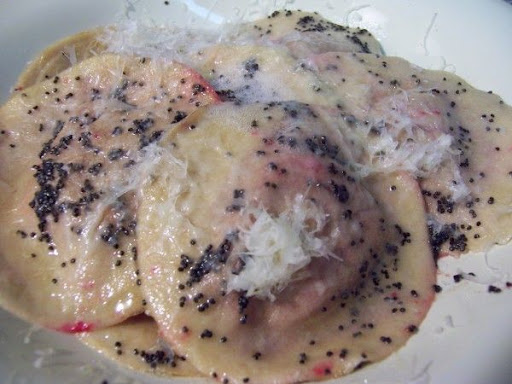 First we were on a little vacation (but that doesn't mean we didn't eat) and then I was a bit under the weather... so my posts have been piling up! I'll try to double-post the next few days to catch up!
This month's Weekend Cookbook Challenge, created by Sara at I Like to Cook, is Red and White:

So grab a recipe that has a red or white ingredient. Or use a cookbook with a red cover. Or cook a recipe by Betty White!I made this dish last Saturday night. We'd gotten a bunch of beets in our CSA shipment the Wednesday before, so this seemed like the ideal entry. I'd looked though my cookbooks and over the internet for a good-looking beet recipe. This was important because I'd only cooked with beets once before, and they played a bit part in a wine sauce. I really wanted the beets to be the star of the show.
Doing so was a gamble, because I'd never really had beets before (the canned variety frightened me). Dave didn't have much experience with them either, so this was a big deal. The comments section of the recipe stressed the importance of the poppy seeds, too, so I made sure to grab some from the store.
What can I tell you about this dish....? I roasted the beets the evening before (with the zucchini and radishes) so I saved time on Saturday. The filling and dough were both really easy to make. Either I didn't make enough filling, or else the dough just makes twice as much, so I had lots extra egg pasta (which you'll see again soon in another ravioli recipe).
I will say that I really almost enjoyed the filling pre-stuffing it into the ravioli. But I think this dish is maybe better suited to being an appetizer or beginning pasta course... because the earthiness became too much after a while. Unless, of course, you love beets. If this is you, then make this pasta. If you have beet-loving family or friends, invite them over, because this dish is very pleasing to the eye... just.... beetly overpowering. O, and the poppy seeds really were key, as they provided a nice crunch to each bite.
Beet Ravioli with Poppy Seed Butter
Bon Appetit Magazine, May 2005
http://www.epicurious.com/recipes/recipe_views/views/232091
2 large red or golden beets (about 14 ounces)
1/2 cup fresh whole-milk ricotta cheese
2 tablespoons dried breadcrumbs
1 1/4 pounds Fresh Egg Pasta
1/2 cup (1 stick) butter
1 tablespoon poppy seeds
Freshly grated Parmesan cheese
Preheat oven to 400°F. Wrap beets individually in foil; place on baking sheet. Roast until tender when pierced with knife, about 1 hour. Open foil carefully (steam will escape). Cool. Peel beets; finely grate into medium bowl. Add ricotta cheese and season to taste with salt and pepper. Stir in breadcrumbs.
Roll Fresh Egg Pasta dough into sheets according to recipe. Place 1 dough sheet on work surface. Using 3-inch round biscuit cutter, cut sheet into 7 rounds. Transfer rounds to lightly floured baking sheet; cover with plastic wrap. Repeat with remaining dough for total of 56 rounds.
Sprinkle 2 smooth kitchen towels with flour. Place 8 pasta rounds on work surface, keeping remaining dough covered with plastic. Place small bowl of water next to work surface. Spoon 1 teaspoon beet filling onto half of each round. Dip fingertip into water and dampen edge of 1 round. Fold dough over filling, pushing out as much air as possible and pressing edges firmly to seal. Transfer to prepared towels. Repeat with remaining rounds. (Can be prepared 1 week ahead. Transfer to rimmed baking sheet and place in freezer until frozen solid, about 6 hours. Transfer ravioli to resealable plastic bags.)
Melt butter in large skillet over medium heat and stir in poppy seeds; keep warm. Working in batches, cook ravioli in large pot of boiling salted water until cooked through, stirring often, about 2 minutes. Using slotted spoon, transfer to skillet with melted butter; toss to coat. Divide ravioli among 8 plates; sprinkle with Parmesan.
Market Tip
The flavor, color, and texture of roasted fresh beets is incomparable, so don't even consider using the canned variety. When choosing beets, select bunches with bright, glossy leaves attached.
Makes 8 first-course servings.
Thursday, July 5, 2007
I'm it, I'm it!!! (My very first meme!)
 The lovely Julie at Noshtalgia tagged me with my very first meme!!! Woohoo!
"I have been tagged to post 8 random facts. I have to post these rules before I give you the facts: Each participant posts eight random facts about themselves. Tagees should write a blogpost of eight random facts about themselves. At the end of the post, eight more bloggers are tagged. Go to their blog and leave a comment telling them they're tagged."Rock on, let's get started!!!
1. When I was a kid, I wanted to be an astronaut. My grandpa would take me to air shows (he was a retired Air Force pilot) and I loved the Air & Space Smithsonian Museum. I even went to Space Camp!!! (I'm wearing my camp shirt, 17 years later, in the photo above - not that you can see it.) I studied books and manuals and got the most out of my math and science classes in high school. And then I went off to college and bombed. Sure, actually going to class would have solved that problem, but I can trace part of my troubles to a particularly odd word problem. I thought it was strange that we were calculating the volume of some guy's pool, so he'd know how many buckets of water to bring from the lake. Why did he need a pool if he had a lake? Especially if he was just going to fill it with lake water? :)
2. I have a thing for stray cats. I had my very first cat from kittenhood, but all the others have been previously homeless. I just can't help it! If not for my darling husband, I'd be a creepy cat lady with a million cats.
3. I have had the same pillow my whole life. I'm 31. At this point, I think only my love is holding it together. Its come to be shaped like a dog bone, from all the tucking into my shoulder. I take it with me when we travel, because I just can't sleep without it. If I ever forget it somewhere, I'm totally screwed.
4. I drive a Toyota Echo. It only came out in 2000 or 2001, but Toyota already doesn't make it anymore. If you're familiar with it, you'll know that it has a large back end, thusly, a big butt. My license plates say: OMG BKY. Its my own personal entertainment on the road, watching people figure it out. :)
5. My husband and I eloped.... in Vegas. We'd been planning this dreamy destination wedding in St. Thomas, USVI, but the wedding planners kept quitting, making it more and more difficult to plan. We'd already had the trip to Vegas with friends planned, so we jumped on it. Thing is, we didn't tell anyone!!! We made reservations at the Little Church of the West, and dinner reservations for that night. Then we got our rings and great outfits. We arrived in Vegas before our friends, so we used that time to get our marriage license. We met up with our friends at the hotel pool, and casually asked them if they had plans the next night, because we needed witnesses!!! They were stunned, but excited for us! We had a blast and are sooooo glad we did it!
6. I love love love man vs. nature movies. Especially if they're made-for-tv. 10.5 Apocalypse might be one of my favorites. They're just so ridiculous and dramatic, and the actors are having such a time trying to make it work... I just can't get enough!!
7. Gooses. I love gooses. (yes, gooses! :)) Canadian ones, to be specific. The way they waddle when the run, their long long necks, their fuzzy little babies.... Knowing this, my sweet husband proposed to me while we were feeding them bread. I couldn't have imagined it happen in a more perfect way. /sigh
8. Before I met Dave (the aforementioned husband), I didn't really cook. I mean, I could cook, but it was mostly stuff out of boxes. I certainly didn't own a cookbook. I'd started offering to make him dinner and pie, and he joked that the pie (banana cream) would probably come out purple!!! Well, to be funny, I added food coloring and made it purple. He didn't think it was as funny as I did. O well. We can't all have great senses of humor. :)
I've really enjoyed this!! Now, peaches, its your turn!! I think you all are terrific, and I'd love to get to know you a little better!!!:
http://brookes-bearnecessities.blogspot.com/
http://workingwomanfood.blogspot.com/
http://lemonalmond.blogspot.com/index.html
http://ilovemilkandcookies.blogspot.com/
http://janetishungry.blogspot.com/
http://eatdrinklive.typepad.com/eat_drink_live/
http://smittenkitchen.com/
http://onceuponatart.blogspot.com/
Tag!!! You're it!
See the recipe...


