
 Thank goodness for our CSA. Otherwise, we'd never have had the chance to learn that we like radishes! Sure, I'd have them raw in salads and the like... but I'd never warmed up to them and Dave didn't even know what they were when I pulled them out of the bag.
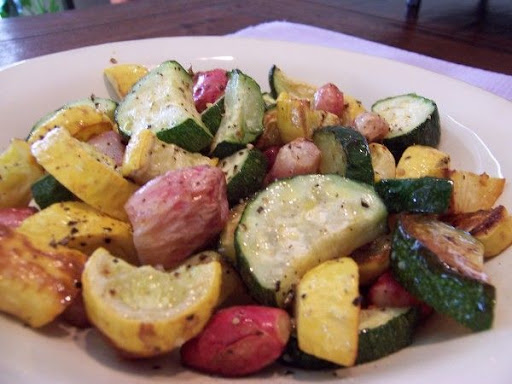
I'd found this recipe recently, almost by magic, as we'd just had some zucchini, yellow squash, and a bunch of radishes in last week's CSA. Clearly, we were meant to eat these veggies together.
We're trying to eat everything in our freezer, not only because I've stuffed it full of all our spare food, but also because we've already spent our "food budget" for the pay period - on concert tickets. :) We won't go hungry, because I often make full recipes of things, and since its just the two of us, I can freeze the extra for later.
All that out of the way, I didn't want to just have meatball sandwiches for dinner, knowing we'd need to eat these vegetables before they croaked. The recipe suggests that you separate the squash and radishes onto different pans, but since I had to fit the meatballs and toast the buns all in the same oven, I just mingled them early. (To no ill effect.)
I am happy to report that the zucchini, squash, and radishes roasted beautifully together and we gobbled them all up.
Roasted Zucchini and Radishes
Gourmet Magazine, June 2007
http://www.epicurious.com/recipes/recipe_views/views/238681
Radishes, when roasted, lose their bite and perfectly complement the mellow sweetness of cooked zucchini.
2 pounds zucchini
7 tablespoons extra-virgin olive oil
1 teaspoon salt
1/2 teaspoon black pepper
3 bunches large radishes (2 1/4 lb total with greens), greens discarded
Special equipment: 2 large (17- by 11-inch) shallow baking pans
Put oven racks in upper and lower thirds of oven, then put baking pans on racks and preheat oven to 450°F.
Halve zucchini lengthwise, then cut crosswise into 1/4-inch pieces. Toss with 1/4 cup oil, teaspoon salt, and 1/4 teaspoon pepper in a large bowl. Halve radishes lengthwise, then cut crosswise into 1/4-inch pieces. Toss with remaining 3 tablespoons oil, 1/2 teaspoon salt, and 1/4 teaspoon pepper in another large bowl. Working quickly, spread zucchini in pan on lower rack and radishes in pan on upper rack.
Roast vegetables, without stirring, until lightly browned and tender, 20 to 30 minutes, then toss together in a large bowl.
Makes 8 servings.
Friday, June 29, 2007
Roasted Zucchini and Radishes
Wednesday, June 27, 2007
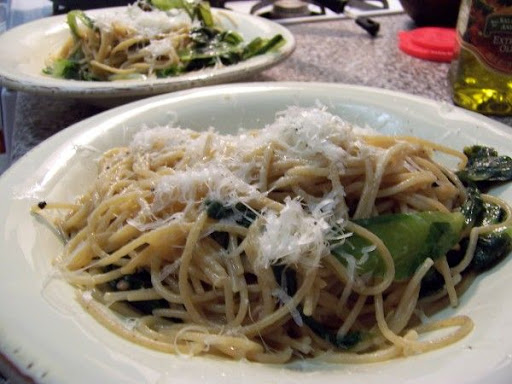
Spaghettini with Spicy Escarole and Pecorino Romano
 This recipe was super-easy to assemble, and pulled it from the epicurious.com website so that I could use the head of escarole that came in this week's CSA.
That being said, I have a hard time being chatty about it because I didn't really like it. I wouldn't take my opinion on it, because my husband liked it enough to go back for thirds! (and the recipe got good reviews on the website) I found the escarole really bitter and the anchovies were maybe a little weird, and it could have used more red pepper flakes. So. With that laundry list, next time, I'll maybe blanch the escarole first, use less anchovy paste, and more pepper flakes.
I have hope for it, and I'm willing to try again... it just didn't ring my bell.
Spaghettini with Spicy Escarole and Pecorino Romano
http://www.epicurious.com/recipes/recipe_views/views/233933
4 tablespoons extra-virgin olive oil, divided
3 anchovy fillets, chopped
1/4 teaspoon dried crushed red pepper
2 garlic cloves, minced
1 1/2 pounds escarole (about 1 large head), cut into 1- to 2-inch strips
1 cup water
1 pound spaghettini
Freshly grated Pecorino Romano cheese
Heat 2 tablespoons oil in heavy large saucepan over medium heat. Add anchovies and dried crushed red pepper; stir 1 minute. Add garlic; stir 30 seconds. Stir in escarole. Add 1 cup water, cover pan, and reduce heat to low. Cook until escarole is tender, about 5 minutes. Season to taste with salt and pepper.
Meanwhile, cook pasta in large pot of boiling salted water until tender but still firm to bite. Drain pasta, reserving 1 cup cooking liquid.
Add pasta to escarole mixture and stir over low heat to combine, adding cooking liquid by tablespoonfuls to moisten if necessary. Stir in remaining 2 tablespoons oil. Divide pasta among shallow bowls, sprinkle with cheese, and serve.
Makes 4 to 6 servings.
Tuesday, June 26, 2007
Potato and Jalapeno Pepper Pierogies
 I am really excited about this post for a couple of reasons:
- I love pierogies
- I've long wanted to participate in a "Waiter, there's something in my..." event
- Pierogies rule!
 Anyway, on to my point! I didn't give it any thought when this dumpling event came out - I didn't think I knew how to make any dumplings. My grandpa had a killer chicken and dumpling recipe, but its never as good if someone else makes it. It was a total light-bulb moment, too, one afternoon, I was re-reading the rules/suggestions, and pierogies just came to me. Bam! I knew I wanted potato and cheese, and I found a recipe that included jalapeno peppers - so I knew Dave would love them.
Added to this loveliness were the hot pepper goat sausages in my freezer (Found at a local farmers market. I know, I know - goat? We went looking for lamb, but they were out, the farmer suggested the goat sausage, and as its hot and spicy, we couldn't resist. On top of that, it allowed us to try goat in a friendly way) Anyway, my plan was that the hot yet creamy potato pierogies would pair nicely with the spicy hot sausages.
Something worth noting: farmers market peppers mean business. I made the dough and filling yesterday afternoon, say, around 12:30. This morning, my fingers still burned. I've experienced ouchy-contact lens removal post-peppering, but never next day burning fingers. I love the freshness this must indicate, and going forward, I'll make sure to don the surgical gloves. :)
Also of note - the pieces of this recipe don't exactly match up. I have a little more than half of the filling left after using all the dough. I plan on freezing it for future use, but if you have a lot of mouths to feed, make double the dough. Though, now that I'm thinking about it, I might not have rolled the dough out thin enough, resulting in less dumplings. Hmm. Whatever the case, you could end up with extra filling. (I plan on making potato pancakes, too!)
Anyway, pop over to Johanna's site, The Passionate Cook, for the roundup, but also because she has a really delightful site. Great writing, tasty food, and beautiful photographs - a foodies dream!!!
Edit: Ugh - it must not have been a lightbulb moment after all - I went back to see how to submit to the event, and the comments section is FULL of pierogie discussion... I prefer to think I was independently genius, but I'm willing to accept otherwise. ;)
Potato and Jalapeno Pepper Pierogies
Recipe courtesy Helen Mannarino, Pierogies Plus
http://www.foodnetwork.com/food/recipes/recipe/0,1977,FOOD_9936_27628,00.html
Pierogie Dough:
3 cups all-purpose flour
1 egg
2 tablespoons margarine
3/4 cup lukewarm water
1 teaspoon salt
Jalapeno Filling:
2 1/2 pounds Idaho potatoes, washed and peeled
3 cups cold water
1 tablespoon salt
1/2 cup butter
1/2 cup chopped onion
2 tablespoons chopped jalapeno peppers
Freshly ground black pepper
To make Pierogie Dough: Combine all ingredients and mix well. Knead dough on flat surface for approximately 5 to 7 minutes. Let dough rest for 30 minutes or refrigerate overnight; the dough can be kept in the refrigerator for up to 2 days.
Roll out dough into a thin sheet, approximately 1/4-inch thick. Then cut in circles: 2 inches for small pierogies and 3 1/2 inches for large pierogies. Fill circles with desired filling. Pinch the edges well and cook them in rapidly boiling water for approximately 10 minutes. Drain and serve immediately with butter. If you decide to store them, dip them in cold water, drain, and let them cool on a cookie sheet. When completely cool, store them in refrigerator.
To make Jalapeno Filling: Place potatoes in a saucepan and cover with cold water. Add salt, bring to a boil over high heat, and cook until potatoes are soft. When potatoes are done, melt the butter in a saucepan over medium heat. Add onion and sauté until soft; you can continue cooking until onions are caramelized if you so desire. Drain the potatoes and mash them. Add the cooked onion and jalapeno and season with salt and pepper, to taste. Continue mashing until blended. Let filling cool. Use 1 tablespoon of filling to fill the circles of dough as directed above.
Monday, June 25, 2007
Summer Salad with Goat Cheese and Walnuts
 I really do adore salads. I try to order them as much as possible when we go out to eat, and I wish we had them more at home. Earlier this year, I went through a salad phase, and we had it every night with dinner. (Salad phase followed Toast Phase) When my six-week class started, all phases, good or otherwise, fell out the window. I wrap up this week, so I expect that our dinners and my gym-visiting will improve.
In the meantime: I made this lovely salad this weekend for lunch. I'd made note of Kelly & Lis's Salad Stravaganza event, and pulled this recipe from a recent magazine. Problem is, I can't remember WHICH magazine (either Eating Well or Vegetarian Times) and neither site has it in their recipe sections... arrgh! So, know that this tasty and easy salad is not my own creation, but its still pretty yummy.
The nice peppery arugula is offset by the sweet peaches and balsamic, and both pair nicely with the creamy/crunchy goat cheese balls. I will happily make this salad again! If you're watching your fat intake (who isn't), you could sub out the goat cheese for something else.. or just make fewer cheese balls. I'm something of a goat cheese addict, myself, so I made a ton.
I gotta say, I'm pretty excited for the Salad Stravaganza's round-up. Considering that its now summer, and with that, pool/beach season, I could certainly use more salad - and there are only so many salads I can come up with on my own before I get burnt out. I'm getting this in right before the deadline, so make sure you visit Lis or Kelly's sites for the round-up!
4 oz. goat cheese (about ¼ cup)
½ cup walnuts, chopped (optional toasted)
1 small shallot, minced (about 2 Tbs.)
2 tablespoons balsamic vinegar
2 tablespoons olive oil
5 oz. baby arugula (4 cups)
2 medium peaches, sliced into ½ inch wedges (about 3 cups)
Scoop out teaspoon-size balls of goat cheese with melon baler or small spoon. Roll cheese balls in walnuts until well coated. Set aside.
Combine shallot and vinegar in small bowl, and season with salt and pepper. Whisk in oil.
Combine arugula and peach slices in large bowl. Add vinaigrette, and toss to coat. Divide salad among 4 plates, and top each with 3 balls of goat cheese.
Per serving: 290 calories, 9g protein, 21g total fat (6g sat. fat), 19g carbs, 13mg chol, 116mg sodium, 3g fiber, 14g sugars
Sunday, June 24, 2007
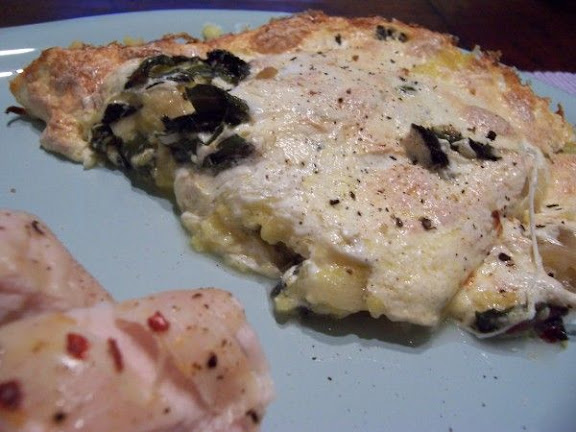
Baked Polenta with Swiss Chard and Cheese
 My CSA Farmer, Ellen, includes a little bulletin with each delivery. The very first week, she asked that we learn to like swiss chard, as we'd be seeing it a lot throughout the course of the summer. I'd neither purchased nor knowingly consumed swiss chard, so I had no preconceived notions on it. First impression - its enormous. People should warn you. I mean, I could fan myself with one, should the AC go out. Whilst I'm fed cool grapes.... I digress. Friends with chard, got it.
I've noticed a trend with the two chard recipes I've used thus far - both had ricotta cheese. I don't know if that means something... it could just be that I gravitate to ricotta cheese.
At any rate, this dish is polenta based, and its built in layers, like a lasagne. I credit (blame) my friend Stephanie with our new-found-love of polenta. I don't how how I got by 31 years without it. The creamy polenta was mixed with the ricotta and layered with the sauteed swiss chard and fresh mozzarella cheese, once repeated. Baked in the oven and then given a chance to rest and meld. Please please please give it the resting period. If you don't, it will ooze all over and not hold up enough to be scooped out. Trust me. (As someone that's only recently learned to wait. ;) )
I didn't do anything fancy with the chicken breasts we had along with the polenta/ricotta/chard casserole, just roasted in the same oven with salt, pepper, and red pepper flakes. I purposefully neglected the chicken, thinking that the mix of flavors in the polenta would make up for it - and I was right!
Baked Polenta with Swiss Chard and Cheese
Bon Appetit Magazine, November 2002
http://www.epicurious.com/recipes/recipe_views/views/107270
2 tablespoons extra-virgin olive oil
1 large white onion, thinly sliced
2 garlic cloves, minced
1/4 teaspoon dried crushed red pepper
1 pound Swiss chard, thick stems and ribs removed, leaves cut crosswise into 1/2-inch-wide strips 3 1/2 cups water
1 teaspoon salt
1 cup polenta (coarse cornmeal) or yellow cornmeal 1 cup part-skim ricotta cheese
2 large eggs
2 cups coarsely grated low-fat mozzarella cheese (about 8 ounces)
Preheat oven to 350°F. Lightly oil a 2-quart glass baking dish. Heat oil in a heavy large deep skillet over medium heat. Add onion; sauté until tender, about 15 minutes. Stir in garlic and crushed red pepper, then chard; cover and cook until chard is tender, stirring occasionally, about 8 minutes. Uncover; stir until any excess liquid in skillet evaporates. Season with salt and pepper.
Meanwhile, bring 3 1/2 cups water and salt to boil in heavy large saucepan. Gradually stir polenta into boiling water. Reduce heat to medium-low; simmer until polenta is very thick, stirring frequently, about 10 minutes. Remove from heat.
Whisk ricotta and eggs in bowl; whisk in 1 cup hot polenta. Stir ricotta mixture into polenta in saucepan. Spread half of polenta mixture in baking dish. Spread half of chard mixture over. Sprinkle with half of mozzarella. Repeat layering with remaining polenta, chard, and cheese. Bake until puffed and brown on top, about 45 minutes. Cool 30 minutes.
Makes 8 servings.
Per serving: calories, 259; total fat, 12 g; saturated fat, 5 g; cholesterol, 79 mg
Saturday, June 23, 2007
Miso-Glazed Sea Bass with Asparagus
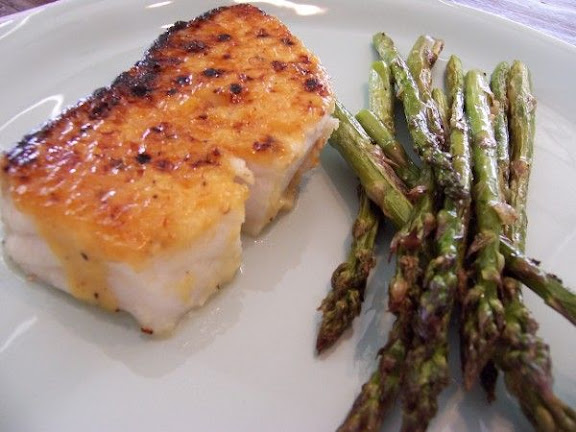 Roasted asparagus might be one of my new favorite foods. If you knew me as a child, this would seem extra preposterous. Asparagus and I just didn't get along. To my defense, I don't know anyone that actually LIKED asparagus as a child... so... at least I came around. It took me even longer to get the preparation correct. I'd always have to get double the amount I needed, so that when I messed it up the first time, I'd have extra. Or I'd have a different Side Plan B. Now, my normal method with asparagus is steaming - but this could change. If any other piece of dinner needs the oven or broiler, the asparagus is going in with it. Tonight, the tips were even nice and crunchy.. Yum!
I'd been itching to try something with miso. Dave had a lovely couscous made with miso broth at Central, and ever since, I've wanted to figure this miso stuff out. Weeks ago, I found and bought some from Whole Foods, not knowing what I'd do with it, but since it had an October expiration date, I knew I had time.
This might be the perfect dinner for one of those days you really want a snazzy dinner but don't want to work for it. We got up early today and were out all day, and I wanted something delicious, but wanted someone else to make it. We considered options for eating out, but we had the sea bass and asparagus at home, and I didn't want them to get old, crusty, stinky, and thus inedible.
I had no idea it would be this easy. Whisk up the miso, lemon juice, water and seasonings. Spoon over fish. Add asparagus, tossed with oil, salt and pepper. Broil 10 minutes. Eat. Really easy, really yummy.
Winner!
Miso-Glazed Sea Bass with Asparagus
Gourmet Magazine, June 2007
http://www.epicurious.com/recipes/recipe_views/views/238675
2 tablespoons white miso (fermented soybean paste; not sweet or labeled "saikyo")
1 1/2 teaspoons sugar
1 teaspoon fresh lemon juice
1/2 teaspoon water
1/8 teaspoon black pepper
1 pound medium asparagus, trimmed
2 teaspoons olive oil
4 (5- to 6-ounce) sea bass fillets with skin (1 inch thick)
Garnish: lemon wedges
Preheat broiler. Lightly oil a 17- by 12-inch shallow baking pan.
Whisk together miso, sugar, lemon juice, water, and pepper in a bowl.
Toss together asparagus, oil, and a pinch of salt in a large bowl.
Arrange fish, skin sides down, in baking pan and spread miso mixture evenly on top. Arrange asparagus in 1 layer around fish and broil 5 to 6 inches from heat until fish is just cooked through and asparagus is crisp-tender, 8 to 12 minutes.
Makes 4 servings.
Friday, June 22, 2007
Quinoa and Crescenza
 My husband wants to know where the ghosts are, and why they're making us eat so much fiber. He also thinks I should rename my blog to All Fiber, All the Time.. or something similar.
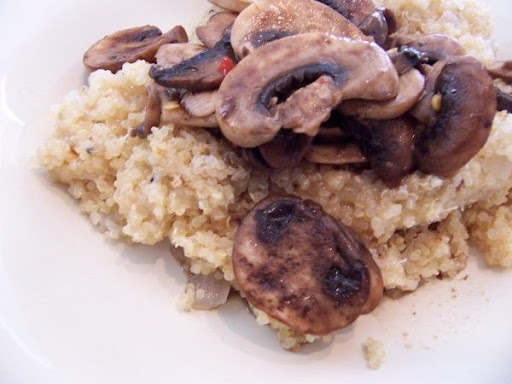
So, yes, this is yet another fiber-y dinner... and my third from Heidi's Super Natural Cooking (see, ghosts... ) THIS WEEK... but what about it? :) This chapter specifically says to explore grains and I have! Before this week, I'd never made pearled barley or quinoa! I really enjoyed their chewy disposition, and I'm quite positive I'll find other ways to incorporate their tastiness into our meals. Just maybe not all in one week.
I couldn't find the Crescenza cheese at Wegmans, so I substituted with the Tallegio. I could have picked my much-loved Brie, but I wanted to go with something new to us. Tallegio, if you've never had it, is really smelly. I mean, really really smelly. Neither one of us cared for it on its own, but it really works in this dish... really really. I also used a mix of brown and white button mushrooms. I went with the already-sliced ones, just for the convenience.
While I really liked this meal, and thought it could stand on its own, Dave would prefer to revisit it as a side dish. More for me, then!
All Fiber, All the Time, signing out. If you'll excuse me, I have to go figure out how to kick my Dearie off the tv, so I can watch the last Stargate SG-1 episode ever. :(
Quinoa and Crescenza
From Super Natural Cooking, by Heidi Swanson
http://www.amazon.com/Super-Natural-Cooking-Incorporate-Ingredients/dp/1587612755/ref=pd_bbs_sr_1/002-6815521-7348005?ie=UTF8&s=books&qid=1182220708&sr=8-1
6 tablespoons clarified butter or extra-virgin olive oil
1 clove garlic, minced
½ onion, chopped
2 cups quinoa, rinsed
1 cup good-quality dry white wine
1 teaspoon fine-grain sea salt, plus more as needed
2 cups water
2 big pinches or red pepper flakes
1 pound mushrooms, sliced ¼ inch thick
Freshly ground black pepper
3 to 4 ounces Crescenza cheese (or substitute Gruyere, Tallegio, or Brie)
Heat 3 tablespoons of the butter in a large saucepan over medium-high heat, then add the garlic and the onion and sauté for 5 minutes, or until the onion starts to soften and get translucent. Add the quinoa, wine, and 1 teaspoon salt, bring to a boil, and continue boiling for 3 to 4 minutes, until the liquid has reduced a bit.
Add the water, return to a boil, then lower the heat, cover, and simmer for about 25 minutes, or until the quinoa opens up, revealing a little spiral, and is soft and pleasant to chew.
Meanwhile, melt the remaining 3 tablespoons butter in a large skillet over medium-high heat, along with the red pepper flakes and a few pinches of salt. Stir in the mushrooms and cook without stirring for a few minutes, until they’ve begun to brown and release their juices. Then shake the skillet every few minutes until the mushrooms are evenly browned, about 4 more minutes. Remove from the heat and season with salt and pepper to taste.
Once the quinoa is perfectly tender yet textured, drain off any excess liquid and stir in the cheese. Ladle into big bowls and top with the mushrooms.
Serves 4 to 6.
Thursday, June 21, 2007
Risotto-Style Barley with Winter Citrus and Arugula
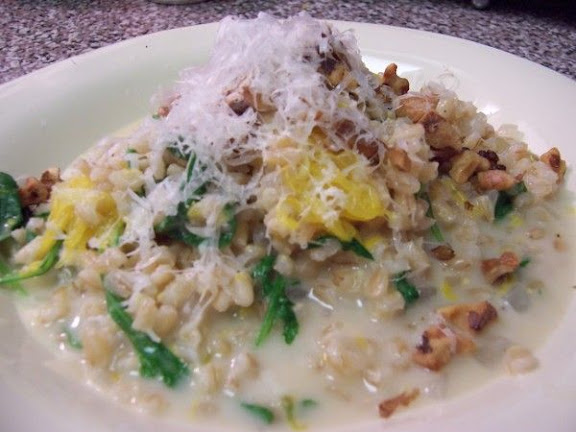 It wasn't until I was about done with this risotto that I noticed the "winter" part of the title. O well. It was 10 degrees cooler today - does that count?? :)
This is my first go with barley. Sure, I've had it in super-fiber cereals, and I've had it in restaurants (I think), but I've never actually made it myself. I really dig the meaty chewiness of the grain. I can see myself really getting into more barley-ish recipes.
I can also see why this is a winter meal. Sure, it takes 45 minutes of stirring over a hot stove. But its also warm and earthy, and the dose of citrus really reminds me of Christmas. (I blame the potpourri.) I think it would be tasty with craisins mixed in, too. Hmm. I'll def. save this for fall. I won't hold it against you if you don't try it out, its just too hot out - unless you're in the southern hemisphere, of course... and if you are... then... I did this on purpose!!! :)
Risotto-Style Barley with Winter Citrus and Arugula
From Super Natural Cooking by Heidi Swanson
http://www.amazon.com/Super-Natural-Cooking-Incorporate-Ingredients/dp/1587612755/ref=pd_bbs_sr_1/002-6815521-7348005?ie=UTF8&s=books&qid=1182220708&sr=8-1
3 tablespoons extra-virgin olive oil
1 yellow onion, chopped
1 or 2 shallots, chopped (optional)
3 cloves garlic, chopped
1 teaspoon fine-grain sea salt
2 cups lightly pearled barley
1 cup good-quality dry white wine
6 cups water
1 orange
Grated zest of 1 lemon
½ cup freshly grated Parmesan cheese
½ cup crème fraiche or sour cream
2 big handfuls arugula, coarsely chopped
Handful of chopped toasted walnuts, for garnish
Heat the butter in a large, heavy saucepan over medium heat, then add the onion, shallots, garlic, and salt and sauté, stirring constantly, for about 4 minutes, or until the onion begins to soften.
Add the barley to the pot and stir until coated with a nice sheen, then add the white wine and simmer for 3 or 4 minutes, until the barley has absorbed the liquid a bit. Adjust the heat to maintain a gentle, active simmer.
In increments, add about 6 cups of water, 1 cup at a time, letting the barley absorb most of the liquid between additions; this should take around 40 minutes altogether. Stir regularly, because you don’t want the grains on the bottom of the pan to scorch. You will know when the barley is cooked because it won’t offer up much resistance when chewing (it will, however, be chewier than Arborio rice.) I think this risotto is better on the brothy side, so don’t worry if there is a bit of unabsorbed liquid in the pot.
Meanwhile, grate the zest of the orange, then peel and segment the orange. Cut the segments in half, reserving any juices that leak out. When the barley is tender, stir in the orange zest, segments and juice, lemon zest, Parmesan, and crème fraiche. Taste and adjust the seasoning if need be, then stir in the arugula. Garnish with the toasted walnuts before serving.
Easily serves 4 to 6.
Tuesday, June 19, 2007
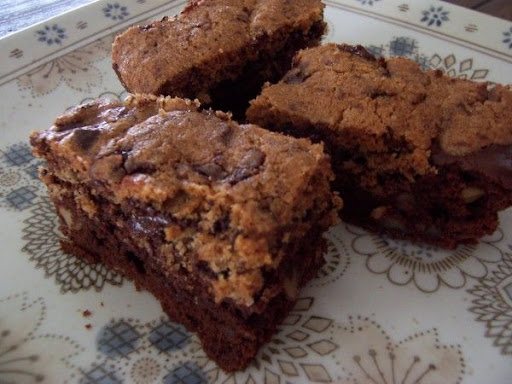
Disappearing Marshmallow Brownies
 I can't decide if Myriam is a genius or pure evil. (meant nicely, of course.) As I love chocolate, and I love brownies, I thought her BrownieBabe concept was fantastic (the genius part). Until the roundups started... and I spent all that time drooling over brownies and blondies... and after I printed more recipes than I could count, and daydreamed about thousands of calories... I realized... maybe this wasn't such a good thing (cue: evil).
Regardless, when I saw Deborah's Disappearing Marshmallow Brownies, I knew I had to make them. I'd only just made my own BrownieBabe entries, so I had to pace myself. As I wanted to make a Father's Day Dinner To Be Proud of (Dad's like meatballs and brownies, right?), I knew these would be perfect. And boy were they!
I tweaked and added some toffee bits along with the chocolate chips and marshmallows, and since I had both the meatballs and the brownies in the oven at the same time, the brownies took a bit longer. Just keep an eye on them and don't do them too long... you want them to be a little squidgy.
Normally, I share and bring in a healthy portion of my baked goods into work. I should note that we kept these all to ourselves. Thanks to Myriam and Deborah!!
Submitted by Deborah for BrownieBabes #1:
Can also be found: http://allrecipes.com/Recipe/Disappearing-Marshmallow-Brownies/Detail.aspx
1/2 cup butter
1 cup butterscotch chips
2/3 cup packed brown sugar
2 eggs
1 teaspoon vanilla extract
1 1/2 cups all-purpose flour
2 teaspoons baking powder
1/2 teaspoon salt
2 cups miniature marshmallows
1 cup semisweet chocolate chips
Preheat oven to 350 degrees F (175 degrees C). Grease a 9x13 inch pan.
Using a microwave-safe bowl, melt the butterscotch chips and butter together in the microwave, stirring occasionally until smooth. Set aside to cool.
In a large bowl, stir together the brown sugar, eggs, and vanilla. Mix in the melted butterscotch chips, then the flour, baking powder, and salt until smooth. Stir in the marshmallows and chocolate chips last. Spread the batter evenly into the prepared baking pan.
Bake for 15 to 20 minutes in preheated oven. Cool, and cut into squares.
Monday, June 18, 2007
Garlic Scape Soup
 I am a little late to the Super Natural Cooking party, but I have to say, better late than never! :) I'd ordered Heidi Swanson's book over a month ago, but I'd gotten about 8 books at the time, so its taken me a while. I really love the easy style of the book, as though Heidi is right there with me in my kitchen and while I'm less familiar with some of her ingredients, the finished products look so amazing, I'm happy to seek them out.
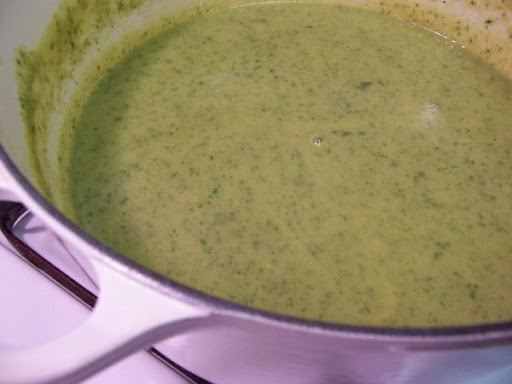
Tonight's secret ingredient wasn't hard to come by. I received my first garlic scapes in my CSA box two weeks ago, and I've been hooked ever since. Anytime I saw them, I bought more. So many more, I'd amassed quite a pile!!! I was flipping through Super Natural Cooking and landed on the Garlic Scape Soup recipe and jackpot noises went off in my head (not in a creepy way).
This soup was flavorful and earthy and such a vibrant green (that my camera couldn't quite capture). The flavor of the scapes was delicate and friendly - I'd bee worried that it would be too garlicy, and thus a little scary. I was happily surprised and I'm thrilled we have lots of leftovers!!!
Garlic Scape Soup
From Super Natural Cooking, by Heidi Swanson
http://www.amazon.com/Super-Natural-Cooking-Incorporate-Ingredients/dp/1587612755/ref=pd_bbs_sr_1/002-6815521-7348005?ie=UTF8&s=books&qid=1182220708&sr=8-1
2 tablespoons clarified butter or extra-virgin olive oil
2 dozen garlic scapes, flower buds discarded and green shoots chopped
3 large russet potatoes, unpeeled and cut into ½ inch dice
5 cups vegetable stock or water
2 large handfuls spinach leaves, stemmed
Juice of ½ lemon
½ teaspoon fine-grain sea salt
Freshly ground black pepper
¼ cup heavy cream (optional)
Chive blossoms, for garnish (optional)
Heat the butter in a large saucepan over medium heat, then add the scapes and sauté for 2 minutes. Add the potatoes and stock, cover, and simmer for about 20 minutes, or until the potatoes are cooked through and beginning to break down.
Remove from the heat, add the spinach, and puree using a hand blender. (If you must use a conventional blender, be careful; the hot liquid can burst out the top and make a huge, potentially painful mess. Try leaving the lid slightly ajar to allow steam to escape. Cover the top with a kitchen towel and blend in batches at low speed.) Season with the lemon juice, salt, and a few grinds of pepper. Whisk in the cream for a silkier texture. If the soup tastes flat, add salt a few big pinches at a time until the flavors really pop. Serve garnished with the chive blossoms.
Serves 4 to 6.
Sunday, June 17, 2007
Pork-and-Ricotta Meatballs in Tomato Sauce
 For Father's Day, I wanted to make a nice manly dinner. As our dad's aren't local, it was just the two of us, but that doesn't mean we couldn't get into the spirit of things! :)
After a successful first try with meatballs, I wanted to give them another go. I'd saved this recipe from the April issue of Food & Wine magazine because it struck me as interesting - 1/2 lb of bread? Ricotta - in a meatball? What? Now, you Experienced Meatballers might not have found that mix of ingredients captivating (I knew about breadcrumbs in meatloaf... but... this seemed different... I mean... HALF A POUND DIFFERENT!!!) :)
We'd had a nice, lazy afternoon of pooltime and video games before I thought to check on how long these meatballs were supposed to cook (2.5 hours), so at about 4:30 pm, I dashed into the kitchen to get started. Seriously, the prep took about 5 minutes. Maybe 7. I processed the bread, then blitzed the pancetta, herbs and spices, hand mixed it, balled it, and boom, into the oven. After the first 30 minutes, I added in the sauce and put the whole mess back into the oven for 2 hours.
I found the meatballs to be light and flavorful. Because I'd only lightly hand-mixed them, each ball had slightly different seasoning, and I thought that was pretty cool. We did think that the sauce was a little boring and already have plans to use different sauce on the leftovers. I def. recommend these, just sass up the sauce. (And I can't wait to use these in a sammich!!)
Pork-and-Ricotta Meatballs in Tomato Sauce
Food and Wine Magazine, April 2007
http://www.foodandwine.com/recipes/pork-and-ricotta-meatballs-in-tomato-sauce
1/2 pound sliced white bread, crusts removed and bread cut into 1/2-inch dice (4 cups)
1 1/2 pounds lean ground pork
3 ounces thickly sliced pancetta, minced
3 large eggs, lightly beaten
2/3 cup ricotta cheese (5 ounces)
1/4 cup chopped flat-leaf parsley
1 teaspoon dried oregano, crumbled
1/2 teaspoon fennel seeds, chopped
1/4 teaspoon crushed red pepper
Kosher salt
Two 28-ounce cans peeled Italian tomatoes, crushed
Freshly ground pepper
2 tablespoons shredded basil
1/2 cup freshly grated Pecorino Romano cheese
Preheat the oven to 400°. In a food processor, pulse the bread to coarse crumbs. Transfer the crumbs to a large bowl and add the pork, pancetta, eggs, ricotta, parsley, oregano, fennel seeds, crushed red pepper and 1 1/2 teaspoons of kosher salt. Mix well. Shape into 24 meatballs, using about 3 rounded tablespoons of the mixture for each. Transfer the meatballs to an oiled medium roasting pan.
Roast the meatballs in the oven for about 30 minutes, or until firm and just beginning to brown. Using a spatula, loosen the meatballs from the bottom of the pan. Add the crushed tomatoes to the pan and season with salt and pepper. Lower the oven temperature to 325° and cook uncovered for about 2 hours, or until the sauce is very thick and the meatballs are very tender; turn the meatballs once or twice during cooking.
Transfer the meatballs and tomato sauce to a large platter. Garnish with the basil and Pecorino and serve hot.
MAKE AHEAD The cooked meatballs can be refrigerated for up to 2 days. Reheat and garnish just before serving.
Saturday, June 16, 2007
Coconut-Crusted Tofu with Peach-Lemongrass Salsa
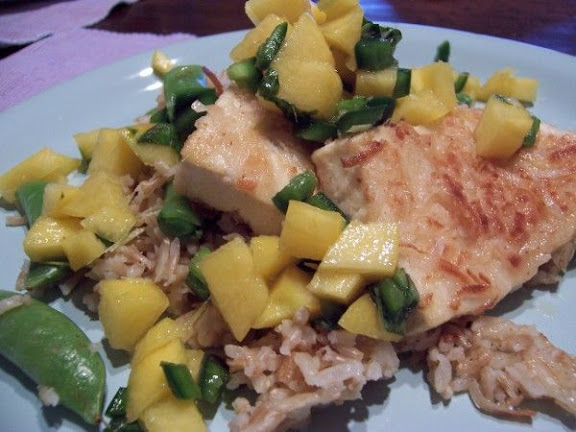 I printed this recipe in March, hopeful that I'd get to it eventually. I think that's about when I started giving tofu a chance, sneaking it into our meals.
Thank goodness for this dinner. Between our breakfast, pizza and a churro from Costco for lunch, Maggie Moo ice cream in the afternoon... I'm sure you see where I'm going with this. Today was a classically bad-eating Saturday. (I did really like that churro, though!)
I made some brown basmati to go-with, and I steamed some CSA sugar snap peas during the last ten minutes of the rice. (I feel very sneaky.) I do wish that the coconut had adhered better to the tofu, and Dave suggested more jalapenos for the salsa. Overall, it was a nice healthy dinner, that assuaged a little ice cream guilt.
Coconut-Crusted Tofu with Peach-Lemongrass Salsa
Eating Well Magazine, June/July 2006
http://www.eatingwell.com/recipes/coconut_tofu_peach.html
3 medium peaches, peeled, pitted and diced
1-2 jalapenos, preferably red, seeded and minced
1 2-inch piece fresh lemongrass, minced, or 1 teaspoon dried (see Note)
1 tablespoon chopped fresh basil
1 tablespoon brown sugar
1 tablespoon rice-wine vinegar
¾ teaspoon salt, divided
½ cup unsweetened flaked coconut
2 tablespoons flour
2 tablespoons cornstarch
1 14-ounce package extra-firm water-packed tofu, drained
2 tablespoons canola oil, divided
Preheat oven to 400°F. Set a wire rack on a large baking sheet.
Combine peaches, jalapenos, lemongrass, basil, brown sugar, vinegar and 1/4 teaspoon salt in a medium bowl; toss to combine.
Mix coconut, flour and cornstarch in a shallow dish. Cut the block of tofu lengthwise into 8 thin steaks. Pat the tofu slices dry with a paper towel, sprinkle with the remaining 1/2 teaspoon salt, then press both sides of each tofu steak into the coconut mixture.
Heat 1 tablespoon oil in a large nonstick skillet over medium-high heat. Add 4 tofu steaks and cook until golden brown, about 2 minutes per side, adjusting heat as necessary to prevent scorching. Transfer the tofu steaks to the rack-lined baking sheet and place in the oven to keep warm. Heat the remaining 1 tablespoon oil in the skillet over medium-high heat; cook the remaining tofu steaks until golden brown, about 2 minutes per side. Serve the tofu with the peach salsa.
Makes 4 servings.
Per serving: 251 calories; 16 g fat (4 g sat, 9 g mono); 0 mg cholesterol; 19 g carbohydrate; 11 g protein; 3 g fiber; 491 mg sodium; 313 mg potassium.
Eggs in Prosciutto Baskets
 We are breakfast in bed people. Yes, I am normally the one that prepares it, but thats ok. ;) My husband does so on occasion, and usually right when I need it. Nothing nicer than being snuggled into bed with something tasty and some hot coffee.
So you can imagine how excited I was to find this recipe yesterday morning. I usually make a grocery run on Fridays, so I added the few ingredients to my list. I also picked up a package of english muffins, because the recipe seemed like it could be friends with eggs benedict.
Prep could not have been easier. Spray with oil, place the prosciutto, cheese, garlic scape (oh yah, I sauteed a scape to add in) and top with egg. A little salt and pepper and boom, into the oven. While they baked, I made coffee, woke up the husband, and toasted the muffins. They looked cute on the muffins, but were strange to eat that way, so we both slid them back on the plate. Its the thought that counts.
Next time, I'll scramble Dave's eggs before I bake them. He's a little squidgy with sunny-side uppedness. I don't know why I didn't think to do it this morning. He ate them and loved them anyway, so no harm done.
To wrap up, I want to say, The Culinary Chase is a new blog to me, but one I will def. follow from now on! :)
Eggs in Prosciutto Baskets
c/o The Culinary Chase
http://theculinarychase.blogspot.com/2006/09/eggs-in-prosciutto-baskets.html#links
Ingredients:
Prosciutto slices (1 slice per egg)
Fontina cheese (about 1 oz. per dish. more if you like)
eggs
Preparation:
Preheat oven to 400°F. Grease muffin pan (muffin size 3" wide 1.5" deep). For this size of muffin pan, cut the prosciutto in half and fit the slices such that they form a basket to hold the egg. Add the cheese and then the egg to each prosciutto basket.
Bake 10 minutes. Remove by running a knife around the outer edges of the pan and lift out with a fork or spoon.
Friday, June 15, 2007
Halibut in Thai Curry Sauce over Fresh Corn Polenta
 Sure, we just had halibut a couple of days ago... but I think I've mentioned I like to eat something over and over again to get a feel for it... at least I used a different recipe!! :)
Well, that and Dave specifically requested seafood... he'd picked out a bottle of wine he wanted to have with dinner, so I needed to pick a dinner that went with it.
This dinner had a lot of things going for it. For starters, it allowed me to use some of my CSA summer squash (in place of the zucchini), it called for red Thai curry paste, which we love, and it had creamy, dreamy, lovely polenta. You can't really see it in the picture, because the sauce is so saucy, but there really is a heaping pile of polenta in there. I promise. I wouldn't lie about polenta.
My substituted lite coconut milk for regular and I used frozen organic corn kernels instead of fresh-off-the-cob. I would suggest, if you decide to make this at home for a crowd, get more fish. There was ample polenta, veg, and sauce to serve at least 6.
Halibut in Thai Curry Sauce over Fresh Corn Polenta
Whole Foods Market
http://www.wholefoods.com/recipes/seafood/halibut_thaicurry.html
Fresh Corn Polenta
4 cups water
3/4 tsp salt
1 cup polenta
2 ears corn, kernels removed (2 TB reserved for curry below)
2 TB butter
Coconut Red Curry Sauce
1 to 3 tsp red curry paste, or to taste
1 can (15 oz) coconut milk
1/4 cup fresh basil, chopped
3 TB fish sauce
2 TB brown sugar
2/3 cup chicken or vegetable stock
2 TB fresh lime juice
2 medium zucchini, chopped
2 medium red bell pepper, chopped
8 oz cremini mushrooms
2 TB corn kernels, (reserved from above)
1 1/4 lb halibut, skinned and cut into 4 pieces
In a heavy medium saucepan, bring four cups salted water to a boil. Slowly add polenta and whisk continuously for one minute. Reduce heat to low, cover and simmer 20 minutes, stirring periodically. Add corn kernels to polenta and cook 5 more minutes. Remove from heat, add butter, and mix well.
While polenta cooks, combine curry paste with coconut milk in a large heavy skillet and simmer on medium low heat for 5 minutes. Add basil, fish sauce, brown sugar, stock, lime juice, reserved corn kernels and chopped vegetables. Simmer for 4 more minutes. Add halibut and simmer, covered, for 10 more minutes or until halibut is opaque and cooked through, flipping once. Set aside and keep warm.
Serve halibut over polenta with curry sauce ladled on top.
Thursday, June 14, 2007
Candlelight and Jazz
Except... there was no jazz... and the candles were there to make light, not mood... the ziti was real (I picked it up at the store myself!)...
You see, we'd lost power yesterday afternoon. I suspected it before I got home, as the nearby traffic lights were dark... so I picked up some baked ziti from Rubinos Pizzeria. Sure enough, the neighborhood was dark and gloomy from the storms.
Mind you, I was a girl scout, so you think I would have been prepared for this. I couldn't find a single flashlight and I broke a lamp as I dug in the closet for my squirreled-away candles (hey, it was dark!). I tried to read by window-light, and then by candlelight, but Abe Lincoln, I am not. I ended up going to bed at 9:30.
At least the ziti was yummy. A coworker recommended it, and I enjoyed it so much, I plan on asking him for more local food advice! :)
I wish I knew how to knit.
Tuesday, June 12, 2007
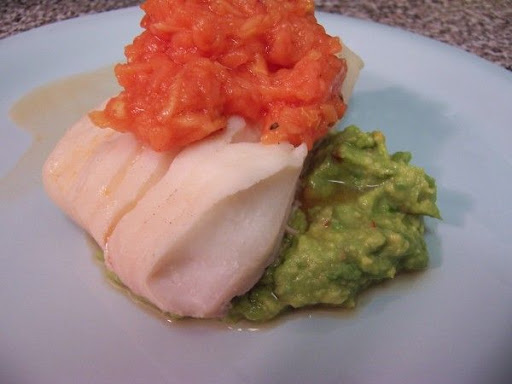
Halibut with Avocado Mash and Green (Red) Papaya Slaw
 I have realized that I've been on blogger autopilot lately. My posts have consisted of, "This was the best dinner ever, you should eat it! Yay!" or some variation. And who wants to read day after day of that? I bore myself! :)
So, my pledge is to actually be personable. (Or try!) I just get very nervous knowing there are actual people out there reading my blog, many of whom I have great respect for as chefs/cooks/food bloggers, and... and... I turned into Robot Katie! Noooo! Heh. I just need to relax, take a deep breath, and pretend you're all naked. Or something.
Tonight, we had this for dinner, but you've already seen it. So I'll tell you about last night's dinner! Halibut with Avocado Mash and Red Papaya. It called for green papaya, but as I'd never actually purchased a papaya before, I wasn't really paying attention. Whoops. In fact, I was pretty dense about it. I got it home, cut it up, seeded it, got to grating it.... and I looked at the picture in the magazine, and the papaya topping in that picture looked almost colorless... so I thought, "Maybe the vinegar does that to it...?" and carried on. It wasn't until later that the light bulb appeared... Oooooh, GREEN papaya! Right. O well.
I rather enjoyed dinner the way it was, and I felt like I'd just eaten a fabulously healthy dinner, but it didn't so much match the picture, or the promise of crunchiness in the magazine blurb. The husband seems to think that this dinner has the potential to make it into his Top Five, if only I were to make it correctly. So now I am on the hunt for a sturdy and safe mandoline. Any recommendations?
Halibut with Avocado Mash and Green Papaya Slaw
Adapted from Food & Wine Magazine, July 2007
http://www.foodandwine.com/recipes/halibut-with-avocado-mash-and-green-papaya-slaw
8 cups water
4 shallots, thinly sliced
6 garlic cloves, halved
12 thyme sprigs
2 tablespoons black peppercorns
2 tablespoons kosher salt
1/4 cup extra-virgin olive oil
1 lemon, halved
2 tablespoons sugar
3 tablespoons rice vinegar
Crushed red pepper
1 pound green papaya—peeled seeded and julienned (2 cups)
Sea salt and freshly ground black pepper
1 tablespoon fresh lime juice
1 large Hass avocado, mashed
Four 6-ounce skinless halibut fillets
In a large saucepan, combine the water, shallots, garlic, thyme, peppercorns, kosher salt and oil. Squeeze the lemon over the saucepan and add to the pan. Bring to a boil, then simmer for 30 minutes.
Meanwhile, in a microwave-safe bowl, mix the sugar and vinegar and microwave at high power for 1 minute; stir to dissolve the sugar. Add a pinch of crushed red pepper and the green papaya. Season with sea salt and black pepper and toss to coat.
In a small bowl, mash the lime juice into the avocado and season with sea salt and crushed red pepper.
Place the halibut in a deep, medium skillet, leaving some space between the fillets. Strain enough of the aromatic poaching liquid over the fish to just cover it. Simmer the halibut gently over very low heat just until the fish flakes easily with a fork, about 10 minutes.
Spoon the mashed avocado onto 4 plates and top with the halibut. Using a slotted spoon, mound the papaya slaw on the fish and serve right away.
Makes 4 servings.
Per serving: 310 cal, 11 gm fat, 1.5 gm sat fat, 17 gm carbs, 4.3 gm fiber.
Sunday, June 10, 2007
And the Trophy Goes to...
 I am thrilled to announce that the HHDD #12: Caesar nod goes to Laura at Eat Drink Live, for her beautiful Mini Caesar Salad Bites!!! I think we can all agree that we patiently await invitations to dinner at Laura's house!
As the Big Cheese, Laura receives one of my favorite cookbooks, and the fun of hosting the next Hay Hay its Donna Day event! Check back to her blog to see what's next!!
Saturday, June 9, 2007
14 Hours Left to Vote!!!
 Don't forget to vote for your favorite Caesar!! Voting concludes at midnight (EDT) tonight!!
Please email your favorite to me at otherpeoplesfoodATgmailDOTcom! Can't wait to hear from you!!
Friday, June 8, 2007
Rainbow Chard and Ricotta Filo Roll
 Filo success! The first time I used filo, it was super-easy. Second time, catastrophe. This, the third time, was a dream! Why the difference? The first and third's dough was from Whole Foods. The one in the middle was from Wegmans. While I am mostly spoiled by Weggies, I'll stick to Whole Foods for my filo.
When I saw this recipe on Haalo's site, Cook Almost Anything, I knew it would be a perfect dinner this week. A large bag of swiss chard was delivered in our CSA, and as I've never used it before, I was hungry for ideas. I immediately printed it out and added the necessary ingredients to my grocery list. (And if any of you have swiss chard recipes, I'd love to have 'em!!)
Sure, we've been on a South Beach Diet roll, but we can go back to those books tomorrow. Tonight, its all Haalo! The filling was nice and creamy, punctuated by the pine nuts. The sesame seeds weren't, to me, as noticeable as a flavor, but the aroma they gave off was earthy and wonderful.
I won't post the recipe, but you can find it on Haalo's blog, here. Her site is just fantastic, so check it out!!
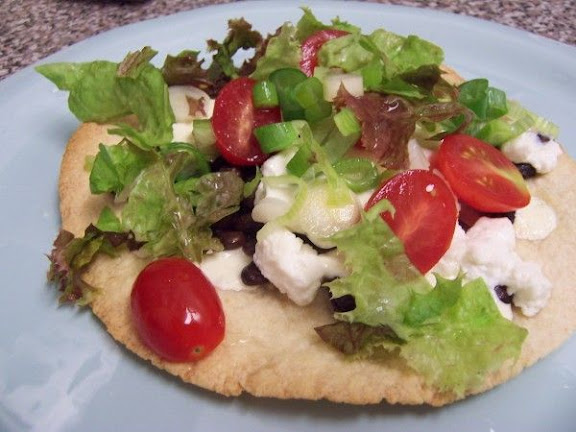
Black Bean and Goat Cheese Tostadas
 I gotta say, its really starting to feel like summer. (Crazy heat and humidity aside) I'm enjoying the smells of people grilling, the brightness of the vegetables, and the general excitement in the air. Now all I need is a trip to the pool and some adult beverages!
This was Wednesday's yummy dinner, also courtesy of a South Beach Diet cookbook. Not only are they healthy and taste great, but so far, all these SB recipes have been a snap to make. I want to say its because they don't have wild and crazy ingredient lists, but I don't know if that's fair. (could just be that I pull from the "quick and easy" and "summertime" books).
As I've mentioned before, I love tortillas and I love goat cheese. I switched out a few things in this recipe, just because I wanted to use what I had. My CSA delivered red leaf lettuce, so I used it instead of romaine, and I already had grape tomatoes, so I used them halved instead of chopping up bigger ones. I also added cubed fresh mozzarella, just because I've been in love with it lately. I imagine you could get away with regular black beans if you couldn't find black soybeans, too.
Black Bean and Goat Cheese Tostadas
Adapted from: The South Beach Diet Quick and Easy Cookbook: 200 Delicious Recipes Ready in 30 Minutes or Less
4 (8-inch) whole-wheat tortillas
2 teaspoons extra-virgin olive oil
1 large garlic clove, minced
1 (15-ounce) can black soybeans, drained and rinsed
4 ounces reduced-fat goat cheese, crumbled (3/4 cup)
½ (1-pound) head romaine lettuce, chopped (4cups)
2 medium tomatoes, diced
3 scallions, thinly sliced
1 lime, quartered
Salt and freshly ground black pepper
Heat oven to 400°F.
Lightly spray tortillas with cooking spray and place, slightly overlapping, on a baking sheet. Bake until lightly puffed and browned, about 10 minutes. Set aside to cool.
While tortillas are toasting, heat oil in a medium saucepan over medium heat. Add garlic and cook until softened, about 1 minute. Stir in beans and heat until warmed through. Season with salt and pepper and remove from heat.
With tortillas still on the baking sheet, top with beans and cheese; bake until cheese has melted, about 5 minutes. Remove from the oven and top with lettuce, tomatoes, and scallions. Squeeze lime over top and serve hot.
Makes 4 servings.
Nutritional stuffage: 290 calories, 10 g fat, 2.5 sat. fat, 13 g protein, 35 g carbs, 7 g fiber, 380 mg sodium
Thursday, June 7, 2007
Herb-Marinated Sirloin with Roasted Asparagus and Tomatoes
 I'm entertaining the idea of giving the South Beach Diet another go, and because of that, I picked up The South Beach Diet Taste of Summer Cookbook
, and I think its wonderful!! The first time we did south beach, we only had the very basic first book to go off of, and those recipes are...well... a little boring. Since then, we've gotten the The South Beach Diet Quick and Easy Cookbook: 200 Delicious Recipes Ready in 30 Minutes or Less
and now this Taste of Summer book... so we really have no excuse for not eating a bit healthier.
Not that we necessarily were eating junk before, but I think that every little bit helps. After our first relationship with the SB diet a few years ago, we never went back to white anything - no white bread, pasta, rice, or sugar, so I think in that respect, giving this way of eating another go won't be such a shock to our systems.
Anyway, on to dinner!! I rarely make beef, but I'm trying to branch out a little. I think my trusty Polder kitchen thermometer finally croaked, because I overcooked the meat a bit. Hopefully all it needs are new batteries, but it might end up being a nice excuse to go to the kitchen store. (Woo!) We've also really been enjoying all the lovely fresh asparagus out right now, and I'm recently in love with grape tomatoes, and all roasted up, both were delicious! This dinner was a real winner and it couldn't have been easier, to tell the truth. Next time around, I'll try to do a little better with the steak, but overall, A+!!
Herb-Marinated Sirloin with Roasted Asparagus and Tomatoes
From: The South Beach Diet Taste of Summer Cookbook
Phase 1
½ teaspoon garlic powder
½ teaspoon dried marjoram
½ teaspoon dried thyme
½ teaspoon freshly ground black pepper
¼ teaspoon salt
1 (1 ¾-pound) sirloin steak, about 1 ½ inches thick
1 pound medium-thick asparagus, trimmed
1 ½ cups grape tomatoes
2 teaspoons extra virgin olive oil
In a small bowl, combine garlic powder, marjoram, thyme, pepper, and 1/8 teaspoon of the salt. Rub onto steak. Place steak on a plate, cover with plastic wrap, and let steak sit at room temperature for 30 minutes.
Lightly coat a heavy skillet with cooking spray and heat over medium-heat. Pan-grill steak 10 minutes per side for medium-rare. Transfer to a cutting board and let sit for 5 to 10 minutes.
While steak is resting, heat the oven to 450°F. Spread asparagus and tomatoes on a baking sheet, drizzle with oil, sprinkle with remaining 1/8 teaspoon salt, and toss to combine. Roast until tomatoes are bursting and asparagus is tender, 8 to 10 minutes.
While vegetables are roasting, thinly slice steak. Divide steak and vegetables among 4 plates and serve warm.
Makes 4 servings.
Stats/serving: 280 calories, 10 g fat, 3.5 sat. fat, 40 g protein, 7 g carbs, 3 g fiber, 250 mg sodium
Wednesday, June 6, 2007
Yay CSA Week One!!!

The only item I hoped to get but didn't was asparagus, but no biggie - because actual real-live garlic scapes WERE included! How lucky am I??? I already had a recipe on deck for the swiss chard, and I'd read some articles recently on the garlic scapes, so I think I'm going to make a pesto out of it. If I love it as much as I think, I'll pop over to the farmer's market this weekend to look for more. I mean, hey, if I can pesto it up and freeze it for later, I'm all for it.
The wait was absolutely worth it, and I'm even more excited for the (tasty) summer ahead!!
See the recipe...
Tuesday, June 5, 2007
Chipster-Topped Brownies!!!
 While I ordered it a few weeks ago, I only cracked open Dorie Greenspan's Baking: From My Home to Yours this past weekend. I went in looking for a cake for my mom's birthday, and I found so much more!!!
I'll post about the cake a little later this week, but I wanted to make sure I got my brownie entry in for Myriam's BrownieBabe of the Month #2 asap! I find this event a little daunting - I love brownies, and I loved her first round-up, but what ended up happening was that I found a number of recipes I wanted to try RIGHT THEN - but making a brownie recipe that someone else just entered seemed a little silly... so the pressure began to find an as-of-yet-unblogged about recipe worthy of Babe-dom! Whew!!
In comes these little beauties. I saw them and knew I had to make them. I mean, really, how much more gratuitous can you get than chocolate chip cookie topped brownies? (Ice cream, maybe?) Its like the bake-sale stars were aligned!!! I took a bucket to my mom's and I took a bucket to work, everyone seems happy. :)
My only change for next time would be to bake them a little less. I went with 50 minutes, so I might try 42-45 next time to see if I get moister brownie action.
Chipster-Topped Brownies
From: Baking: From My Home to Yours, by Dorie Greenspan
http://www.amazon.com/Baking-Home-Yours-Dorie-Greenspan/dp/0618443363/ref=pd_bbs_sr_1/002-6815521-7348005?ie=UTF8&s=books&qid=1180888595&sr=8-1
For the brownie layer:
6 ounces bittersweet chocolate, coarsely chopped
3 ounces unsweetened chocolate, coarsely chopped
2 sticks (8 ounces) unsalted butter, cut into chunks
1 2/3 cups sugar
4 large eggs
½ teaspoon salt
½ teaspoon pure vanilla extract
1 cup all-purpose flour
1 cup walnuts, coarsely chopped
For the cookie layer:
1 ¼ cups all-purpose flour
½ teaspoon baking soda
½ teaspoon salt
1 ½ sticks (12 tablespoons) unsalted butter, at room temperature
¾ cup (packed) light brown sugar
2/3 cup sugar
1 large egg
1 egg yolk
1 teaspoon pure vanilla extract
6 ounces bittersweet chocolate, chopped into chips, or 1 cup store-bought chocolate chips
Getting ready: Center a rack in the oven and preheat the oven to 350 degrees F. Butter a 9-x-13-inch baking pan, line it with wax or parchment paper and butter the paper. Put the pan on a baking sheet.
To make the brownie batter: Put both chocolates and the butter in a bowl set over a saucepan of simmering water. Stirring occasionally, heat just until the ingredients are melted, shiny and smooth. If the mixture gets too hot, the butter will separate from the chocolates. Remove the bowl from the heat.
Working with a stand mixer, preferably fitted with a paddle attachment, or with a hand mixer in a large bowl, beat the sugar and eggs on medium-high speed for about 2 minutes, until pale, thick and creamy. Beat in the salt and vanilla extract. Reduce the speed to low and mix in the melted chocolate and butter, mixing only until incorporated. Scrape down the sides of the bowl with a rubber spatula, then, still on low speed, add the flour, mixing only until it disappears into the batter. Using the spatula, fold in the walnuts, and scrape the batter into the prepared pan. Set aside.
To make the cookie dough: Whisk together the flour, baking soda, and salt.
Working with a stand mixer in the cleaned bowl or with the hand mixer in another large bowl, beat the butter and both sugars together on medium-high speed until smooth and creamy, about 3 minutes. One at a time, add the egg and the yolk, beating for 1 minute after each addition. Beat in the vanilla. Reduce the mixer speed to low and add the dry ingredients, mixing only until they disappear into the dough. Still on low, mix in the chopped chocolate. Drop the cookie dough by spoonfuls over the brownie batter an, using a spatula and a light touch, spread it evenly over the batter.
Bake for 50 to 55 minutes, or until the cookie top is deep golden brown and firm and a thin knife inserted into the brownie layer comes out with only faint streaks of moist chocolate. Transfer the pan to a rack and cool to room temperature.
When the brownies are completely cool, carefully run a knife between the sides of the pan and the brownies, then invert them onto another rack, remove the paper and turn right side up onto a cutting board. Cut into bars about 2 inches by 1 inch. (You can cut larger bars if you’re serving to cookie lovers with Texas-size appetites.)
Sunday, June 3, 2007
Hay Hay it's Caesar: Tasty Round-up!
You guys rock!!!
I knew choosing Caesar Salad was a little different. I also had great faith that you guys would rise to the challenge and deliver some amazing recipes!!! Seriously, the high point of my day was opening my email to find all of your delicious entrys. I think anyone's need for salads this summer will surely be met by any one of these great ideas! Thank you so much for sharing and making my (first-ever) event so enjoyable!!!
Voting begins today, June 3rd, and runs until midnight on Saturday June 9th. The winner will be announced Sunday the 10th! Anyone can vote by emailing your choice to me at otherpeoplesfoodATgmailDOTcom. Good luck!!!
Entry #1
The HHDD #12 Roundup begins with Lisa and her Vegetarian Caesar Salad. As someone that’s trying to incorporate more vegetarian meals into her life, I was very glad to get her entry!
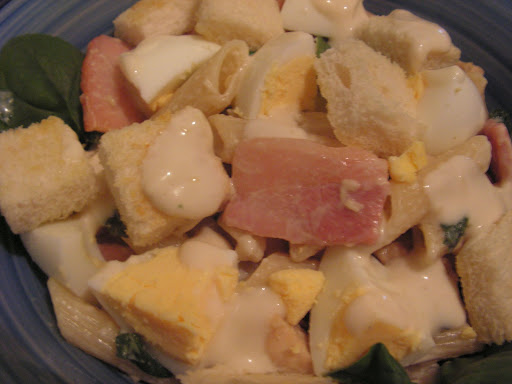
Entry #2
Janet is Hungry, and now I am too! Perfect for your next bbq, Janet combined her love of potato salad with Caesar, and ended up with a lovely looking Potato Caesar Salad! Yum!
Entry#3
Laura of Eat Drink Live takes such dreamy photographs of her meals, and this is no exception. Her Mini Caesar Salad Bites are perfectly adorable!!
Entry #4

Brooke, a fellow new food blogger, overcame her un-love of Caesar salad and came up with a very creative alternative – Parmesan Crusted Chicken Involtini! She combined everything Caesar-y, and created a nice little package!
Entry #5
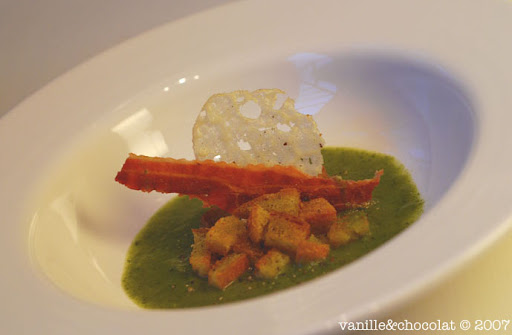
Delightful Londoner Inne, of Vanille & Chocolat, surprised me with her Caesar Soup – I’d been hoping for creative recipes, and this certainly fits the bill! Great for a cool evening!
Entry #6

Thanks go to Edward of Wino Sapien, for his figure-friendly submission. Not only is his Caesar Salad healthy, it’s cute, too! (Don’t you carb-conscious folks worry, the croutons are multigrain!)
Entry #7
Heading into the colder months, Tara from Should You Eat That? was more interested in creating a warm Caesar dish, and I don’t blame her! Her Chicken Caesar Pasta Salad looks creamy and inviting – just what you want when the temperature drops!
Entry #8

With another healthy alternative, Deborah wows us with her Creamy Caesar Salad with Spicy Croutons and Shrimp. Sounds like a delicious mouthful!
Entry #9
 New HHDDer Pam of Backyard Pizzeria brings us her delightful version of Caesar Salad. I am so glad she chose to join the fun with this event, aren’t you???
Entry #10

Despite disliking eggs (and anchovies), Alison rallied and submitted her very first HHDD entry – AND her first Caesar – Caesar Salad with Sourdough Croutons! I think she’s one brave cookie, and I for one am glad to have her!
Entry #11

With another photo that has me wanting to lick my screen, Sarina brings us her beautiful Spicy Caesar Salad. Her post delivers not only a great recipe, but a little history, too! Thanks!!!
Entry #12
 Lauren B. from Burghilicious treats us to her Endive Lettuce Cups with Citrus Caesar Vinaigrette and Frico entry. This was a pretty early post for her, and if this recipe means anything, it means that she’s a new blogger to watch!
Entry #13
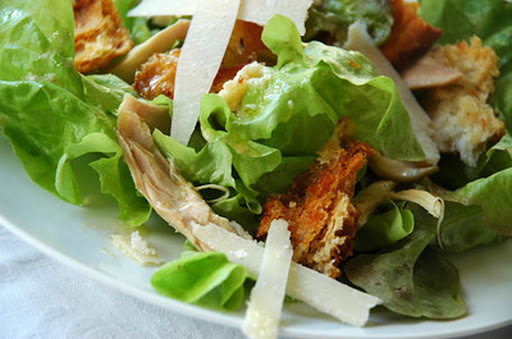 Most Awesome Barbara, of Winos & Foodies, and creator of Hay Hay is Donna Day, brings to the table her Jamie Oliver-inspired Caesar Salad. I love croutons in general, and she roasts hers under a chicken! Yum!
Entry #14
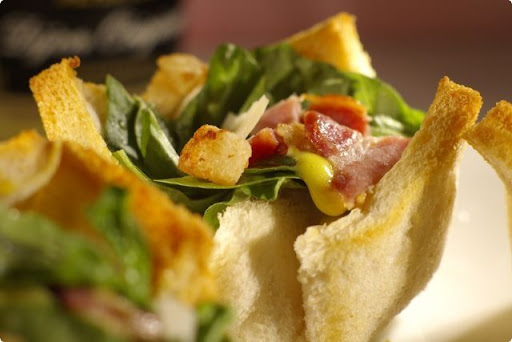
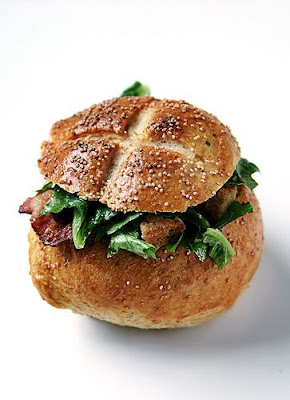 I think Deinin’s Caesar Salad-Filled Bread rolls are so cute! She combines the bread and salad course all in one in a tasty, efficient little treat! Love it!
Entry #15
 Ulrike of Küchenlatein (Kitchen Latin, if I translated that correctly), brought us her first Caesar Salad recipe (Insipired by Cardini's dressing)! I’m sure glad she did! Looks great!
Entry #16
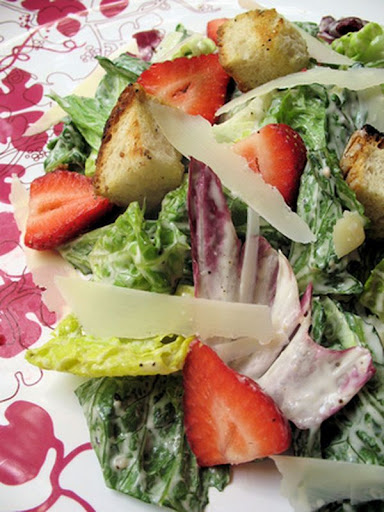 Tami, from Running with Tweezers, confesses her undying love for Caesar Salad and kicks it up a notch by tossing in some fresh strawberries! Who wants to carpool with me to her house for Sunday brunch?
Entry #17
 Joey kicks regular potato salad in the pants with her creamy Potato Caesar dish. She even kept to the Donna Hay Caesar recipe! Rock on!
Entry #18

Honoring the history of Caesar Salads, Anita at Married with Dinner cooked up her Senor Caesar entry. She even tossed in a hint from my fav. Smart guy, Alton Brown.
Entry #19
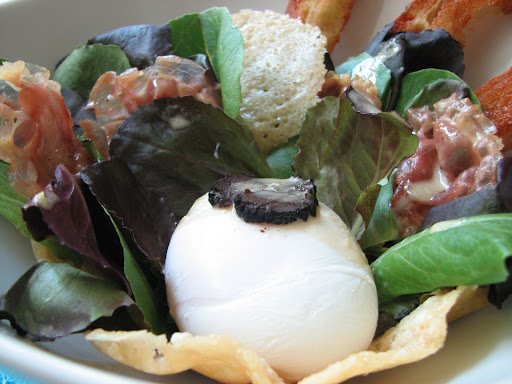 My mouth actually watered reading about Brigitte’s entry (and its an honest mouthful!) - Insalata dell'imperatore (Caesar salad made with baby romaine, pancetta, and truffles with anchovy-mayonnaise in parmesan baskets, and chiabatta-sticks). Dreamy!!!
Entry#20
Talk about taking one for the team!!! Bron was attacked by her salad ingredients!!! She persevered, however, and delivers a knockout Caesar Salad! Let this be a reminder, however – bacon: delicious AND dangerous!
Entry #21
 Another great Jamie Oliver-inspired salad from Gilli of So So Simple Food. She dubbed it Hail Caesar Thanks Jamie – I say, Thanks Gilli!!
Entry #22
Arfi's salad, made to accompany her pumpkin cakes ,is not quite the traditional Caesar Salad, although it does contain green leaves and garlic. It is a Garlic, Lime and Chilli Prawns on a Baby Lettuce and Fresh Basil Salad.


