Sunday, April 27, 2008

My Cheesecake is Cool, My Cheesecake be Poppin'


They're popping, they're popping!

(Let me preface by saying that I'm a raging nerd for just linking to this song. What it's doing on my ipod is a mystery. I was trying to come up with a title to this entry, and I couldn't shake the lyrics. Hey, it's catchy!)

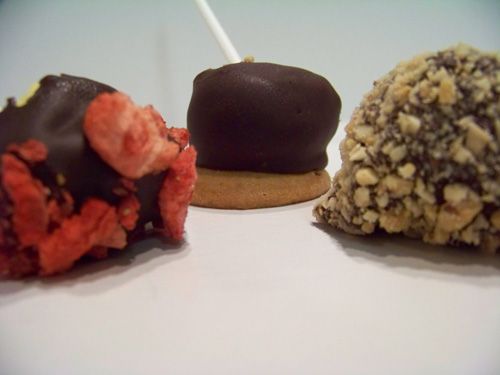
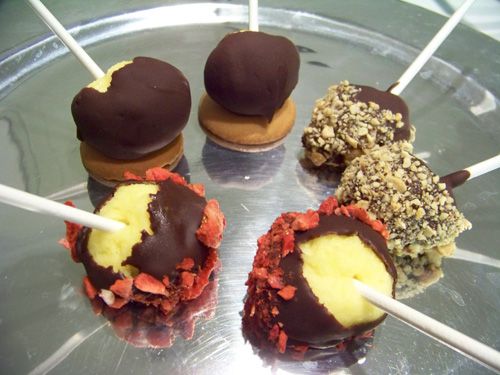
Welcome to the April Daring Bakers Challenge - Cheesecake Pops! Elle and Deborah are our hostesses, and I could reach through the computer and hug them! I was so excited about this challenge that I got to planning my pop flavorings out right away. This is a vast departure for me, because I almost always wait until the last minute to complete my challenge (and thusly, because I am in a frenzied panic, I am rarely creative.) Cheesecake and graham crackers are friends, but I wanted to pop it in less traditional ways. I split the cheesecake batter into three different 9-inch round cake pans and flavored each differently.

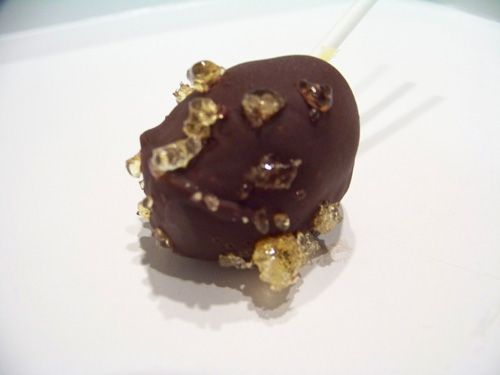
I will lead with my favorite. Of this pop, there was only one. It was something spontaneous and interesting, but turned out to rather tricky. What you see to the left is a vanilla cheesecake pop, dipped in chocolate and sprinkled with a crushed Honey Drop. I processed the drop in my mini-chopper and sprinkled the bits onto the pop. I had hoped that the drop crumbles would be something I could dip into, but they were too busy sticking to each other to latch on to the chocolate. I had a tray of pops before me, so I moved on to the peanut butter pops. I wish had persevered, because the honey/chocolate/cheesecake combination was so, so amazing. Honibe's Honey Drops have such a delicate honey flavor, and the sprinkles imparted a soft sweetness to the lush creaminess of the cheesecake and chocolate.

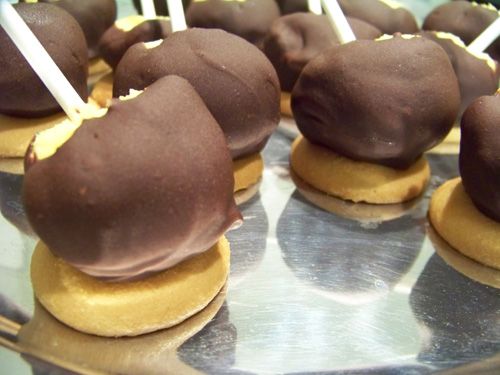
For my second pop, my goal was chocolate banana pudding on a stick. I flavored the cheesecake itself with banana essence. Once dipped, I placed each pop on a nilla wafer and called it a day! Dave thinks I'm nuts, but they remind me of a little French girl once picked up. (Yanno, with the jaunty beret!)


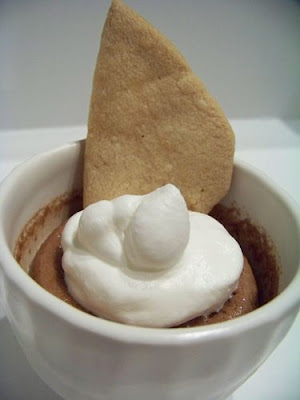
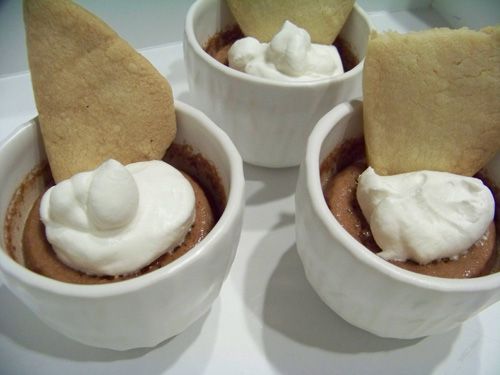
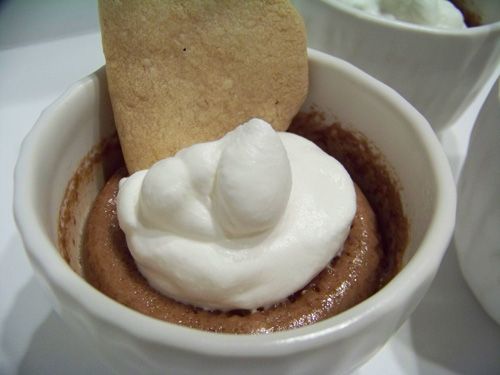
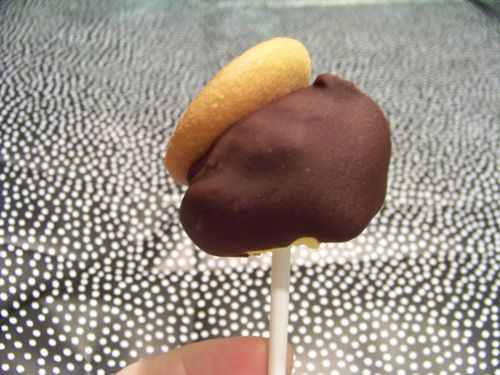
You see it, too, don't you?


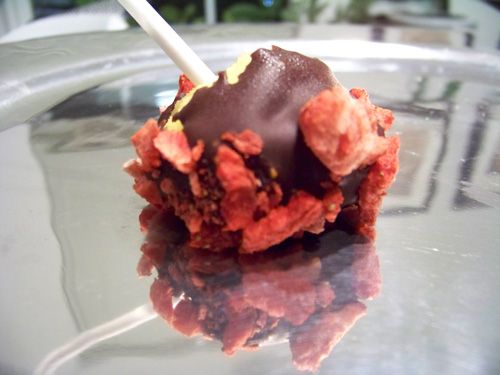
The flavoring I am most proud of, and the one that caused me the most anxiety, is the strawberry balsamic pop. I knew I could do it, but would it be as delicious as I'd hoped? I flavored the chocolate with 2 tablespoons of balsamic vinegar. Once dipped, each vanilla pop went into a bowl of crushed freeze-dried strawberries (Yeah, astronaut food!) These inside-out chocolate-dipped strawberries exceeded my expectations. The sweetness of the balsamic vinegar paired perfectly with the strawberries.

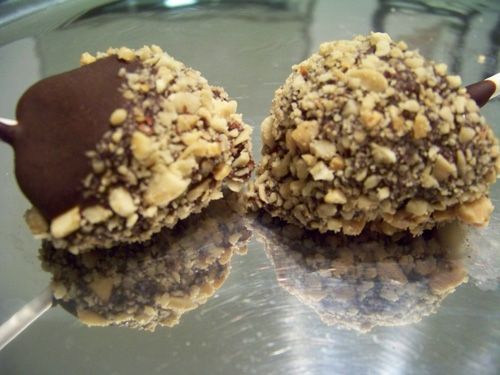
Last but not least, and Dave's favorite, are the peanut-dipped pops. I tried to flavor the cheesecake with peanut butter essence, but it didn't seem to take. I couldn't tell the difference between it and the plain vanilla cheesecake. I tried to make up for that by adding some peanut butter to the melted chocolate, which seemed to do the trick. Rolled in peanuts, these little beauties had the right balance of creamy AND crunchy. They were by far the easiest to make and the most universally approved of. I think these would have been great with almonds or pistachios, too.


I couldn't be happier with the outcome of this challenge. Sure, it took me three days, but it was well worth it. These pops would be awesome for a party or shower, and at the very least, they made my husband and coworkers very happy.

Big pop props to Deborah and Elle - thank you for a fantastic challenge!

For 1000 other pops, click over to the Daring Bakers Blogroll!


Cheesecake Pops
from Sticky, Chewy, Messy, Gooey by Jill O’Connor
http://www.amazon.com/Sticky-Chewy-Messy-Gooey-Desserts/dp/081185566X/ref=pd_bbs_sr_1?ie=UTF8&s=books&qid=1209261000&sr=8-1

Makes 30 – 40 Pops

5 8-oz. packages cream cheese at room temperature
2 cups sugar
¼ cup all-purpose flour
¼ teaspoon salt
5 large eggs
2 egg yolks
2 teaspoons pure vanilla extract
¼ cup heavy cream
Boiling water as needed

Thirty to forty 8-inch lollipop sticks

1 pound chocolate, finely chopped – you can use all one kind or half and half of dark, milk, or white (Alternately, you can use 1 pound of flavored coatings, also known as summer coating, confectionary coating or wafer chocolate – candy supply stores carry colors, as well as the three kinds of chocolate.)

2 tablespoons vegetable shortening

(Note: White chocolate is harder to use this way, but not impossible)

Assorted decorations such as chopped nuts, colored jimmies, crushed peppermints, mini chocolate chips, sanding sugars, dragees) - Optional

Position oven rack in the middle of the oven and preheat to 325 degrees F. Set some water to boil.

In a large bowl, beat together the cream cheese, sugar, flour, and salt until smooth. If using a mixer, mix on low speed. Add the whole eggs and the egg yolks, one at a time, beating well (but still at low speed) after each addition. Beat in the vanilla and cream.

Grease a 10-inch cake pan (not a springform pan), and pour the batter into the cake pan. Place the pan in a larger roasting pan. Fill the roasting pan with the boiling water until it reaches halfway up the sides of the cake pan. Bake until the cheesecake is firm and slightly golden on top, 35 to 45 minutes.

Remove the cheesecake from the water bath and cool to room temperature. Cover the cheesecake with plastic wrap and refrigerate until very cold, at least 3 hours or up to overnight.

When the cheesecake is cold and very firm, scoop the cheesecake into 2-ounce balls and place on a parchment paper-lined baking sheet. Carefully insert a lollipop stick into each cheesecake ball. Freeze the cheesecake pops, uncovered, until very hard, at least 1 – 2 hours.

When the cheesecake pops are frozen and ready for dipping, prepare the chocolate. In the top of a double boiler, set over simmering water, or in a heatproof bowl set over a pot of simmering water, heat half the chocolate and half the shortening, stirring often, until chocolate is melted and chocolate and shortening are combined. Stir until completely smooth. Do not heat the chocolate too much or your chocolate will lose it’s shine after it has dried. Save the rest of the chocolate and shortening for later dipping, or use another type of chocolate for variety.

Alternately, you can microwave the same amount of chocolate coating pieces on high at 30 second intervals, stirring until smooth.

Quickly dip a frozen cheesecake pop in the melted chocolate, swirling quickly to coat it completely. Shake off any excess into the melted chocolate. If you like, you can now roll the pops quickly in optional decorations. You can also drizzle them with a contrasting color of melted chocolate (dark chocolate drizzled over milk chocolate or white chocolate over dark chocolate, etc.) Place the pop on a clean parchment paper-lined baking sheet to set. Repeat with remaining pops, melting more chocolate and shortening (or confectionary chocolate pieces) as needed.

Refrigerate the pops for up to 24 hours, until ready to serve.

See the recipe...


Wednesday, April 23, 2008

Chocolate Mascarpone Cheesecake Pots with Shortbread Cookies

Do you have a dinner party coming up? Do you want an amazing dessert that you can prepare ahead of time? One that will wow your friends and family? If so, these cheesecakes are for you!

Our friends Jeremy and Liane came over for dinner last week, for a revisit to the shrimp tacos. Considering that the dinner could be spicy, I wanted something creamy and luscious for dessert. (And I'd received these adorable dessert cups for my birthday and I wanted to try them out!)

I was also tickled to be able to use a tub of mascarpone from the dairy lady at my local farmer's market. (I'll try to get her name next time... although, the Dairy Lady has a nice ring to it!) Mascarpone is like an Italian cream cheese, and figures prominently in tiramisu. If you can't find any (or if it's marked up something crazy), you can substitute straight cream cheese or a mix of equal parts cream cheese to sour cream.

There aren't many ingredients to this dessert, so try to use the best you can get your hands on. Those seven (eight, if you include the rum - I didn't) come together easily. I only realized as I typed up the recipe that I neglected to cover the pan of pots with aluminum foil... my pots came out fine, but I'd be interested to see how they turned out if I'd paid attention. Evidently I was too interested in licking the contents of the bowl and less interested in the directions. Oops!

While the cheesecakes are rather tasty warm from the oven (what? like you wouldn't try one), they are MUCH better after getting their chill on in the fridge. Trust me. You could probably also divide the batter between six cups instead of 8, to make a bigger serving per person. I actually liked the smaller amount, because the cheesecake was really rich, and I found the eight or so spoonfuls to be the perfect amount.

Now, on to the cookies. I wish I had a spoon-shaped cookie cutter. I don't and I was too lazy to go tracing any spoons for these cookies... but I'm sure the triangles are just as delicious! The only hard part is waiting for the dough to firm up. When I want cookies, I WANT COOKIES! I made the dough and let it rest in the fridge overnight. I took the dough out the next day when I got home from work and it was really stiff - too tough to roll out. I let it sit on the counter for about 20 minutes before I formed the cookies. I waited to bake them until an hour before we had dessert (we were stuffed with tacos!) and they were done and cool by the time we wanted them. I only went for 25 minutes, and they could probably have come out a little sooner. I think I'd keep an eye on them if you go for the spoon shape - they'd bake even quicker!

These cookies were delightfully crisp. The corners of the triangles served as tasty little cheesecake-bearing utensils (too bad we can't eat more things on cookies, eh?) These cookies would be great for use as a sandwich cookie or for ice cream sandwiches, too. Def. saving these to my keeper file.

Topped with a dollop of whipped cream and accented with a crisp, tasty cookie, had with friends or snuggled in bed late at night (which is how the rest of them went) and you have a great night on your hands!

Chocolate Mascarpone Cheesecake Pots with Shortbread Spoons
From: Sticky, Chewy, Messy, Gooey: Desserts for the Serious Sweet Tooth by Jill O’Connor
http://www.amazon.com/Sticky-Chewy-Messy-Gooey-Desserts/dp/081185566X/ref=pd_bbs_sr_1?ie=UTF8&s=books&qid=1208805807&sr=8-1

The silky, rich flavor or Italian mascarpone cheese marries well with dark chocolate and makes for a sublime cheesecake, baked up smooth and buttery in little custard cups and eaten with crunchy, sweet, and delightfully edible shortbread spoons! Add a dollop or whipped cream and a few chocolate curls to the tops of these individual cheesecake pots for the perfect dinner-party dessert.

Serves 8.

1 cup heavy cream
4 ounces semisweet chocolate, finely chopped
8 ounces mascarpone cheese
¼ cup sugar
3 large eggs
1 teaspoon pure vanilla extract
Pinch of salt
1 tablespoon dark rum, brandy or grand marnier (optional)
Boiling water as needed
Sweetened whipped cream and chocolate curls, for serving
Shortbread spoons, recipe follows

Position a rack in the middle of the oven and preheat to 325°F.

In a saucepan, bring the cream to a simmer over medium heat. Remove the pan from the heat before the cream starts to boil and add the chocolate, stirring constantly until mixture is smooth. Set aside and let cool to room temperature.

In a large bowl, whisk together the mascarpone and sugar until smooth. Add the eggs one at a time, whisking well after each addition until the mixture is smooth. Add the vanilla, salt and rum (if using) and whisk to combine.

Pour the cooled chocolate mixture into the mascarpone cheese mixture and whisk gently until smooth.

Put eight 4-ounce custard cups, ramekins, or small ovenproof coffee cups in an empty 9-by-13-inch baking pan. Divide the chocolate-cheesecake mixture among the cups.

Put the baking dish in the oven and carefully pour boiling water into the pan, adding just enough water to reach halfway up the sides of the custard cups. Cover with aluminum foil.

Bake until the tops of the cheesecakes appear solid but jiggle slightly when shaken, 30 to 40 minutes. The perfect consistency is a little soft, but not liquid. The cheesecake pots will firm up as they cool. Transfer the pots from the baking pan to a wire rack and let cool to room temperature. Cover each pot with plastic wrap and refrigerate for at least 4 hours or preferably overnight before serving. The cheesecake pots can be prepared up to 2 days before serving.

Top each cheesecake pot with a dollop of whipped cream and a few chocolate curls and serve with a shortbread spoon.


Shortbread Spoons

From: Sticky, Chewy, Messy, Gooey: Desserts for the Serious Sweet Tooth by Jill O’Connor http://www.amazon.com/Sticky-Chewy-Messy-Gooey-Desserts/dp/081185566X/ref=pd_bbs_sr_1?ie=UTF8&s=books&qid=1208805807&sr=8-1
There is nothing more fun than these little cookie spoons. I was lucky enough to find a spoon-shaped cookie cutter, but you can also use a small, sharp paring knife to cut these spoons freehand from the rolled-out dough. Use a small spoon (I like the size of infant feeding spoons) on the dough to use as a template. Chill the cutout cookies until very firm and cold – they will hold their shape better as they bake.
Makes about 12 spoons
½ cup (1 stick) unsalted butter, room temperature
1 cup confectioner’s sugar, sifted
1 teaspoon pure vanilla extract
1 cup unbleached all-purpose flour
¼ teaspoon salt
In a bowl, cream together the butter and sugar. Stir in the vanilla. Add the flour and salt and stir together until the mixture forms a soft dough. Pat the dough into a disk and wrap in plastic wrap. Refrigerate for at least hour and up to 1 week.
On a lightly floured work surface, roll the dough out to ¼ inch thick and cut into 4-in spoons. Place the shortbread spoons on a parchment paper-lined baking sheet and refrigerate until cold and very firm, 45 to 60 minutes.
Position a rack in the middle of the oven and preheat to 300°F.
Remove the shortbread spoons from the refrigerator and immediately place in the oven. Bake until the edges of the cookies are a pale, golden brown but the centers are still very pale, 25 to 30 minutes. Transfer the baking sheets to wire racks and let cool slightly. Using a large metal spatula, transfer the cookies from the baking sheets to the wire racks and let cool to room temperature.
Store the cookies, tightly covered at room temperature, for up to 3 days, or freeze for up to 2 weeks.

See the recipe...


Monday, April 21, 2008

Scallops with Edamame Salad and Puree

We thought we were so smart, getting curtains for our bedroom. I'd bitched and moaned about the morning light for long enough, it seems. We chose a set that goes eerily well with our sheets and hung them with no issues. Until the next two mornings, when it was close-to-impossible to get out of bed. I'd heard it advertised in fancy alarm clocks, but I'd never given much thought to how light helps you wake up in the morning. Mind you, our room isn't THAT much darker... but it is just enough darker that I'm having trouble. Can't just be happy, can I? :)

Except, I AM happy! Let me tell you why! Ever since I saw this amazing dish on Sher's site, I've been waiting for just the right moment to make these gorgeous scallops with edamame. I happened to be at the butcher over the weekend and he had these beauties! Only 7 to a pound! That's nuts! Her recipe calls for 12, but since it was just the two of us for dinner, I opted for an even pound of scallops.

While the edamame cooked per their bag's instructions, I chopped and blended away. When they were finished and prepared as needed (tossed or pureed), I cooked the scallops. In less than 10 minutes, dinner was ready. And what a dinner it was!

"Spring on a plate" had been one of the reviews of the original, and I heartily second. The bright, fresh flavors of the beans and red bell pepper (tossed with the chili paste) provided the right amount of heat atop the scallops and puree. The puree itself was thick and had a really nice chew to it - and I totally didn't expect that. The play of textures was just brilliant - delicate scallop, sassy salad, both atop a fresh, thick puree, heady with mint.

I cannot thank Sher enough for sharing this fantastic meal with us!

Scallops with Edamame Salad and Puree
c/o Sher at What Did You Eat?
http://whatdidyoueat.typepad.com/what_did_you_eat/2008/03/scallops-with-e.html

Serves 4.

Start with a 16 ounce bag of frozen shelled edamame and divide according to below to make the salad and puree.

Salad
1/2 cup shelled edamame, cooked according to package instructions
1/2 cup red bell pepper, finely chopped
1 Tablespoon white or black sesame seeds
1 Tablespoon lime juice
1/2 Asian chili paste
1/4 teaspoon coarse salt
freshly ground black pepper

Combine all the ingredients and set aside.

Puree
2-1/2 cups of the cooked edamame, (The rest of the package)
1/4 cup lime juice
1/3 cup water
2 Tablespoons chopped fresh mint
1 Tablespoon chopped garlic
1/4 teaspoon salt
ground pepper

If the soy beans are warm when you make this, the puree will be ready to use. If you make it in advance, reheat it in a small skillet or the microwave.

Process all the ingredients in a food processor until smooth.

Making the dish
12 sea scallops
1 teaspoon salt
pepper
1 Tablespoon olive oil

Season both sides of the scallops with salt and pepper. Heat oil in a large non-stick skillet until very hot, but not smoking. Cook the scallops until golden brown, about 1-2 minutes per side. Don't overcook!

Divide the warm puree among serving plates, top with scallops and the salad.

See the recipe...


Thursday, April 17, 2008

Mahi-mahi with Blood Orange, Avocado, and Red Onion Salsa


Today was one of those days. I felt like I was herding cats. Every time I thought I had a handle on something, a new situation arose. Not that my job is brain surgery or rocket science, far from it actually... but today... whoa.

The best part of my day was this meal. I love how fresh fish combined with fresh, clean-flavored ingredients make me feel like I'm eating "spa food." You know what I'm talking about... a refreshing plate you'd have after your aromatherpy hot stone mud massage with rose petals.


Because, believe me, that is how I felt when eating this. The fish was so simply done with salt and pepper that the salsa really had the opportunity to shine. The sweet-tartness of the blood orange combined with the creamy avocado and the zingy red pepper in a way that tasted like fate... as though blood oranges, avocado, and red onion are grown only to be friends. No fussiness, very little effort, just happiness.

I took a reader's suggestion (in the comments of the Bon Appetit recipe online) and served this with plain couscous and a cucumber salad. I sliced the cucumber and tossed it with blood orange olive oil and pomegranite vinegar (I know, right? Could this have been more perfect?), but any vinegar/oil/citrus would do well.

I can't explain it, and I feel weird even typing it, but this dinner made my day. It was exactly what I needed.


Mahi-mahi with Blood Orange, Avocado, and Red Onion Salsa
Adapted from: Bon Appétit Magazine, February 2005
http://www.epicurious.com/recipes/food/views/231590

1 blood orange, Cara Cara orange, or regular orange
1/2 cup 1/3-inch cubes avocado
1/3 cup chopped red onion
2 teaspoons minced red jalapeño
2 teaspoons fresh lime juice
2 teaspoons olive oil
2 6-ounce mahi-mahi fillets
1 large cucumber, sliced
2 cups prepared couscous

Using small sharp knife, cut peel and white pith from orange. Working over small bowl, cut between membranes to release segments. Add avocado, onion, jalapeño, and lime juice to oranges in bowl; stir gently to blend. Season salsa to taste with salt.

Heat oil in heavy medium skillet over medium-high heat. Sprinkle fish with salt and pepper. Add fish to skillet and sauté until brown and cooked through, about 5 minutes per side.

Place 1 fillet on each of 2 plates. Spoon salsa atop fish and serve with cucumber slices and couscous.

>> Orange you sweet: Although they look like regular navel oranges, Cara Cara oranges are tinged pink on the inside and taste a little sweeter. You'll find them at some supermarkets and farmers' markets.


See the recipe...


Tuesday, April 15, 2008

Green Chile Chicken and Pink Bean Stew

I had really hoped that these pink beans would be as pink as the beans in the photo on the outside of the can. As you can see, they aren't so pink. O well. Should you not be able to find pink beans at your grocers, feel free to use pinto or kidney beans. You won't miss out!

As a recent convert to chicken thighs, I really loved this meal. Quick, flavorful and easy - can't go wrong! The heat provided by the two (yes two!) cans of green chiles was hot - and addictive. Even though it made my face sweat, I went back for more! Not so practical a dish once the weather warms up for good, but since we're in that grey weather period (is it hot, is it cold, should I bring an umbrella?), this is perfect for when the evening turns cold.

What's nice, too, is the cilantro and lime. Those flavors together brighten up the thighs and beans, and balance the heat in the chiles really well.

This didn't make enough for a small army, like most stews, but should you have leftovers, it does really well as lunch the day after and I bet it would freeze well.


Green Chile Chicken and Pink Bean Stew
c/o Food and Wine Magazine, April 2008
http://www.foodandwine.com/recipes/green-chile-chicken-and-pink-bean-stew

Canned green chiles contribute flavor and heat to this thick chicken stew, made doubly satisfying with the addition of pink beans. Pink beans are similar to pinto and kidney beans, and they give this recipe a nice Latin feel.

2 tablespoons vegetable oil
1 1/2 pounds skinless, boneless chicken thighs, cut into 1-inch dice
Kosher salt and freshly ground pepper
1 white onion, cut into 1/2-inch dice
2 garlic cloves, minced
1 1/4 teaspoons ground cumin
One 19-ounce can pink beans, drained and rinsed
Two 4-ounce cans green chiles, drained
1 3/4 cups chicken stock or low-sodium broth
2 tablespoons chopped cilantro
Lime wedges, for serving

In a medium soup pot, heat the vegetable oil until shimmering. Season the diced chicken thighs with salt and pepper and cook over moderately high heat until browned on both sides, about 5 minutes. Add the onion and garlic and cook over moderate heat until softened, about 4 minutes. Stir in the cumin and cook until fragrant, about 1 minute.

Add the pink beans, green chiles and stock to the chicken and bring to a simmer. Cook over moderately low heat until the stew has thickened, about 10 minutes. Stir in the cilantro and season with salt and pepper. Ladle the chicken and pink bean stew into bowls and serve with lime wedges.

Serve with: White rice.

Wine: Spicy, black-fruited Malbec: 2006 Trumpeter.

See the recipe...


Monday, April 14, 2008

Cheddar Beer Soup with Croutons

Who doesn't like beer and cheese? Beer and cheese are like bacon and whipped cream (or in my case, goat cheese and peanut butter) - they go well with almost everything! As my Father-in-law would say, if you can't improve something with bacon, you could probably improve it with whipped cream. We spent the next stretch of time pondering this phrase, tossing meals around, and I can't remember one dish bacon or cream wouldn't do well on.

Now, this isn't Bacon Whipped Cream soup (Anyone want to take a moment to daydream about that for a minute?), but its just as interesting. I saw this recipe on YumSugar and immediately printed it out. You don't mess around with stuff like this.

The ingredients aren't anything fancy - absolutely easy to put together. The hardest part is all the stirring - not because I have the arm muscles of a toddler, but because it was so hard to stand over the pot, the soupygoodsmell filling my nose.

Not only dreamy soup, oh no, but delicious, crunchy croutons! Make extra, because if you get them ready before your soup is done, you'll snack on them - and I'd hate for you to run out before dinner is ready!

I would recommend making this when having guests, as I had enough beer soup after one bowl... it's kind of like butternut squash soup, in that you can't eat it forever (like goat cheese or peanut butter.) :)

Cheddar Beer Soup & Croutons
c/o YumSugar
http://yumsugar.com/user/partysugar/recipes/1042371

5 tbsp. butter
2 carrots, finely chopped
2 leeks, white and light green parts only, finely chopped
Salt and pepper
1/3 cup flour
3 cups milk
One 12-ounce bottle amber beer, such as Dos Equis
1 1/2 tablespoons Dijon mustard
10 ounces sharp cheddar cheese, grated (about 3 1/2 cups)
Croutons, for garnish, recipe follows

In a large saucepan, melt the butter over medium heat.

Add the carrots and leeks, season with salt and pepper and cook, stirring, until soft, 10 minutes.

Add the flour and cook, stirring often, for 2 minutes.

Slowly pour in the milk, whisking constantly.

Increase the heat to medium-high, add the beer and mustard and bring the soup to a boil, whisking constantly. Reduce the heat to low and simmer, whisking, until creamy and thickened, about 10 minutes.

Remove the pan from the heat. Whisk in the cheese 1 handful at a time until combined.

Season to taste with salt and pepper. Top with the croutons.

Serves 4.


Croutons

7 slices thick white bread, crusts removed
2 tbsp. melted butter
2 tbsp. extra virgin olive oil
1 tbsp. garlic, minced
1 tbsp. fresh thyme, minced
salt and pepper

Preheat the oven to 375°F.

Slice the bread into small cubes, about half-an-inch by half-an-inch.

In a large bowl toss the bread cubes with the butter, oil, garlic, thyme, salt and pepper. Toss well to coat all of the bread pieces.

Spread out on a baking sheet covered with foil.

Bake in the oven, checking often for 20-25 minutes.

Remove and let cool 5 minutes. Serve in a bowl alongside the cheddar cheese soup.

See the recipe...


Friday, April 11, 2008

Why I Never Want to Move

Ah, Friday! I don't know about you, but my work-week really flew by. Here it is Friday, and we've had nothing but leftovers all week!

Now, the Canadian geese in our area have all paired off to raise their chicks - these photos are from February! We have a wee baseball field behind our apartment (with these views from our balcony), and every morning, at around 7:15, this flock of geese would fly in. They would spend the day flying back and forth from this field to the little pond on the other side of our complex. (I don't have a photo of that.)


Why does this matter, you ask? It doesn't, other than that it brought me great joy every morning, listening to them honk by. You see, my darling husband proposed marriage to me while we were feeding geese (almost 3 years ago, now) and I couldn't have imagined a more perfect proposal.

We were supposed to move to our new condo in March, and I am glad it fell through, not only because of the crummy housing market, but this means that I get another late-Winter of morning gooses!

No recipe today, just good wishes for a great weekend! Enjoy!

See the recipe...


Thursday, April 10, 2008

Chile-Rubbed Short Ribs with Creamy Polenta and Cotija Cheese

Over the next stretch of time, I'm going to trot out some of my older posts. In fact, I want to have something like Twilight Zone Thursday or something (I'm taking suggestions)... a nice, friendly way for us to all share those posts we've had kicking around, under the bed, lost in the couch, kicked under the oven. If there is enough interest, I'd be happy to try doing a round-up, too. Our poor neglected recipes should feel like stars, too!

Every so often, I let Dave pick out something he'd like me to make from one of his favorite cookbooks (of mine, he doesn't have any cookbooks!) They are usually all-day affairs, but I don't mind because they're always worth it in the end. This time, he chose a recipe from Bobby Flay's Mesa Grill cookbook. I want to say, too, that this was his main birthday dinner in November... but its been a while, so I'm fuzzy on the details. :)


These ribs were so tender and delicious. I like that the directions call for bone removal, because ever since I had braces, I'm hesitant to eat ribs. (And corn on the cob, since I'm sharing.) Plenty of warming heat - but that's ok, because the creamy polenta more than made up for it. The muffins you see in the top picture were so good, they're getting their own post - I promise!

While start-to-finish this dinner took a few hours, it really wasn't difficult. The ribs got a nice spice rub, seared, and then popped in the oven. While they finished, I pulled the polenta together. Super easy!

So. Let me know if you're interesting in playing along with me, and I'll get something going! (And if you have any clever naming ideas, send them my way!)


Chile-Rubbed Short Ribs with Creamy Polenta and Cotija Cheese
c/o Bobby Flay's Mesa Grill Cookbook: Explosive Flavors from the Southwestern Kitchen,

3 tablespoons New Mexico red chile powder
Kosher salt
2 teaspoons ground cinnamon, preferably Mexican cinnamon (canela)
2 teaspoons coarsely ground black pepper
3 pounds bone-in short ribs
½ canola oil, plus extra as needed
4 cloves garlic, peeled
1 medium Spanish onion, coarsely chopped
2 medium carrots, peeled and coarsely chopped
1 stalk celery, coarsely chopped
1 cup red wine
4 cups low-sodium chicken stock
6 sprigs fresh thyme
Freshly ground black pepper
Creamy Polenta with Cotija (recipe follows)

Preheat the oven to 325° F.

Mix together the chile powder, 2 teaspoons salt, the cinnamon and the coarsely ground black pepper in a small bowl. Lay the ribs on a baking sheet and season one side with the spice mixture, rubbing the mixture in so that it adheres to the meat.

Heat the oil in a large ovenproof Dutch oven over high heat until it shimmers. Working in batches, place the ribs in a single layer, rub side down, in the oil and cook until a crust has formed and the ribs are golden brown. Turn the ribs over and cook until the second side is golden brown. Remove to a plate and repeat with the remaining ribs, adding more oil if needed.

Remove all but 2 tablespoons of the fat in the pan and add the garlic, onion, carrots, and celery and cook until golden brown and caramelized, 6 to 7 minutes. Add the wine and boil until nearly reduced, 2 to 3 minutes. Add the stock and bring to a simmer.

Return the ribs to the pan along with the thyme and bring to a simmer. Place the lid on the pan and place it in the oven. Cook until the meat is tender and falling off the bone, 2 to 2 ½ hours.

Carefully remove the ribs to a large plate and let cool slightly. When cool enough to handle, remove the meat from the bones and discard the bones.

Strain the sauce into a medium saucepan and return it to the stove over high heat. Bring the sauce to a boil and continue cooking, stirring occasionally, until reduced to a sauce consistency, 10 to 15 minutes. Season with salt and freshly ground black pepper and discard the thyme sprigs. Return the ribs to the pan to reheat.

Serve over creamy polenta with cotija in large, shallow bowls.

Serves 4.


Creamy Polenta with Cotija
c/o Bobby Flay's Mesa Grill Cookbook: Explosive Flavors from the Southwestern Kitchen,

5 cups low-sodium chicken stock
Kosher salt
1 cup medium-grind white cornmeal
8 tablespoons (1 stick) unsalted butter, cut into pieces
¼ cup heavy cream
1/3 cup grated cotija cheese
Freshly ground black pepper

Combine the stock and two teaspoons salt in a large saucepan and bring to a boil over high heat. Add the cornmeal in a fine stream, whisking constantly with a wire whisk. Once all the cornmeal has been added, reduce the heat to low and cover the pan. Stir the mixture, using a wooden spoon, every 5 minutes and continue cooking until all the liquid has been absorbed and the mixture is very creamy, 25 to 30 minutes.

Remove from the heat and stir in the butter, heavy cream, and cotija cheese until combined; season with salt and pepper.

Serves 4.

See the recipe...


Wednesday, April 9, 2008

Spaetzle Baked with Ham and Gruyere

Spaetzle counts as pasta, right? I sure hope so, because this tasty comforting dinner is my entry to this week's Presto Pasta Night, hosted by the lovely Ruth!!

I had ripped this out of a Cooking Light magazine from 2004! I have been going through my stack of saved recipes and either making them or tossing them. I'm glad that this one made the cut!

I always enjoy spaetzle in restaurants, but I'd never made it at home. Wasn't too tricky, but boy, is it one sloppy process! I spilled the dough all over the place! I used a pasta insert in place of the colander, and it was a touch bigger than my pan, so yah, messy messy.

However, messy messy = tasty tasty! The dainty, soft spaetzle was so nice with the ham and cheese. The ham was cut into a fine dice, so it was really easy to get some ham, onion, and spaetzle with each spoonful. The gruyere was a great choice, it melted beautifully and bound it all together. I would maybe include a little extra cheese in the milk mixture, but only because I like it. :)

Pop on over to Ruth's blog, Once Upon A Feast Friday for the round-up!


Spaetzle Baked with Ham and Gruyere
c/o Cooking Light magazine, April 2004
http://find.myrecipes.com/recipes/recipefinder.dyn?action=displayRecipe&recipe_id=604745

1 2/3 cups all-purpose flour
1 teaspoon salt, divided
1/4 teaspoon baking powder
2 1/4 cups 1% low-fat milk, divided
4 large eggs, divided
2 quarts water
Cooking spray
1 cup finely chopped onion
3/4 cup finely diced ham (about 4 ounces)
2 tablespoons all-purpose flour
1/4 teaspoon black pepper
3/4 cup (3 ounces) shredded Gruyère cheese

Preheat oven to 375°.

Lightly spoon flour into dry measuring cups; level with a knife. Sift together 1 2/3 cups flour, 1/2 teaspoon salt, and baking powder. Combine 3/4 cup milk and 2 eggs, stirring with a whisk. Add milk mixture to flour mixture, stirring with a whisk until combined. Let stand 10 minutes.

Bring 2 quarts water to a boil in a large saucepan. Hold a colander with large holes (about 1/4-inch in diameter) over boiling water; spoon about 1/2 cup dough into colander. Press the dough through holes with a rubber spatula (droplets will form spaetzle); set colander aside. Cook 3 minutes or until done (spaetzle will rise to surface). Remove with a slotted spoon; drain in a strainer (spaetzle will stick to a paper towel). Repeat procedure with remaining dough.

Heat a medium nonstick skillet coated with cooking spray over medium heat. Add onion; cook 5 minutes or until lightly browned, stirring frequently. Remove from heat; stir in ham. Combine spaetzle and onion mixture in a 2-quart baking dish coated with cooking spray, tossing gently.

Combine remaining 1/2 teaspoon salt, 1 1/2 cups milk, 2 eggs, 2 tablespoons flour, and pepper, stirring with a whisk. Pour milk mixture over spaetzle mixture. Sprinkle evenly with cheese. Bake at 375° for 35 minutes or until cheese is lightly browned.

Yield: 6 servings (serving size: about 1 cup)

Nutritional info: cals 310, fat 9.6g, sat fat 4.4g, protein 18.8g, cholesterol 165mg, calcium 288mg, sodium 786mg, fiber 1.5g, iron 2.4mg, carbs 35.7g

See the recipe...


Monday, April 7, 2008

One Year Old: Dinner in a Bucket!

I cannot believe that I've had my little blog for a whole year. A whole year! I want to say that time sure flies, and it does, but I also know that a lot of meals have been made in the last year and I know I've learned a lot and met a ton of really great people! Thank you for tuning in and thank you for your kind support! To celebrate, I made dinner in a bucket, and I wish I could have had you all over for this funny little dinner this weekend!

Being a year-old blogger seemed the perfect reason to break out my nifty new Polyscience thermal circulator. I was lucky enough to win it through Menu for Hope 4, hosted by the lovely Pim. I seriously ran around the office squealing when I saw my name listed as the winner. I went rambling to my coworkers (who had NO IDEA what a thermal circulator was (and probably still don't, even though they've seen it)). I called my husband, I called my mom, I called the mailman. I felt like I was homecoming queen - or as best I can imagine that must feel, anyway. This is one clever kitchen accessory, and it goes so well with the snazzy vacuum sealer my darling husband/Santa brought me for Christmas!

The thermal circulator will allow me to more easily and safely sous-vide at home. Not that you couldn't wrap your product up in plastic wrap and monitor the temperature in a pot of water, but the fancy machines take the fussiness out of it. And the fear of botulism - which is a plus!

I pulled this recipe from the May 2007 issue of Food & Wine magazine. The recipe itself calls for roasting the loaf in the oven, but includes a blurb at the top mentioning that the chef prepares it sous-vide in his restaurant. I jumped on the opportunity!

I don't yet have a stock pot and my other pots weren't quite the right size, so I ordered a heat-safe hotel pan... that of course didn't arrive in time... We also ordered the little polyscience cage to protect the heat coils of the circulator (so the plastic wouldn't melt), but that also didn't arrive in time... so we used our multipurpose bucket from Home Depot and duct tape! Yay MacGuyvered dinner in a bucket!

While my husband fiddled with the bucket/tape set-up, I got to loafing! The meatloaf comes together the same way any other meatloaf would, but for one surprise - cottage cheese! I had never put cottage cheese in my meatloaf before, and now that I've done it, I don't know if I could go back (at least for turkey meatloaf, it might look weird in beef or pork.) Once ready, they got the spa treatment for about 90 minutes, until the meatloaf reached an internal temperature of 160
°F. At that point, it was still pale pale meat, so I broiled the loaves for about 5 minutes for some color. (And as you can see in the photo above, the loaves got a little squished during the vacuum sealing, and they have sexy little squish-edges! Def. will freeze the loaves before I seal them, so they maintain their loaf-shape.)

I really really liked the red pepper sauce as it was, but Dave thought it needed a little pizazz, so I tossed in a pinch or two of crushed red pepper flakes. The little kick the flakes provided really did the trick, I think. I served the meatloaf, sauce, and peppers with quinoa instead of wild rice, because I wanted something closer to mashed potatoes - because who doesn't like potatoes and meatloaf?

Altogether, a lovely meal. Interesting gadgetry, moist and lovely meatloaf, fresh and vibrant red pepper sauce, joined with fluffy quinoa. A very satisfying way to mark a great year!


Mini Turkey Meat Loaves with Red Pepper Sauce
c/o Food & Wine Magazine, May 2007
http://www.foodandwine.com/recipes/mini-turkey-meat-loaves-with-red-pepper-sauce

Cottage cheese is a low-fat way to keep lean turkey meat loaf moist. At Gamba’s restaurants, he cuts even more fat by cooking the meat loaves sous-vide.

5 tablespoons extra-virgin olive oil
1 carrot, finely chopped
1 celery rib, finely chopped
1 garlic clove, minced
1 large onion, finely chopped
Kosher salt and freshly ground white pepper
1 1/2 pounds ground lean turkey, white meat only
2 large egg whites
1/2 cup panko
1/2 cup low-fat cottage cheese
3 red bell peppers, sliced
1 thyme sprig
1/2 cup water
1 tablespoon half-and-half
1 yellow bell pepper, sliced
Cooked wild rice, for serving

Preheat the oven to 400°. Lightly oil two 6-by-3 1/2-inch metal loaf pans. In a skillet, heat 2 tablespoons of the oil. Add the carrot, celery, garlic and two-thirds of the onion; season with salt and white pepper and cook over moderate heat, stirring, until softened, about 10 minutes. Let cool.

Add the turkey and cooked vegetables to a large bowl. Add the egg whites, panko, cottage cheese, 2 teaspoons of salt and 1/2 teaspoon of white pepper. Knead until blended and divide between the pans. Place the pans on a baking sheet and bake in the upper third of the oven for 35 minutes or until an instant-read thermometer registers 160°. Remove from the oven and preheat the broiler.

Meanwhile, in a skillet, heat 2 tablespoons of the oil. Add two-thirds of the red peppers, the remaining onion and the thyme. Cover and cook over moderate heat until softened, 10 minutes. Add the water, cover and simmer until the peppers are very tender, 7 minutes. Discard the thyme. Transfer the contents of the skillet to a blender, add the half-and-half and puree. Season with salt and pepper.

In a skillet, heat the remaining 1 tablespoon of oil. Add the remaining peppers and cook over moderate heat until softened, 10 minutes. Season with salt and pepper.

Broil the meat loaves 4 inches from the heat until browned, 2 minutes. Turn the loaves out onto a plate and cut into 1/2-inch slices. Spoon the pepper sauce onto plates. Top with the meat loaf and peppers. Serve with wild rice and the remaining sauce.

Per serving: 505 cal, 21 gm fat, 2.9 gm sat fat, 20 gm carb, 3.3 gm fiber.

See the recipe...


Friday, April 4, 2008

Southwestern Tofu Scramble


I won't lie, I chose this dish because it gave me an excuse to get more tortillas. I love tortillas and I will take any excuse to eat them. I think I confessed once that I used to eat leftover spaghetti in tortillas in college. I am currently under the spell of the whole wheat flour tortillas that Whole Foods carries in their bakery department. Glorious, they are. I've been eating them with hummus and peanut butter (not together) and just plain.

This recipe was a lovely way to fill those tortillas, let me tell you. The more we have it, the more I just adore tofu. It is a perfect flavor chameleon, super healthy and just so versatile! I had never "scrambled" tofu before and I was a little nervous. I know they're supposed to take on the texture of scrambled eggs, and in a way they did, but with the cumin and chili powder flavoring the tofu, it seemed more taco-filling-esque than scrambled-egg-y.

The zucchini was a nice touch, as it added a good texture difference and healthy chew. Of course I over-did it with the corn, but so what! I like corn! There isn't much chopping to this dinner, so it is perfect for a weeknight. (That, and we had a good amount left over, which made a terrific lunch the next day!) Pick out your favorite salsa, grate some cheese, and you're good to go.

I feel like I say this every time I make tofu, too, but this is another good Introductory Tofu Recipe... my husband happily gobbled this up!


Southwestern Tofu Scramble
c/o Eating Well Magazine, April 2008
http://www.eatingwell.com/recipes/southwest_tofu_scramble.html

Cooking crumbled firm tofu in a skillet approximates the fluffy texture of scrambled eggs in this vegetable-studded, vegetarian main dish. Enjoy it for breakfast, lunch or dinner. Serve with steamed corn tortillas, some extra salsa and black beans.

Makes 4 servings, about 3/4 cup each

3 teaspoons canola oil, divided
1 14-ounce package firm water-packed tofu, rinsed and crumbled
1 1/2 teaspoons chili powder
1 teaspoon ground cumin
1/2 teaspoon salt, divided
1 small zucchini, diced
3/4 cup frozen corn, thawed
4 scallions, sliced
1/2 cup shredded Monterey Jack cheese
1/2 cup prepared salsa
1/4 cup chopped fresh cilantro


Heat 1 1/2 teaspoons oil in a large nonstick skillet over medium heat. Add tofu, chili powder, cumin and 1/4 teaspoon salt and cook, stirring, until the tofu begins to brown, 4 to 6 minutes. Transfer to a bowl.

Add the remaining 1 1/2 teaspoons oil to the pan. Add zucchini, corn, scallions and the remaining 1/4 teaspoon salt. Cook, stirring, until the vegetables are just tender, about 3 minutes. Return the tofu to the pan and cook, stirring, until heated through, about 2 minutes more. Remove from the heat and stir in cheese until just melted. Top each serving with 2 tablespoons salsa and 1 tablespoon cilantro.

Per serving: 202 calories; 12 g fat (4 g sat, 5 g mono); 13 mg cholesterol; 12 g carbohydrate; 13 g protein; 3 g fiber; 501 mg sodium; 422 mg potassium.

See the recipe...


Thursday, April 3, 2008

Pork Burgers with Avocado Dressing


You had me at the avocado dressing.

The folks at Cookthink won me over quick and easy. I am a sucker for a different, yet tasty burger. Especially one that lets me smear it with avocado goodness. What can I say, I'm a slut for them. (Avocados AND burgers, really.)

I don't normally like my food salty, but it did indeed go really well with the creamy dressing - just like they said it would! We skipped the tomatoes, but I think their cool juiciness would have been a nice touch. Served with roasted red potatoes, this was a delightful dinner.

My only suggestion would be to up this whole thing by half and I'll tell you why - these burgers shrink. Not one of the four burgers was very big in the end, and one was even very sadly small (but hideously cute!). So make more - or just plan on them being large sliders instead.


Pork Burgers with Avocado Dressing
c/o Cookthink
http://www.cookthink.com/recipe/4086/Pork_Burgers_With_Avocado_Dressing

The richness of the avocado dressing is cut by the salty and slightly spicy pork burgers. Add more chipotle sauce if you want a spicier burger. We don't mention it here but sliced carrots make also make a great garnish.
avocado dressing

1 ripe avocado
1/2 lime, juiced
1 teaspoon olive oil
1/8 teaspoon kosher salt
1/8 teaspoon freshly ground black pepper

pork burgers
1 pound lean ground pork
1/4 teaspoon kosher salt
1/4 teaspoon freshly ground black pepper
2 teaspoons chipotle sauce
1 teaspoon soy sauce
3 tablespoons chopped fresh cilantro
2 teaspoons olive oil

garnishes
2 medium spring onions, thinly sliced
4 plum tomatoes, thinly sliced
4 slices Monterey Jack cheese

1. Preheat the oven to 375F and put the rack in the middle position. Peel and pit the avocado and put it in a food processor or bowl. Add the lime juice, olive oil, salt and pepper. Purée or mash until smooth. Refrigerate until you’re ready to use.

2. Form the burgers: Put the pork in a large bowl and sprinkle it with the salt and pepper. Add the chipotle sauce, soy sauce and cilantro. Using your hands, mix the pork just enough to incorporate the ingredients. Divide the pork into 4 equally sized burgers, each about 1 inch thick. Season them on both sides with a sprinkling of salt and pepper.

3. Heat the olive oil in an oven-safe (preferably nonstick) skillet over medium-high heat. When the oil is hot and shimmering, add the burgers. Leave them alone for 2-4 minutes to sear. When the bottoms are very brown, flip them and brown the other side another 2-4 minutes.

4. Prep the onions and tomatoes while the burgers are cooking.

5. When the burgers have browned on the second side, put them in the oven to roast. Cook the burgers until they reach 155F in the thickest part, 10-15 minutes. Check the temperature early and often, since they turn dry if you let them go too long. (They’ll be just firm but not hard to the touch when they’re done.)

6. Pull the pan out of the oven with an oven mitt. Put the burgers on a plate and loosely cover them with foil to rest 5 minutes. Serve on toasted multi-grain buns with avocado spread, slices of Monterey Jack cheese, spring onions and tomatoes.

See the recipe...


Tuesday, April 1, 2008

Lamb Shanks, Cannellini Beans, and Oranged-up Swiss Chard

I wish this photo was better. These lamb shanks deserve better!

We had these beauties in February sometime (Dave is at the Caps game tonight, so I thought I'd show you this instead of my leftovers!) and I remember that it was cold outside and perfect for this slow-cooked recipe out of Food and Wine magazine. This is one of those meals that doesn't require a lot of hands-on fiddling, but you definitely need to get started early.

Let me tell you about the smells. Holy moly, my apartment smelled delicious. I am often jealous of the smells coming out of my neighbors doors as I come up the stairs, but this time, I feel like I was able to give back a little and maybe, just maybe, they were wondering if they could come over with a cake and score some shanks. ;)

What's so interesting is that there is seriously nothing ON the shanks but salt and pepper and then some garlic cloves nestled in the pot. That's it. No juice, no other seasonings, nothing but shanky, garlicky goodness. The juices from the lamb are used to flavor the sauce that goes into the beans, too, so the meaty flavor remains throughout the dish. Yum!

What I am about to say is going to sound a little ridiculous, considering how much praise I gave the shanks.... but I think the orange swiss chard was my favorite thing on the plate. It was seriously THAT good. Crazy-amazing, in fact. The bright acidity and fruity sweetness, accented with the bacon... terrific! Perfect pairing with the lamb and cannellini beans.

Hurry out and make this before the weather changes (and if you're in the southern hemisphere, make this once it's cold) - you won't regret it!


Pot-Roasted Lamb Shanks with Cannellini Beans
c/o Food and Wine Magazine, February 2008
http://www.foodandwine.com/recipes/pot-roasted-lamb-shanks-with-cannellini-beans

For a comforting wintry meal, F&W Test Kitchen Supervisor Marcia Kiesel, adopts Simple French Food author Richard Olney's method of roasting lamb shanks at a low temperature with no added liquid. The spare ingredients yield an incredibly rich sauce that infuses the beans. The currant and berry notes in a right bank Bordeaux brighten this luxurious dish.

1 1/2 cups dried cannellini beans, soaked overnight and drained
1 bay leaf
4 meaty lamb shanks
Salt and freshly ground black pepper
4 large garlic cloves, unpeeled
3 cups chicken stock
1 teaspoon sherry vinegar
1 teaspoon chopped thyme

In a large saucepan, cover the beans and the bay leaf with 2 inches of water and bring to a boil. Simmer over low heat until the beans are tender, about 2 hours. Drain the beans and discard the bay leaf.

Meanwhile, preheat the oven to 300°. Heat an enameled cast-iron casserole that's large enough to hold the lamb shanks in a single layer. Season the shanks with salt and black pepper and cook over moderate heat, turning a few times, until lightly browned all over, about 15 minutes. Nestle the garlic cloves among the shanks. Cover and cook in the oven for about 1 hour and 45 minutes, turning 3 times, until the shanks are very tender.

Reduce the oven temperature to 200°. Transfer the shanks to a small roasting pan, and the garlic cloves to a small bowl. Cover the shanks with foil and keep warm in the oven. Strain the juices from the casserole into a bowl and skim off the fat. Return the juices to the casserole, add the chicken stock and set the casserole over a burner. Boil over high heat until the juices have reduced to 2 cups, about 12 minutes.

Peel the garlic cloves and add the sherry vinegar. With a fork, mash to a paste. Add the garlic paste to the juices in the casserole and stir in the beans and thyme. Simmer over low heat for 5 minutes. Season with salt and black pepper.

Place the lamb shanks on plates and serve with the beans.

MAKE AHEAD The beans can be prepared through Step 1 and refrigerated overnight in their liquid. The lamb can be prepared through Step 2 and refrigerated overnight.

SERVE WITH Chard with Orange and Bacon.

WINE These succulent lamb shanks will go best with a Merlot-dominated red Bordeaux from what's known as the right bank—the appellation of Pomerol, for instance. Merlot's gamey, black cherry depth, which the 2005 Christian Moueix Pomerol has in abundance, is potent enough to pair with rich meats; at the same time it's not so tannic that it will conflict with the orange-spiked Swiss chard.


Swiss Chard with Orange and Bacon
c/o Food and Wine Magazine, February 2008
http://www.foodandwine.com/recipes/chard-with-orange-and-bacon

Swiss chard spiked with both tart orange juice and tangy orange zest could easily clash with many red wines. But the citrusy greens here only serve to enhance the fruitiness of a Merlot-laden Bordeaux. This side dish would also be delicious with swordfish or pork.

2 pounds Swiss chard, stems discarded and leaves coarsely chopped
3 tablespoons unsalted butter
4 thin slices of lean-cut bacon, sliced crosswise 1/2 inch thick
1 cup fresh orange juice
1/4 teaspoon finely grated orange zest
Salt

In a large pot of boiling salted water, cook the chard until bright green and tender, about 2 minutes. Drain, squeezing out any excess water from the leaves.

In a skillet, melt 1 tablespoon of the butter. Add the bacon and cook over moderate heat until crisp, 5 minutes. Transfer all but 1 tablespoon of the bacon to a plate.

Pour the orange juice into the skillet and boil over high heat until reduced to 1/4 cup, about 4 minutes. Stir in the remaining 2 tablespoons of butter. Add the orange zest and the chard, season with salt and stir to coat. Transfer to a bowl, top with the reserved bacon and serve.

MAKE AHEAD The recipe can be prepared through Step 1 and refrigerated overnight.

See the recipe...


Orzo Risotto with Sausage and Artichokes

I am getting my pasta in early this week! I wanted something easy yet satisfying for Presto Pasta Night, and no pasta is as easy as orzo*! It is a dainty rice-shaped pasta that cooks up super-fast - which is just what you need when you want dinner in a hurry!

Except, making a risotto out of it sortof ruins the point, right? Don't you worry, the risotto-stirring lasts mere moments (15 minutes), which isn't long enough to get annoyed by it. In its favor, the orzo is sauteed in the sausage drippings - and who doesn't like sausage fat?

You wouldn't believe how creamy the orzo was! Yes, yes, I know there are 6 tablespoons of Parmesan cheese mixed in... but before I added the cheese, the pasta was already nicely creamy - I was so excited!

You can't really see the artichokes in the photo above because they were mostly the same shade as the pasta, but I promise they're in there. I used extra peas, too, because I love them. This pasta was thick and creamy and such a wonderful comforting dinner. As happy as I am to welcome Spring, I'm more than a little sad that dinners like these won't be around again for a while.

* At least to me!


Orzo Risotto with Sausage and Artichokes
c/o Food and Wine Magazine, March 2008
http://www.foodandwine.com/recipes/orzo-risotto-with-sausage-and-artichokes

2 tablespoons extra-virgin olive oil
1 pound sweet Italian sausage, casings removed
1 large white onion, thinly sliced
1 large garlic clove, minced
1 1/2 cups orzo (10 ounces)
2 cups chicken stock or low-sodium broth
Salt and freshly ground pepper
1 cup marinated artichokes, drained and quartered
1 cup frozen baby peas
3 tablespoons snipped chives
6 tablespoons grated Parmesan, plus more for serving

In a deep, 10-inch skillet, heat the oil. Add the sausage and cook over high heat, pressing to flatten, until cooked through, 10 minutes. Transfer to a plate, leaving the fat in the pan. Break the sausage into bite-size pieces. Add the onion and garlic to the skillet. Cover and cook over moderate heat, stirring occasionally, until softened, 4 minutes. Add the orzo and cook, stirring, for 3 minutes. Add the stock and 2 cups of water and cook, stirring constantly, until the orzo is al dente and suspended in a thick creamy broth, about 15 minutes. Season with salt and pepper.

Add the sausage, artichokes, peas, chives and cheese to the orzo. Cook, stirring, until the peas are heated through and the cheese is melted, about 4 minutes. Serve the orzo risotto in bowls, passing extra cheese at the table.

See the recipe...