Sunday, March 30, 2008

The Daring Bakers Do Dorie: Perfect Party Cake


After last month's bread-baking debacle, I was so excited to see that Morven chose Dorie Greenspan's Perfect Party Cake, sourced from her much-loved Baking book. Why? For starters, because there isn't any yeast (ha!), but mostly because it was recently my birthday, and this cake would serve as a lovely birthday cake. And! I made cakes from Dorie's book for both my mom and my husband's birthdays, so I wanted to complete the arc. And there wasn't any yeast.


I wish there was such a thing as taste-o-vision or something, because I wish all of you non-DBers, or those of you that aren't invited over when a DBer makes their challenge, could try this cake. It is seriously the most pillowy-soft cake I have ever put in my mouth (and believe you me, I have put A LOT of cake in said mouth.) I don't even know what to compare it to. Its a little like angel-food, but not all springy. It reminds me of really really sassy wedding cake, only better.

We were given the freedom to fill the cake as we wished, and though I'd fully planned to make the recipe to Dorie's letter, when I was at the grocery store picking out seedless raspberry jam (and I even had the jar in my hand!), I instead picked up a jar of preserves I've had before. My friend Liane once suggested to me this wonderful strawberry preserves with champagne. While I loved it, I never felt like my toast or pbj's did it justice. I thought that THIS cake was my opportunity to really let the jam shine.

And shine it did. The preserves went beautifully with the fluffy lemoney buttercream and surprisingly well with the coconut! (I hadn't expected that, but I should have, because Dorie is a genius!)

This cake was a dream to put together. I made the cakes last night and let them cool to room temperature before wrapping them in clingfilm. I made the buttercream this morning and layered the cake, preserves, and buttercream. I couldn't stand the idea of waiting to try it (and I think my mom is coming by with a cake she made for later), so we cut into it. (Yay cake for lunch!)

Please make sure that you have lots of milk, or some hot tea or coffee to serve with this cake, as it is really sweet. Really really sweet. Not that I'm complaining - it is just worth mentioning, for those of you with aversions to stuff like that.

If someone special to you is having a birthday or party, make this cake. You no doubt will be crowned the Rock Star of the Evening.

Thank you, Morven, for a wonderful challenge! This cake was just the thing I needed!!

Head on over to the Daring Baker's Blogroll to see all the other Rock Stars!

See the recipe...


Friday, March 28, 2008

Spicy Chickpea Soup

I love the food blogging community. I love all the interesting food events that encourage me to cook outside my comfort zone. I love the sense of togetherness and belonging and I love that it gave me a reason to embrace chickpeas! ;)

For this round of WTSiM, Jeanne chose pulses. Pulses? What are those? Pulses, or legumes, as you might guess, are beans (mostly dried) but the term also includes lentils, lupins, black-eyed peas, and chickpeas (among others!)

For my entry, I chose the humble chickpea. I've been a fan of hummus for a long while, and I always like a spoonful of chickpeas in my salad, but I'd never really given chickpeas a chance in any other way. I figured that since we love beans and lentils, that it should follow that we'd adore chickpeas as well - and I was right!

This came together so nicely in the blender - thick and creamy without being heavy. I used Fage Greek yogurt, as it seemed fitting to me. F&W suggested serving the soup with pita chips, but rather than make my own, I just bought a bag. I'll admit, I was on the fence with the chips, wondering if we really needed them... and I am glad I got them. They added a nice crunchy dimension (or less-crunchy, if you let them soak in the soup a little like I did!!)

Note: Pop over to CookSister for the round-up!!


Spicy Chickpea Soup
c/o Food and Wine Magazine, March 2008
http://www.foodandwine.com/recipes/spicy-chickpea-soup

Makes 6 servings.

Chickpeas are rich in both types of dietary fiber, which are important for maintaining heart health and for stabilizing blood sugar levels. Pam Anderson uses them as the base for this Indian-flavored creamy (though cream-free) soup, which she prepares by first pureeing it, then simmering it, to save time. “Pureed beans give you richness without having to enrich the soup,” she says.

Two 19-ounce cans chickpeas, drained
One 13.5-ounce can light coconut milk
One 14.4-ounce can whole tomatoes, drained and chopped (1/2 cup)
1/4 cup naturally sweetened apple juice
1/4 cup cilantro leaves
1/2 teaspoon garam masala
1/2 teaspoon ground ginger
1 cup chicken stock or low-sodium broth
Salt and freshly ground black pepper
1/4 cup plain low-fat yogurt
2 scallions, green parts only, thinly sliced

In a blender, combine the drained chickpeas with the coconut milk, chopped tomatoes, apple juice, cilantro leaves, garam masala and ground ginger and puree the mixture until smooth.

Transfer the puree to a medium saucepan. Stir in the chicken stock and bring to a simmer over moderately high heat. Season with salt and black pepper. Ladle the soup into bowls, top with the yogurt and scallion greens and serve.

Make ahead: The soup can be refrigerated overnight. Reheat gently.

Per serving: 288 cal, 6 gm fat, 3.7 gm sat fat, 49 gm carb, 8.7 gm fiber.

See the recipe...


Thursday, March 27, 2008

Kung Pao Tofu

Nevermind. I take back everything I said. I no longer want to make friends with my neighbors. In fact, I have a bucket-full of strong words for my neighbors. I hope they ALL stub their toes during their middle-of-the-night bathroom breaks, that they accidentally use salt instead of sugar in their baked goods, and that they sip some soured milk. A pox on my neighbors.

Why? Well, they had my car towed. I am sure they didn't all band together to do it, but SOMEONE did, and I'm chuffed about it. Tired and zoned out, I parked a spot to the left of my numbered spot. Rather than knock on my door or call me or have the leasing office call me, they called the (super-rude) towing company. I came out of my apartment to an empty spot and just stood there. (At least it happened at home - I frequently have nightmares in which my car is stolen while I'm in the grocery store or mall or something - and in my dreams, it's much scarier.) Anyway, it isn't like I'm new - we've been here 5 years and have always had the same spot. I should have looked. I just wish whoever called me in had had some common courtesy. Live and learn, I suppose.

I'm sorry for the rant. I hope I can make it up to you with this lovely version of home-made take-out. I've been really enamored lately with my issue of Eating Well Magazine (and you'll seen more from it shortly - I have some posts saved up!) I know that whatever I make from it will be healthy and delicious - and not to mention quick! I had never tried any "Chinese" food at home, and this recipe seemed like a nice starting point.

This would be another good dish to use, too, if you've wanted to break into tofu but have been squidgy about it. The tofu is flavored nicely by the five-spice powder and the oyster sauce, and since it's sauteed in the pan for a while before it is added to the veggies and sauce, it isn't the least bit squishy. I served the kung-pao over jasmine rice, but I'm sure the noodles would be terrific as well. This dish was really satisfying and I'll happily make it again. My Darling Picky Eater seemed happy with it as well, and asked that I look for a tofu-and-broccoli recipe next!


Kung Pao Tofu
c/o Eating Well Magazine, March/April 2008
http://www.eatingwell.com/recipes/kung_pao_tofu.html

You won’t be tempted to reach for another take-out menu again after trying this easy vegetarian remake of the popular Chinese classic. Serve with Chinese noodles.

Makes 4 servings, about 1 cup each

1 14-ounce package extra-firm water-packed tofu, rinsed
1/2 teaspoon five-spice powder, divided (see Shopping Tip)
1 tablespoon canola oil
1/2 cup water
3 tablespoons oyster-flavored or oyster sauce (see Shopping Tip)
1/2 teaspoon cornstarch
12 ounces broccoli crowns, trimmed and cut into bite-size pieces (4 cups)
1 yellow bell pepper, cut into 1/2-inch dice
1 red bell pepper, cut into 1/2-inch dice
1 tablespoon minced fresh ginger
1 tablespoon minced garlic
2 tablespoons unsalted roasted peanuts
2 teaspoons hot sesame oil (optional)

Pat tofu dry and cut into 1/2-inch cubes. Combine with 1/4 teaspoon five-spice powder in a medium bowl.

Heat canola oil in a large nonstick skillet over medium-high heat. Add tofu and cook, stirring every 1 to 2 minutes, until golden brown, 7 to 9 minutes total. Transfer to a plate.

Meanwhile, whisk water, oyster sauce, cornstarch and the remaining 1/4 teaspoon five-spice powder in a small bowl.

Add broccoli, yellow and red bell pepper to the pan and cook, stirring occasionally, until beginning to soften, about 4 minutes. Add ginger and garlic and cook, stirring, until fragrant, about 30 seconds. Reduce heat to low, add the oyster sauce mixture and cook, stirring, until thickened, about 30 seconds. Return the tofu to the pan along with peanuts and stir to coat with sauce; stir in hot sesame oil (if using).

Per serving: 197 calories; 11 g fat (2 g sat, 4 g mono); 0 mg cholesterol; 16 g carbohydrate; 12 g protein; 5 g fiber; 622 mg sodium; 517 mg potassium.

TIP: Shopping tips: Be sure to use “oyster-flavored” sauce (it’s oyster-free) to make this vegetarian; both it and oyster sauce are found in the Asian-food section or at Asian markets. Five-spice powder is a blend of cinnamon, cloves, fennel seed, star anise and Szechuan peppercorns. Look for it in the spice section or with other Asian ingredients.


See the recipe...


Tuesday, March 25, 2008

Brown Rice and Goat Cheese Cakes

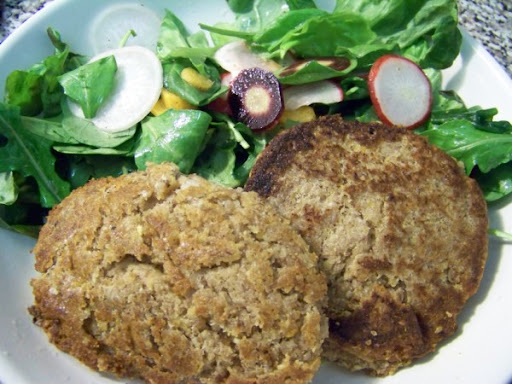
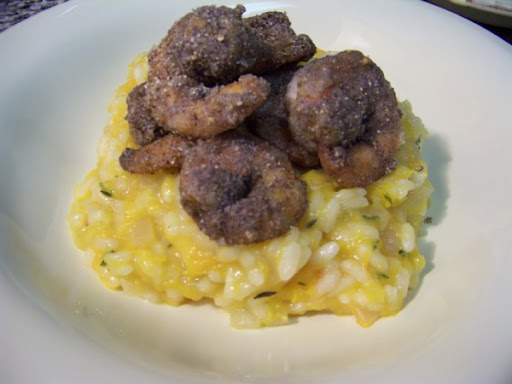
You know you've been memorable when your husband lovingly refers to a dinner as those "cakes that looked like pressed cow turds." I countered with the fact that they didn't seem dark enough for that, so maybe sun-bleached ones. Sorry, moving on. :)

When I get the cooties, all I can manage to eat is rice, so I make a lot of rice. Like, a lot. Usually brown, and since it takes so long to make, I tend to make way more than I need, because I def. don't want to mind a pot of rice for 50 minutes any more than I have to. Now, this has led to a herd of extra baggies of rice in my freezer. You'd think that when I get sick, I would just reach into the freezer for a bag, but I don't. I make more. You cannot argue with a sick person.

This meal wasn't intended to use them up, because like I said, I practically forget that rice is in there - until it drops on my foot - but it worked out that way. I was hungry for these, but not in the mood for the 50-minute rice action, and that much-underused light-bulb flickered on... "no need to worry, dearie, you have rice already!" Rad. (This is a wonderful thing, too, because I almost always have goat cheese and pecans at home, too, so I'll be able to throw these together in a pinch!)

I probably over-did it with the food processor, because the mix wasn't so much on the grainy side, but that didn't seem to matter. Formed, fried, and baked and they were quite tasty. Dave made the comment that these would make great veggie-burgers, and I have to agree. The rice gives it a nice chew, but the goat cheese kept them moist.

I served these with our new favorite salad. Let me tell you how we came upon it.

Dave and I visited with his parents in Phoenix in December. We went to Quiessence Restaurant & Wine Bar, located at The Farm at South Mountain. We'd arrived early and had a chance to tour the property. I was just smitten with row after row of vegetables, the noisy chickens, the citrus trees, heavy with fruit. The farm seemed to be a little piece of heaven, right there in an active and bustling city. Quiessence prides itself on its use of local, sustainable ingredients, and it shows. The meal we shared there was the best meal of my life. Seriously. The attention to detail, the marriage of flavors without complication... I cannot wait to go back.

Dave and I each had their root vegetable salad. It consisted of many varieties of sliced radish, carrot, and arugula, all tossed in a light vinaigrette. We asked the server to find out what was in it, and she listed radishes we'd never heard of: Easter Egg, French Breakfast, Icicle, Watermelon... I knew then that we'd have to find them.

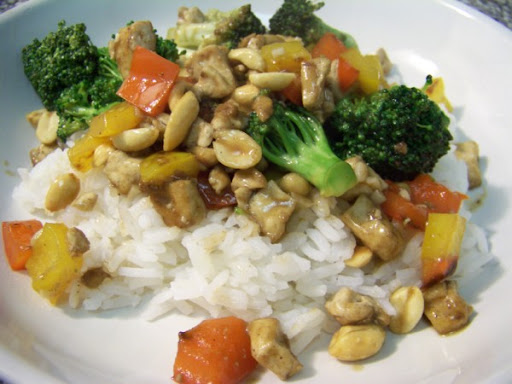
I was able to find the Easter Egg radishes and some very colorful carrots to pull this together at home. (My favorite are the purple carrots - they're green in the middle!!) Topped with a little olive oil and a splash of whichever O Vinegar we're in the mood for, and we're happy salad eaters.

I've never grown radishes, carrots, or arugula at home, but this summer, I'm going to try. :)


Brown Rice and Goat Cheese Cakes
c/o Eating Well Magazine, April 2008
http://www.eatingwell.com/recipes/rice_goat_cheese_cakes.html

Medium-grain brown rice has a toothsome texture and nutty flavor that complement creamy, earthy goat cheese in these elegant cakes. Serve over salad greens as a main course.

Makes 6 servings

3/4 cup medium-grain brown rice
1 1/2 cups water
4 teaspoons extra-virgin olive oil, divided
6 medium shallots, chopped
2 medium carrots, shredded using the large holes of a box grater
1/2 cup toasted pecans (see Tip)
3 ounces goat cheese
1 large egg white
1/2 teaspoon dried thyme
1/2 teaspoon salt
1/2 teaspoon freshly ground pepper

Bring rice and water to a boil in a medium saucepan. Reduce heat to low, cover, and simmer at the lowest bubble until the water is absorbed and the rice is tender, 30 to 50 minutes (see Test Kitchen Note). Remove from the heat and let stand, covered, for 10 minutes.

Meanwhile, heat 2 teaspoons oil in a large skillet over medium heat. Add shallots; cook, stirring often, until soft, 2 to 3 minutes. Add carrots, reduce the heat to low and cook, stirring often, until softened and the shallots are lightly browned, about 4 minutes. Remove from the heat.

Preheat oven to 400°F.

Transfer the cooked vegetables and rice to a large food processor. Add pecans, goat cheese, egg white, thyme, salt and pepper. Pulse until well blended but still a little coarse. Scrape into a large bowl. With wet hands, form the mixture into six 3-inch patties (about 1/2 cup each).

Heat the remaining 2 teaspoons oil in a large nonstick skillet over medium heat. Add the patties and cook until well browned, 3 to 4 minutes per side. Transfer to a baking sheet and bake until an instant-read thermometer inserted into the middle registers at least 160°F, 10 to 15 minutes.

TIP: Tip: Spread pecans on a baking sheet and bake at 350°F, stirring once, until fragrant, 7 to 9 minutes.

Test Kitchen Note: Perfectly cooked rice is not simple. In fact, it’s something that we struggle with occasionally in the Test Kitchen. To have the most success cooking whole-grain rice, we recommend using a pan with a tight-fitting lid, cooking on your coolest (or simmer) burner and making sure the rice is simmering at the “lowest bubble.” While testing the recipes that use less than 1 cup of dry rice, we found that the cooking time varied greatly depending on what stove we used. Although whole-grain rice usually requires 50 minutes of cooking, we found smaller volumes of rice were sometimes done in as little as 30 minutes (and burned at 50 minutes). So, when cooking a small batch of rice, start checking it after 30 minutes to make sure it doesn’t burn.

Make ahead tip: Cover and refrigerate for up to 3 days. Serve cold or reheat.

Per serving: 250 calories; 14 g fat (3 g sat, 7 g mono); 7 mg cholesterol; 26 g carbohydrate; 7 g protein; 3 g fiber; 274 mg sodium; 250 mg potassium.
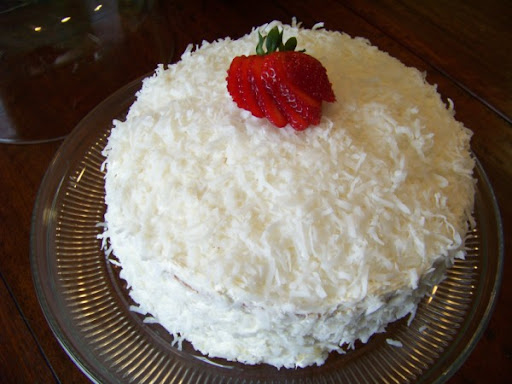
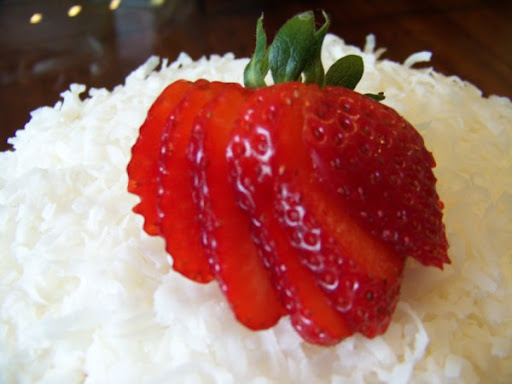
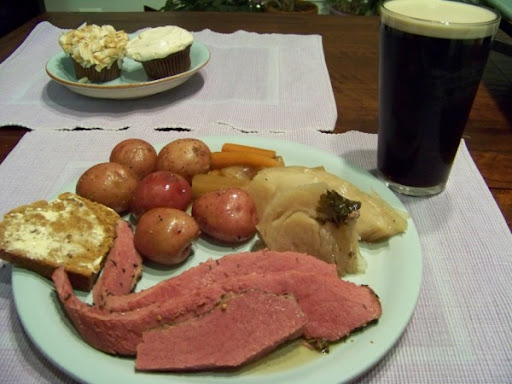
See the recipe...


Taste & Create VII: Friends for Life Chocolate Cake

I am in love with Ms. Omana Paul. She was Nags' neighbor growing up, and would bring her family this lovely cake during the holidays. Obviously, I need to make friends with my neighbors! My husband and I currently live in an apartment community that sees a lot of resident turn-over.... considering we've lived there for... wow... 5 years as of last week... we've watched many people come and go. Add to it that we're both shy and private... and you may understand how we know no one here. We did make friends with a lovely woman (Hi Gail!) and her sassy puppy (Woof Kayla!), but they moved away. No new friends or dogs have been met since.

I don't know why I shared all of that with you, other than to think that if I made this cake for the people that lived in my building, that we could be friends. (It's ok, it isn't a big building.) Seriously friends for life, I'd think. This is that kind of cake.

This cake reminded me a lot of Orangette's Winning Hearts and Minds cake. Nags cake is spongier, for sure, but the richness of it (thanks, butter/eggs) is very similar. Mine took about 55 minutes, but I think I could have gotten away with taking it out sooner. The center of the cake was still gooey, so make sure you let it cool for a while before you try getting it out of the pan. I chose not to frost, and while I enjoyed it tremendously as it was, I can see how some folks could find it a little less sweet than a traditional cake. (But I really liked that aspect - the under-sweetness allowed the flavor to be more chocolate-based.) Perhaps a nice compromise would have been some lightly sweetened freshly whipped cream. Deal?

O my gosh! I've gotten this far without thanking Nicole for pairing me up with Nags for Taste & Create 7! How silly of me! T&C is a terrific monthly event, create by Nicole. She sorts out all of the participants and pairs us together and then hosts the roundup at the end of the month! I cringe at the amount of work that entails, and I couldn't be more grateful that she goes to the trouble! Check back to her site in a few days for the T&C 7 collection!!

Rich Dark Chocolate Cake
c/o Nags, For the Cook in Me
Adapted from, http://cookingandme.blogspot.com/2007/07/rich-dark-chocolate-cake.html

2 cups powdered sugar
1 ¼ cups unsalted butter (2 ½ sticks), room temperature
5 large eggs
2 teaspoons vanilla extract
1 1/3 cup AP flour
1 teaspoon baking soda
1/3 cup cocoa powder
4 ¼ teaspoons powdered milk
1 teaspoon espresso powder
pinch salt
1 cup yogurt

Optional Butter Icing:
2 tablespoons unsalted butter, room temperature
6 1/5 tablespoons sugar

Preheat your oven to 350°F. Butter an 8-inch round cake pan.**

Beat sugar and butter well. Add eggs, one at a time, beating well after each addition. Mix in the vanilla extract.

Sift together the flour, baking soda, cocoa powder, powdered milk, espresso powder, and salt six times. This is to make sure that the ingredients have blended completely.

Beat the yogurt well to remove any lumps.

Alternate adding the yogurt and the dry mixture to the butter and sugar mixture. Do not beat at this stage. Slowly blend the ingredients and keep mixing well.

Pour batter into prepared pan and bake for 55 minutes, until risen and springy to the touch. Center will still be wet. Remove pan to a cooling rack and cool for 30 minutes, then loosen the cake from the sides with a thin knife. Invert and cool to room temperature (or less, if you like it warm), right side up.

If frosting, mix butter and sugar and spread on the cake.

**Note: Unless you have really high-sided cake pans, I would recommend either using two pans or placing a foil-lined sheet pan underneath the cake pan as it bakes.

See the recipe...


Thursday, March 20, 2008

Fried Cornmeal Shrimp with Butternut Squash Risotto

I enjoyed getting a little silly with this dish. I had blue cornmeal on hand, and I just couldn't resist the idea of crusting my little shrimps with it. I think the contrast between the shrimp and the risotto is lovely, too.

Happy First Day of Spring, btw. The weather here is more than a bit crazy. I feel like we're going to get blown away at any minute, the wind is so wicked. It was one of those mornings that had me not wanting to get out of our nice warm cozy bed. I even got back in a few times... got up, fed the cats, got back into bed. Got up, started the shower, got back into bed. I stayed in as long as I could... but we have bills to pay, so off to work I went. Sad. :)

This dish would be perfect for a windy, chilly day like today, because you'll need to hover over the stove stirring the risotto. I always feel like risotto is something of a present to myself on a cold day, because I'm almost always cold at home, so hovering over a nice warm stove makes me really happy.

I cheated a little and roasted my squash the night before. This is also a good time to get your shrimp soaking in their garlicy marinade. Both of those pieces accomplished, all you really need to worry about is stirring your rice and battering and frying your shrimp.

One last note about the shrimp and risotto, and then I'll shush up. These go really well together. The cornmeal-crust is such a nice crunchy contrast to the creamy risotto. The spark of the garlic in the shrimp popped against the smooth friendliness of the butternut squash. All around, this dish was just plain great.


Fried Cornmeal Shrimp with Butternut Squash Risotto
c/o Bon Appetit Magazine, October 2007
http://www.epicurious.com/recipes/food/views/240105

1 1 3/4- to 2-pound butternut squash

24 uncooked large shrimp (about 1 1/4 pounds), peeled, deveined
3 1/2 tablespoons extra-virgin olive oil, divided
3 large garlic cloves, peeled, smashed, plus 2 large garlic cloves, chopped

1 cup cornmeal
1/2 teaspoon salt
1/2 teaspoon freshly ground black pepper

5 cups low-salt chicken broth
1 1/2 cups chopped onion
4 teaspoons finely chopped fresh thyme, divided
1 1/2 cups Arborio rice or medium-grain white rice
1/2 cup dry white wine

Vegetable oil (for frying)

1/2 cup freshly grated Parmesan cheese

Preheat oven to 400°F. Pierce squash several times. Place on baking sheet; roast until tender, about 1 hour. Cool. Cut squash in half; discard seeds. Scoop flesh into processor. Puree until smooth. Measure 1 1/2 cups puree (reserve remaining puree for another use).

Place shrimp, 1 1/2 tablespoons olive oil, and 3 smashed garlic cloves in large reseal-able plastic bag; turn to coat. Chill 2 to 3 hours, turning bag occasionally.

Stir cornmeal, 1/2 teaspoon salt, and 1/2 teaspoon pepper in medium bowl. Add shrimp; toss. Arrange in single layer on large plate.

Preheat oven to 200°F. Bring broth to simmer in heavy small saucepan; reduce heat to low and keep hot. Heat remaining 2 tablespoons olive oil in heavy large saucepan over medium-high heat. Add onion and cook until beginning to brown, stirring often, about 5 minutes. Add chopped garlic and 2 teaspoons thyme; stir 1 minute. Add rice and stir 1 minute. Add wine; stir until almost absorbed, about 2 minutes. Reduce heat to medium. Add 1 cup hot broth and cook until almost all liquid is absorbed, stirring often. Continue adding hot broth 1 cup at a time and stirring frequently until rice is almost tender, about 15 minutes.

Meanwhile, add enough vegetable oil to heavy large skillet to reach depth of 1/4 inch. Heat oil over high heat. Working in 2 batches, fry shrimp until golden brown and cooked through, about 1 1/2 minutes per side. Transfer to paper-towel-lined baking sheet and place in oven to keep warm.

Re-warm reserved 1 1/2 cups squash puree in microwave. Add warm puree to risotto and stir until rice is tender but still firm, about 2 minutes. Stir in Parmesan cheese and remaining 2 teaspoons thyme. Season with salt and pepper.

Divide risotto among bowls. Top with shrimp and serve.

See the recipe...


Wednesday, March 19, 2008

Chicken, Mushroom and Goat Cheese Burritos

I pulled this recipe out of a magazine and held on to it for a long time. Thinking about it later, I'm not sure why. I love burritos, yes. But burritos with mushrooms and spinach? What was I thinking?

My older self must have known something my recent self didn't, because I could hug old me. These burritos, as weird as they are, are scrumptious. Filling and delicious and HEALTHY! How many burritos can claim that? And quick-to-make! I got home and 20ish minutes later, Dave and I were chowing down on burritos with spinach in them. Crazy!

For whatever reason, I couldn't find green salsa at the store or they were out, but I didn't get it. We had lots of jars of salsa in the fridge already, so I dumped in some of a couple. Please feel free to use whatever salsa your heart desires. This is a perfect opportunity to impulse-buy a rotisserie chicken, too. (Except, if it's on your grocery list, it isn't much of an impulse-buy, now is it?)


Chicken, Mushroom and Goat Cheese Burritos
c/o Everyday Food Magazine
http://www.marthastewart.com/recipe/chicken-mushroom-and-goat-cheese-burritos?autonomy_kw=goat%20cheese%20chicken%20mushroom%20burrito&rsc=header_1

2 tablespoons olive oil
1 medium onion, chopped
1 jalapeno chile (ribs and seeds removed for less heat), minced
Coarse salt and ground pepper
10 ounces white button mushrooms, trimmed, thinly sliced
1 rotisserie chicken (about 2 1/2 pounds), skin removed and meat shredded (about 4 cups)
1 package (10 ounces) frozen corn kernels
1 cup prepared green salsa, plus more for serving
6 burrito-size (10-inch) flour tortillas
1 bunch flat-leaf spinach, thick stems removed (3 cups)
1 log (5 ounces) soft goat cheese, crumbled

In a large skillet with a lid, heat oil over medium. Add onion and jalapeno; season with salt and pepper. Cook, stirring occasionally, until softened, 3 to 5 minutes.

Add mushrooms; cover, and cook until they begin to release their liquid, 3 to 5 minutes. Uncover; cook, stirring occasionally, until mushrooms begin to brown and skillet is dry, about 5 minutes more.

Add chicken, corn, and salsa. Cook, stirring, until heated through and mixture is saucy, 4 to 5 minutes.

Meanwhile, heat tortillas according to package instructions. In center of each tortilla, layer spinach, chicken mixture, and goat cheese.

Wrap burritos one at a time: Fold side of tortilla closest to you over filling. Fold right and left sides toward center, and roll up. Halve if desired; serve with additional salsa.


See the recipe...


Tuesday, March 18, 2008

Corned Beef and Cabbage with Dark Irish Soda Bread

Happy St. Patrick's Day!

Like any good Irish girl, I made sure to wear my green today, but I tried to get out of making our corned beef and cabbage. I asked Dave, "Wouldn't you like a nice lamb stew this year?" He promptly turned his face into a pout, and so it was decided. Corned beef and cabbage it is.

Even then, I didn't put much of an effort into even finding a recipe, I went with the first one I found. Slacker. If you yourself have ever made it, you know that there isn't much to it, so I wasn't worried. We picked up a lovely brisket from the butcher (and they even gave me a nice thermal bag!!) and went home. I'd even planned to make it Sunday night, but got started later than I planned, (movies and cupcakes with a girlfriend will do that) so I broke it into two parts.

Sunday night, I tossed everything (sans cabbage) into the pot with a bottle of Guinness and boiled for two hours. By that time, it was almost 8 pm, so I waited for it to cool and then put the whole pot into the fridge. Tonight, I pulled out the pot and brought it back to a boil and tossed in the cabbage. While that did it's thing, I made a loaf of Dark Irish Soda Bread I found in The Washington Post. (I'm normally crap at bread, but since this was baking-soda-based, I figured I was safe.

Thank goodness the cabbage only took an hour, because by the time it was finished, the apartment smelled so delicious, I could have gnawed on the couch!! The bread was done a little early, and we tore into it (which is why no pre-sliced pictures). I was delighted when I brought some to Dave and he asked me where I got it. Where I got it indeed! :) The corned beef was perfectly tender. The carrots were so soft that they seemed to be holding together in carrot shape by sheer force of will. And you know what? I actually liked the cabbage (and I thought I detested boiled cabbage!) This recipe, as whimsically as I picked it, has cemented it's place in our St. Patrick's Day routine.

You'll see in the background of the top photo some cupcakes. I picked those up on Sunday from my favorite cupcake place ever because they had a sign that promised their peanut butter cupcakes would go famously with my pint of Guinness. Darn them, they were right!


Corned Beef with Cabbage
c/o Epicurious.com
http://www.epicurious.com/recipes/food/views/241775

Editor's note: The recipe and introductory text below are from Irish Traditional Cooking by Darina Allen.

Although this dish is eaten less frequently nowadays in Ireland, for Irish expatriots it conjures up powerful nostalgic images of a rural Irish past. Originally it was a traditional Easter Sunday dinner. The beef, killed before the winter, would have been salted and could now be eaten after the long Lenten fast, with fresh green cabbage and floury potatoes. Our local butcher corns beef in the slow, old-fashioned way which, alas, is nowadays more the exception than the norm.

Makes 6 to 8 servings

4 lb corned brisket of beef
3 large carrots, cut into large chunks
6 to 8 small onions
1 teaspoon dry English mustard
large sprig fresh thyme and some parsley stalks, tied together
1 cabbage
salt and freshly ground pepper

Put the brisket into a saucepan with the carrots, onions, mustard and the herbs. Cover with cold water, and bring gently to a boil. Simmer, covered, for 2 hours. Discard the outer leaves of the cabbage, cut in quarters and add to the pot. Cook for a further 1 to 2 hours or until the meat and vegetables are soft and tender.

Serve the corned beef in slices, surrounded by the vegetables and cooking liquid. Serve with lots of floury potatoes and freshly made mustard.

And

Dark Irish Soda Bread
c/o The Washington Post Food Section, March 5, 2008
http://projects.washingtonpost.com/recipes/2008/03/05/dark-irish-soda-bread/

This soda bread gets its appealing brown color from molasses and whole wheat flour. The flour used here is the traditional whole-wheat flour that is made from red-wheat berries.
It's best eaten on the same day it is made, but it tastes great toasted the next day. The bread can be wrapped well and frozen for up to 1 month. Defrost with the wrapping on so that any condensation will form on the foil and/or plastic, and not on the bread itself.
Makes one 8-inch oval loaf (12 servings)

2 tablespoons melted unsalted butter (plus softened butter for greasing the baking sheet)
1 1/2 cups whole-wheat flour, plus more for the baking sheet
3/4 cup flour
1 tablespoon dark or light brown sugar
2 teaspoons caraway seeds
1 teaspoon baking soda
1/2 teaspoon salt
1 tablespoon molasses
1 cup low-fat or regular buttermilk

Position a rack in the middle of the oven; preheat to 375 degrees. Lightly grease a rimmed baking sheet with softened butter, then sprinkle lightly with whole-wheat flour; tap to discard any excess flour.

Combine both flours, brown sugar, caraway seeds, baking soda and salt in the large bowl of a stand mixer or hand-held electric mixer. Mix to combine on low speed; add the melted butter.

Combine the molasses and the buttermilk, then add to the mixer bowl, on low speed; beat for a minute or two, until a soft dough forms. Gather the dough into a ball and roll it around in the palms of your hands to smooth it; the dough will not be perfectly smooth. Form into an 8-inch long oval and place on the prepared baking sheet. Use a smooth-edge knife to cut a slash about 5 inches long and about 1 inch deep along the length of the loaf.

Bake for 30 to 35 minutes, until the bread feels firm and crisp and you can see that the bottom has browned when you lift it carefully. Transfer to a wire rack to cool.

Recipe Source:

From cookbook author Elinor Klivans.
113 calories, 3g fat, 1g saturated fat, 6mg cholesterol, 225mg sodium, 20g carbohydrates, 2g dietary fiber, 4g protein.

See the recipe...


Sunday, March 16, 2008

Penne with Beef and Arugula and Parmesan Popovers

When I watched Giada make this, I wanted to reach through the tv and eat it. I longed to work in her husband's office, in the hopes that I could look starved in the corner, so that she might share some with me. Alas, tv's don't work like that, and I don't work with her husband. Such is life.

It occurred to me, as I watched, that this dinner would make excellent lunch leftovers. I know, I know, how crazy is it that I made this meal looking forward to its leftovers? I knew we'd like it for firstovers, but still! We're trying to cut back on our grocery purchases and control our lunches, so it only makes sense! :)

I really enjoyed the mix of the balsamic and the mustard. Both went beautifully with the beef and pasta.

The popovers, while tasty, were a reminder to me that I have to pay attention to the instructions!! I baked them in regular muffin tins, not mini's, so they weren't as light and airy as expected. Still yummy, though.

I submit this tasty dinner-and-lunch to Ruth for her Presto Pasta Night round-up. Check over to her site on Friday for all the tasty pasta the Internet has to offer!

Penne with Beef and Arugula
c/o Everyday Italian, Food Network TV
http://www.foodnetwork.com/food/recipes/recipe/0,,FOOD_9936_33971,00.html

1 (1-pound) New York strip steak
1 teaspoon herbs de Provence
1 garlic clove, minced
3/4 cup extra-virgin olive oil, plus 3 tablespoons
1 pound penne pasta
1/4 cup balsamic vinegar
2 tablespoons Dijon mustard
1/2 teaspoon salt, plus more for steak and pasta water
1/2 teaspoon freshly ground black pepper, plus more for steak
1/4 cup chopped fresh basil leaves
1/4 cup chopped fresh parsley leaves
2 cups chopped arugula

Season the steak with salt and freshly ground black pepper, herbs de Provence, and minced garlic. In a skillet, heat 3 tablespoons olive oil over medium heat. Cook steak about 7 minutes per side. Remove the meat from pan and let it rest for 5 minutes. Thinly slice the steak. Set aside.

Meanwhile, bring a large pot of salted water to a boil over high heat. Add the pasta and cook until tender but still firm to the bite, stirring occasionally, about 8 to 10 minutes. Drain pasta, reserving 1/4 cup of pasta water.

In a small bowl, whisk together the balsamic vinegar, Dijon mustard, 1/2 teaspoon salt, 1/2 teaspoon pepper, fresh herbs, and 3/4 cup olive oil. In a large bowl toss the pasta with half of the salad dressing and the reserved pasta water. Add the arugula and steak, more dressing, and season with salt and freshly ground black pepper, as needed. Toss, pack for the picnic, or serve.

Parmesan Popovers
c/o Everyday Italian, Food Network TV
http://www.foodnetwork.com/food/recipes/recipe/0,1977,FOOD_9936_33976,00.html

3 eggs
3/4 cups all-purpose flour
1/4 teaspoon salt
1/2 teaspoon freshly ground black pepper
1/2 teaspoon herbs de Provence
4 tablespoons chopped parsley leaves
1 cups whole milk
3/4 cup grated Parmesan (about 5 ounces)

Preheat the oven to 400 degrees F.

In a blender, combine eggs, flour, salt, pepper, and herbs, milk, and cheese. Blend on medium speed.

Spray a mini-muffin pan with nonstick cooking spray. Pour the batter into the muffin cups, filling each cup 3/4 full. Bake until puffed and golden brown, about 20 to 25 minutes.

Remove popovers from muffin tin and cool on a wire rack. Save in a storage container to take to the picnic.

See the recipe...


Thursday, March 13, 2008

Fresh Tagliatelle with Sprouting Broccoli and Oozy Cheese Sauce

For this week's Presto Pasta Night, I bring you a most glorious Jamie Oliver recipe. I went on a binge a few weekends ago and watched all my saved-up cooking shows, and this pasta dish was featured in his episode on eggs. I made sure to do as he asked and used farm-happy eggs in both the pasta and sauce.

Now, the pasta was something of a departure for me. I'd never made it in the food processor before, and I'd never not let it rest for 30 minutes before I rolled it out. I would probably have questioned the instructions, had I not just watched Jamie do it on television. Ya, ya, tv magic is often in play, but if you've seen his episodes, he doesn't appear to use too much trickery. My trust in him, I went forth and processed and didn't wait to roll, and as you can see, the pasta came out nicely. I am converted.

I mentioned a couple days ago that I don't like much cheese. This recipe may then be confusing. But fontina is way lower on the Stinkiness Scale, and it was smooth and creamy and oozy... all things that get me to like cheese better. His method of gently warming the creme fraiche and cheeses over top of the pasta water is pure genius, if you ask me. I put the pot of water on and the pan on top while I made the pasta. I've rarely done all the prep before I start cooking, so it was nice to be able to stage everything as I went.

If you are comforted by a nice, velvety smooth pasta, this could be heaven for you. I was floored by the cheesy aroma wafting from the pasta as I poured the sauce on it. I know I yammered about smells just yesterday and I meant it at the time. But this pasta blows that soup's smell out of the water. I could be kind and just say that they're different (in the way I find both Jack and Charlie hot, but for different reasons). But I would be lying. Or, at least, I wouldn't mean it. The beautiful cheesy smell just appeals to me more. Could have been my mood at the time, or the weather or something, I guess. I enjoyed them both, don't get me wrong. This one just wins. At least it had the baby broccoli as the token vegetable of the evening, so I didn't feel all bad about it. :)


Fresh Tagliatelle with Sprouting Broccoli and Oozy Cheese Sauce
c/o Jamie at Home, Food Network TV
http://www.foodnetwork.com/food/recipes/recipe/0,1977,FOOD_9936_120489,00.html

The hero of this dish (apart from the eggs, of course!) is fontina, a delicious Italian mountain cheese used for melting, available in good cheese shops and delis. But any combination of Parmesan, pecorino, taleggio or Gruyere cheeses will also work well.

For the pasta:
4 large free-range or organic eggs
2 cups pasta flour, plus extra for dusting
Sea salt

For the cheese sauce:
1 cup creme fraiche
5 ounces sliced fontina or other nice melting cheese
5 ounces freshly grated Parmesan
Sea salt and freshly ground black pepper
1 pound purple sprouting broccoli
2 large free-range or organic egg yolks
1 small bunch fresh marjoram, oregano or thyme tips, leaves picked

Freshly grated Parmesan, for serving
Extra-virgin olive oil

You can buy ready-made dried or fresh tagliatelle, but this is a really quick way to make your own.

Crack the eggs into a food processor and add the flour. Whiz it up and listen for the sound changing to a rumble - this means the dough is coming together nicely. Turn the power off and test the consistency by pinching the dough. If it's a bit sticky add a little more flour and pulse again.

Tip the dough mixture onto a floured surface and shape it into a ball using your hands. Give it a little knead until smooth, then divide your dough into 4 equal parts. Start on the thickest setting of your pasta machine and run the first bit of dough through 4 or 5 times, moving the rollers closer together each time until the pasta is silky, smooth and about as thick as a CD. Flour your finished sheet generously, then fold it up and cut across into 1/2-inch strips. Gather all the slices together and toss them through your fingers, with a little flour, to open them up and make your pile of tagliatelle. Place to 1 side and repeat with the rest of the dough.

Bring a large pan of salted water to the boil. In a bowl large enough to rest on top of the pan, put your creme fraiche, fontina or other melting cheese and your Parmesan with a pinch of salt and pepper. Place the bowl over the pan for the cheeses to slowly melt. It won't take long. Meanwhile, trim any dry ends off the broccoli, then finely slice the stalks diagonally and leave the florets whole (cutting any larger ones in half).

At this point the cheese sauce should be lovely and oozy, so remove the bowl from above the pan and drop the pasta and broccoli into the boiling water. Boil hard for 2 to 3 minutes, until the pasta is just cooked through. Whip up the 2 egg yolks and the marjoram, or other chosen herb leaves, into the sauce. Drain the pasta and broccoli, reserving a little of the cooking water, and quickly toss them with the sauce - the heat from the pasta will be enough to cook the eggs through. If the sauce is a little thick, add a few splashes of cooking water to make it silky and loose. Taste and season, if necessary. Serve as quickly as you can, with some extra Parmesan sprinkled over the top and a drizzle of extra-virgin olive oil. Grand!

See the recipe...


Wednesday, March 12, 2008

Fragrant Fish Soup = Not a Chicken

I almost impulse-bought a rotisserie chicken.

Most times, it's the gum or candy bars, batteries or spare lint rollers that people buy as they wait in the check-out aisle. Not me. I get chickens. See, Wegmans is smart. They have a hot chicken display right there where the wee soda fridge's go. And they smell sooooo good. Omg. Sometimes I just can't help myself. This time, though, I remained strong. (Mostly because I couldn't think of a way to incorporate it into our week's meals on such short notice!)

Instead, we had this lovely Fragrant Fish Soup, found in the latest issue of Eating Well Magazine. Let me tell you, "fragrant" is the perfect word for this soup. The melding of the lemony jasmine rice with the pungent mint, fresh carrots and dainty green onions... delightful! I breathed deep and my stomach growled.

I'd never plated soup (bowled soup?) in this manner before - with the island of rice in the center, broth like a moat around it. I didn't mess up anything extra doing it, and I thought it added so much to the presentation. Sure, it's nothing new, but it made me happy. :)

You can probably already guess that I really liked this soup. I enjoyed the play of textures between the delicate fish, the soft rice, the nice chew of the carrots... and I could happily eat this again and again (and I did for lunch the next day!). That said, Dave claimed it was "missing something," but couldn't place what, other than to say it just needed MORE of everything on top. He could be on to something, for sure, but I was happy with it as it was.


Fragrant Fish Soup
c/o Eating Well Magazine, April 2008
http://www.eatingwell.com/recipes/fragrant_fish_soup.html

Lemony rice, delicately flavored broth and gently poached tilapia are topped with a colorful blend of vegetables and herbs. The aromatic mint provides fresh and complex flavor.

Makes 4 servings, about 1 1/4 cups each

1 cup jasmine rice
2 cups water
Zest and juice of 1 lemon
4 cups reduced-sodium chicken broth or vegetable broth
1 pound tilapia fillets or other firm white fish (see Tip)
4 cups bite-size pieces arugula or watercress (about 1 bunch), tough stems removed
1 cup finely shredded carrots
1/4 cup very thinly sliced fresh mint
2 scallions, finely chopped

Combine rice and water in a medium saucepan. Bring to a simmer over medium heat; cover and cook until the water is absorbed, about 20 minutes. Stir in lemon zest and juice.

Meanwhile, bring broth to a simmer in another medium saucepan over medium-high heat. Reduce the heat so the broth remains steaming, but not simmering. Add fish and cook until just tender, about 5 minutes. Remove and break into bite-size chunks.

Divide the lemony rice among 4 bowls. Top with equal portions of the fish, arugula (or watercress), carrot, mint and scallions. Ladle 1 cup of the warm broth into each bowl and serve.

TIP: Tip: Look for U.S. farm-raised tilapia, which is usually grown in closed farming systems that limit pollution and prevent escapes. Some Central and South American tilapia is farmed in this manner as well, but avoid tilapia from China and Taiwan, mostly farmed in open systems.

Per serving: 239 calories; 3 g fat (1 g sat, 1 g mono); 62 mg cholesterol; 25 g carbohydrate; 29 g protein; 2 g fiber; 230 mg sodium; 572 mg potassium.

See the recipe...


Tuesday, March 11, 2008

Fusilli Pasta with Burrata Cheese, Spinach, Lemon, and Toasted Almonds

This was a very spontaneous dish. Dave and I had popped into Balducci's for a few things (very few, or else I'm not allowed to go very often!) and I happened to see that they had some burrata in the cheese case. I'd never had it before and I've always wanted to try. Was it last Summer or Fall that it was all the craze?

Well, burrata in hand, we looked up what to make with it and got cracking. With the new laptop, it was really awesome to have it open to the recipe in the kitchen. Ah, technology.

Now, I'm keeping an open mind, but I didn't love the burrata. This won't make any sense to you, but I don't really like cheese as a whole. It's the smell. I like some cheeses in things, and I like fresh mozzarella in a Caprese salad, and I adore pizza and the like... but I have to wash my hands after I grate Parmesan because I don't like the way my hands smell (not that I wouldn't wash them anyway, of course!) So, less-stinky cheeses are cool, more stinky, not so much. I really wanted to like the burrata because I love fresh mozz... the burrata was stinky in a way I couldn't make friends with. The creamy texture was really great, I'll admit that... but I also picked around any clumps I couldn't just mix in. O well. At least it looked pretty.

Now, the REST of it I liked. The perfectly cooked pasta, tossed in the lemonybutterygarlicy goodness, tossed with the toasted almonds and spinach... dreamy.


Campanelle Pasta with Burrata Cheese, Spinach, Lemon, and Toasted Almonds
c/o Bon Appetit Magazine, December 2004
http://www.epicurious.com/recipes/food/views/231293

Burrata is a luscious Italian cheese made by mixing cream and unspun mozzarella curds together (for a texture similar to ricotta): the mixture is then inserted into the center of a ball of fresh mozzarella. It can be found in some supermarkets, at specialty foods shops, and at Italian markets. Substitute fresh mozzarella if you can't find burrata.

1 pound campanelle (trumpet-shaped pasta) or fusilli (spiral-shaped pasta)
2 tablespoons (1/4 stick) butter
1/3 cup olive oil
2 large garlic cloves, minced
1/4 cup lemon juice
1 teaspoon finely grated lemon peel
1 6-ounce package baby spinach (about 4 cups)
3/4 cup sliced almonds, toasted
1 pound burrata cheese, cut into 1-inch chunks

Cook pasta in large pot of boiling salted water until tender but still firm to bite, stirring occasionally.

Meanwhile, melt butter with oil in heavy large skillet over medium heat. Add garlic; sauté until soft, about 2 minutes. Add lemon juice and lemon peel. Drain pasta; transfer to large bowl. Place spinach and almonds atop hot pasta. Pour hot lemon mixture over spinach. Toss until spinach is wilted, about 1 minute. Divide pasta among plates. Top with burrata cheese, sprinkle with salt and pepper, and serve.

See the recipe...


Thursday, March 6, 2008

Pea, Pancetta, Leek and Onion Frittata

Doesn't that slice of frittata look like it fell from the sky and onto my plate? Splat!

No, the weatherman wasn't calling for frittata showers, this particular frittata didn't hold together particularly well. I take all the blame myself, and not just because Donna Hay is a food genius. I know it was oozy because I added more ricotta cheese than called for. I had so much fun doling out dollop after dollop... I couldn't control myself!

Dave and I shared this for dinner, and while I can't see us having it for breakfast, I think it would be perfect for brunch. Just make sure you take it easy on the ricotta. :)


Pea, Pancetta, Leek and Onion Frittata
c/o Donna Hay Magazine, Issue 32

20g (3/4 oz) unsalted butter
2 teaspoons olive oil
1 brown onion, sliced
1 leek, sliced
6 eggs
1 cup (8 fl oz) (single or pouring) cream
1/3 cup finely grated Parmesan cheese
Sea salt and cracked black pepper
200g (7 oz) fresh ricotta cheese
1 cup frozen peas, defrosted
5 slices pancetta, roughly chopped

Heat a 22 cm (8.5 inch) frying pan over medium heat. Add the butter and oil and swirl around the pan to coat. Add the onion and leek and cook, stirring, for 5 minutes or until soft. Place the eggs, cream, Parmesan, salt and pepper in a bowl and whisk to combine. Reduce the heat to low pour over the egg mixture and cook for 5 minutes or until the edges just start to set. Top with ricotta, peas and pancetta and cook for 15 minutes or until the egg is almost set. Place under a preheated hot grill for 5 minutes or until the egg is set and the top is golden.

Serves 4.

See the recipe...


Sunday, March 2, 2008

Pappardelle with a Ragu of Tiny Meatballs

Science! Hurry up and learn to clone people (but not in a scary Island kind of way), so you can make many many more Jamie Olivers. Many. Lots. Enough to go around, I say. Please put me on your list for three Jamies. Thanks.

I am smitten with his show, for sure. I have a lot of love for his books, too. His last one, Cook with Jamie, looks all rough-and-tumble on the cover. Yah, he's smiling... but his arms are crossed... and that knife in the counter? He just stab that in there an then vamp for the camera? Love it.

He's spot on when he says that you can make it all ahead of time. I made the meatballs and sauce while Dave was at a hockey game last week. I stopped at the "toss the meatballs into the sauce"step, before the 10-15 minutes of additional simmering. I let it cool and then put the whole pot in the fridge. The next night, I took the pot out when I got home, placed it on the stove and gave it gentle heat while I made the pasta. In the time it took me to make the pasta start to finish, the sauce and meatballs were ready and we had this amazing dinner. (Makes a great lunch the day after, too!)

You may think it weird to put cinnamon and so much nutmeg into meatballs (its ok, I did too). I even thought it a tad strange to be putting lemon zest into them. You'll get over it. Don't worry. You'll like it. I figured, if I like them in my bolognese, I'd like them in these meatballs. And I did.

These tiny meatballs have something really special going for them: they're tiny. You don't have to fight over them, you don't have to cut into them to get a bite. Just swirl some pasta on your fork and stab a meatball and you're set! Also nice - the sauce wasn't big and bulky. There was just enough to coat the meatballs and the pasta without junking the place up. (However, I don't know if that's normal or just how it turned out that way once I reheated it.)

Now, you don't have to make this recipe ahead. It didn't take long to pull together. I only did so because I had the free time that evening with the husband away, and my beef thawed faster than I thought it would. If we'd had extra leftovers, I am sure this would have made a nice freezer dinner, too.


Pappardelle with a Ragu of Tiny Meatballs
c/o Cook with Jamie: My Guide to Making You a Better Cook, by Jamie Oliver

This is a fantastic, classic, easy-pleaser of a dish. Make this for a dinner party or for your family and you’ll be incredibly popular! The brilliant thing about it is that you can make the meatballs, the pasta, and the sauce in advance, so when it comes to putting it all together it can be quite quick. If you’re making fresh pasta, try cutting it out using a crinkly cutter as I’ve done in this picture – I think it just takes it to another league. Of course you can use dried pappardelle or tagliatelle instead.

When it comes to the meatballs, I would suggest that you ask your butcher to grind the beef in front of you; that way you know exactly what you’re getting and that it’s nice and fresh. The reason I mention this is because very often (and I’m not for a minute suggesting your butcher is a con-man) ground meat gets treated a little bit like a dustbin for random cuts of meat. So if you can be specific about what you want, you might as well be. Or you can buy the cuts of meat yourself and pulse them up in your food processor when you get home.

Serves 4-6.

1 x basic pasta dough or use 1 lb good-quality dried pappardelle
A knob of butter
Parmesan cheese

For the meatballs
1 lb good-quality coarse ground beef (chuck, skirt or brisket)
1-2 dried chilies, crumbled
A pinch of ground cinnamon
½ a nutmeg, grated
3 cloves garlic, peeled and finely chopped
Sea salt and freshly ground black pepper
1 large free-range or organic egg
A handful of freshly grated Parmesan cheese, plus extra for serving
Zest of 1 lemon

For the tomato sauce
Olive oil
2-3 cloves garlic, peeled and chopped
A bunch of fresh basil, leaves picked, stalks chopped
1 fresh red chili, pierced with the tip of a knife
2 x 14 oz. cans good-quality plum tomatoes
A little swig of red wine vinegar
Sea salt and freshly ground black pepper

If you’re making fresh pappardelle to this first and lay it out on a floured pan while you get on with the meatballs and tomato sauce. To make your meatballs, mix and scrunch together all the meatball ingredients in your hands and shape into marble-sized balls. When rolling the meatballs, run your hands under cold water every now and then – it will help to make the meatballs dense and hold their shape better. Place them in a pan and put in the fridge while you make your tomato sauce.

Get a pan on the heat and add a glug of olive oil to it. Gently fry the garlic, basil stalks and the whole chili, then add the tomatoes and red wine vinegar. Season with salt and pepper then gently simmer for half an hour.

Heat up a little olive oil in a frying pan and throw in your meatballs. Cook until they’ve got a really good color on them, and then add them to your tomato sauce. Remove the chili from the sauce and check for seasoning. Continue to simmer for 10 to 15 minutes. Meanwhile, if you’re using dried pasta, bring a large pan of salted water to the boil and cook according to the package instructions. Otherwise, when your meatballs are almost done, cook your fresh pasta for 2 to 3 minutes until al dente. Drain the pappardelle in a colander, reserving a little of the cooking water, then toss it in the meatball sauce. Add the knob of butter, the Parmesan and tear over half the basil leaves. Now, toss around to coat the pasta. Add a little bit of cooking water to loosen the sauce if needed. When it’s superb, serve on a big platter or divide up between individual plates, scatter with the rest of the basil leaves, grate over some Parmesan and serve as soon as possible.

Matt’s wine suggestion: Italian red – Sangiovese

See the recipe...