
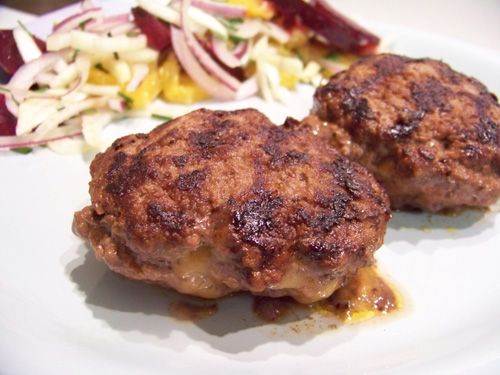
 And here I didn't think the typical made-at-home burger could get any better! For this round of Taste & Create (a special seasonal grilling version), I was paired with the event's creator and lovely hostess Nicole of For the Love of Food. I'm a big fan of Taste & Create, and I was tickled to try a grilling swap - even though I don't actually own a grill (grill pans and broiling were both allowed!)
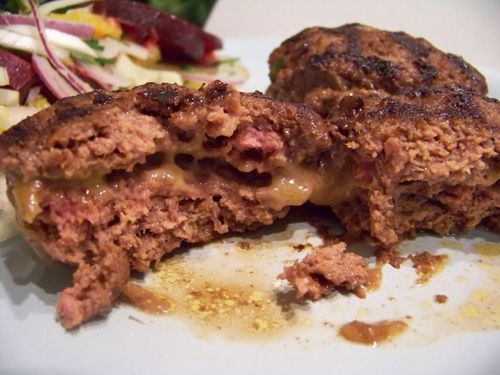 Ultimately, I chose her Cheese-Stuffed Burgers. Why? Because I'd never stuffed a burger before, and I was intrigued by the inclusion of jam in the mix. You heard me. Jam. In. The. Mix. Now, hers specifically calls for apricot, but I didn't have any and couldn't rationalize buying a whole jar for a half-teaspoon. So I used what I had - peach - and I probably used a full teaspoon. I wasn't measuring, but it seemed like a bigger blob. My other modification was to use ground bison instead of beef - both leaner and more humanely raised, more often than not. I was at Wegmans for my shopping, and while I don't normally get my meats there, I also wasn't in the mood for a special trip to my butcher. Lazy, a little, but I tried to swap out smartly. These burgers are so tasty! I had a little bit of cheese seepage (now that's a sentence I bet you didn't expect), but overall, the cheese stayed where it was supposed to. The burgers were moist and flavorful (and not the least bit jammy.) I skipped a bun, but Dave doctored a sub roll, and he liked it a lot.
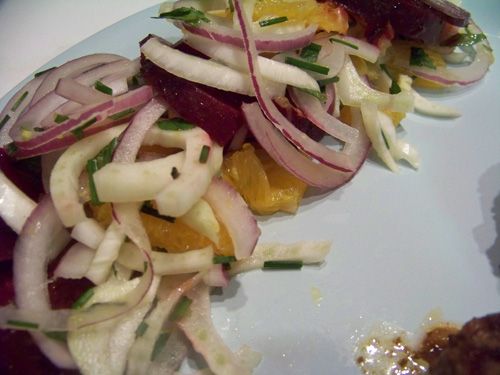 We didn't have dinner until close to 9:30 last night. We'd had a late, large breakfast and shared a pretzel at the mall after our movie (Wall-E - go see it!), so we just weren't hungry earlier. While Dave talked to his parents on the phone, I mixed and filled the patties. I also prepared this little salad of roasted beets, fennel and orange. I wasn't in my right mind, it seems, because it was a salad entirely composed of things Dave doesn't like. See, we received beets in our CSA last week... and we tried beets last summer and decided we didn't like them. I was determined to give them another go and found this recipe in Fresh Every Day. It looked good to me... I just wasn't thinking. In the end, it all worked out, because something about all of those ingredients really clicked, and Dave liked it. We even had the extra for lunch today. Whew, saved!
This was a lovely summer grilling dinner. A delicious, easily-prepared burger, alongside a salad that surprised us in its goodness.
Cheese-Stuffed Burgers
c/o Nicole at For the Love of Food
http://forfood.rezimo.com/?p=614
1/4 Cup finely shredded Cheddar Cheese
1/4 Cup fresh finely shredded Parmesan (originally calls for Gruyere)
1 lb. 90% lean Ground Beef (ground Sirloin)
*1 Tablespoon Soy Sauce
*1/8 teaspoon Fructose (or Sugar)
*1/2 teaspoon Fructose-based Apricot preserves
1 1/2 teaspoons Paprika
1/4 teaspoon Pepper
*Soy Sauce, Fructose, and Apricot preserve can be substituted with 1 tablespoons of Worcestershire sauce
Preheat your grill to medium-high or preheat your broiler.
Combine the cheeses in a small bowl and set aside.
In a large bowl combine the remaining ingredients until the spices are evenly distributed. Separate the mixture into 8 same-size balls of meat. Flatten each into a nice round thin patty.
Place 2 tablespoons of the cheese mixture in the middle of 4 of the patties, leaving 1/2 an inch free from the edge. Top those 4 patties each with a cheese-less patty and press down the edges to seal in the cheese.
To Grill:
Grill over medium-high heat for about 4 minutes on each side. It is recommended not to press the burgers while they are cooking or the cheese will ooze out.
To Broil:
Place the patties on a rack in the oven and broil the patties as close to the top as possible without touching the heat source directly. Broil for 4 minutes on each side.
And:
Roasted Beet Salad with Oranges, Fennel, and Mint
c/o Fresh Every Day: More Great Recipes from Fosters Market, by Sara Foster
http://www.amazon.com/Fresh-Every-Day-Recipes-Fosters/dp/1400052858
Serves 6 to 8
6 medium beets (red, golden or any other variety, or a combination), trimmed of greens and washed well
Juice of 1 orange
1/4 cup olive oil
2 tablespoons balsamic vinegar
2 tablespoons maple syrup
Sea salt and freshly ground black pepper to taste
3 navel oranges, peeled and sliced into 1/2-inch rounds
1 large fennel bulb, halved, cored and sliced into thin slivers
1 small red onion, sliced into very thin rounds
3 ounces crumbled goat cheese (about 3/4 cup)
2 tablespoons chopped fresh chives
2 tablespoons chopped fresh mint leaves
Preheat the oven to 400°F.
Place the beets on a baking sheet with sides or in a large, glass baking dish. If you're using a combination of red and golden beets, separate them to prevent the red from bleeding onto the golden. Pour the orange juice, olive oil, vinegar, maple syrup and 1/4 cup of water over the beets and season with salt and pepper. Cover the baking sheet tightly with foil and roast the beets until they're tender when pierced with a knife, 40 to 45 minutes. Uncover and let the beets cool to room temperature. Reserve the cooking liquid.
Peel the beets and slice them into 1/4-inch rounds. Arrange the beets, oranges, fennel and onion on a platter or on individual plates, placing contrasting colors and textures next to one another.
Pour the reserved beet liquid over the vegetables, season with salt and pepper, and top with the crumbled goat cheese, chives and mint. This is best served just after it's dressed.
Variation: Any pungent cheese, such as Stilton or blue, is delicious in place of goat cheese.
Monday, July 7, 2008
Taste & Create Seasonal: Grilling Cheese-Filled Goodness

Saturday, May 24, 2008
Taste & Create: Tasty, Tasty Biscuits
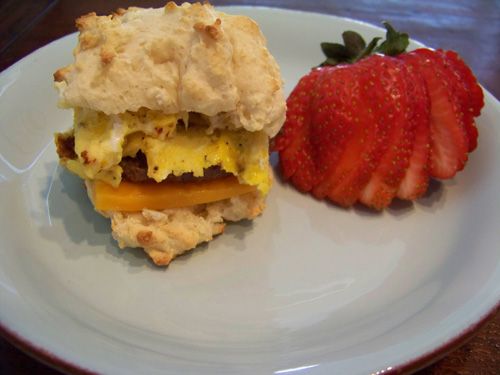

Crater Biscuits
adapted from My Food Blog
12 Tbsps all-purpose flour
1 tsp baking powder
6 Tbsp skim milk
3 tsp Greek yogurt
Preheat oven to 425.
Mix dry ingredients. Quickly mix in milk and yogurt.
Drop into mounds and bake for 10-13 minutes.
Makes 4 biscuits.
See the recipe...
Tuesday, March 25, 2008
Taste & Create VII: Friends for Life Chocolate Cake
 I am in love with Ms. Omana Paul. She was Nags' neighbor growing up, and would bring her family this lovely cake during the holidays. Obviously, I need to make friends with my neighbors! My husband and I currently live in an apartment community that sees a lot of resident turn-over.... considering we've lived there for... wow... 5 years as of last week... we've watched many people come and go. Add to it that we're both shy and private... and you may understand how we know no one here. We did make friends with a lovely woman (Hi Gail!) and her sassy puppy (Woof Kayla!), but they moved away. No new friends or dogs have been met since.
I don't know why I shared all of that with you, other than to think that if I made this cake for the people that lived in my building, that we could be friends. (It's ok, it isn't a big building.) Seriously friends for life, I'd think. This is that kind of cake.
This cake reminded me a lot of Orangette's Winning Hearts and Minds cake. Nags cake is spongier, for sure, but the richness of it (thanks, butter/eggs) is very similar. Mine took about 55 minutes, but I think I could have gotten away with taking it out sooner. The center of the cake was still gooey, so make sure you let it cool for a while before you try getting it out of the pan. I chose not to frost, and while I enjoyed it tremendously as it was, I can see how some folks could find it a little less sweet than a traditional cake. (But I really liked that aspect - the under-sweetness allowed the flavor to be more chocolate-based.) Perhaps a nice compromise would have been some lightly sweetened freshly whipped cream. Deal?
O my gosh! I've gotten this far without thanking Nicole for pairing me up with Nags for Taste & Create 7! How silly of me! T&C is a terrific monthly event, create by Nicole. She sorts out all of the participants and pairs us together and then hosts the roundup at the end of the month! I cringe at the amount of work that entails, and I couldn't be more grateful that she goes to the trouble! Check back to her site in a few days for the T&C 7 collection!!
Rich Dark Chocolate Cake
c/o Nags, For the Cook in Me
Adapted from, http://cookingandme.blogspot.com/2007/07/rich-dark-chocolate-cake.html
2 cups powdered sugar
1 ¼ cups unsalted butter (2 ½ sticks), room temperature
5 large eggs
2 teaspoons vanilla extract
1 1/3 cup AP flour
1 teaspoon baking soda
1/3 cup cocoa powder
4 ¼ teaspoons powdered milk
1 teaspoon espresso powder
pinch salt
1 cup yogurt
Optional Butter Icing:
2 tablespoons unsalted butter, room temperature
6 1/5 tablespoons sugar
Preheat your oven to 350°F. Butter an 8-inch round cake pan.**
Beat sugar and butter well. Add eggs, one at a time, beating well after each addition. Mix in the vanilla extract.
Sift together the flour, baking soda, cocoa powder, powdered milk, espresso powder, and salt six times. This is to make sure that the ingredients have blended completely.
Beat the yogurt well to remove any lumps.
Alternate adding the yogurt and the dry mixture to the butter and sugar mixture. Do not beat at this stage. Slowly blend the ingredients and keep mixing well.
Pour batter into prepared pan and bake for 55 minutes, until risen and springy to the touch. Center will still be wet. Remove pan to a cooling rack and cool for 30 minutes, then loosen the cake from the sides with a thin knife. Invert and cool to room temperature (or less, if you like it warm), right side up.
If frosting, mix butter and sugar and spread on the cake.
**Note: Unless you have really high-sided cake pans, I would recommend either using two pans or placing a foil-lined sheet pan underneath the cake pan as it bakes.
Sunday, February 24, 2008
Taste & Create VI: Bring on the Burger
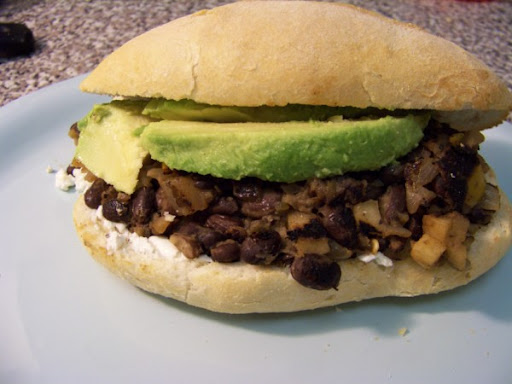
I apologize for having this to you a day late - I was having some interweb-connectivity issues that seem to have resolved themselves. This is fortunate, because I am chomping at the very tasty bit to tell you about this lovely burger!!!
For this sixth round of Taste & Create, hosted by Nicole, I was paired with a fellow Daring Baker, Krishna from Cooking from A to Z. Truly, I couldn't have asked for a better partner. I seriously spent the better part of an afternoon reading through her blog. (Don't tell work!) I gotta tell you, the photography is AMAZING! I drooled over almost everything, from her Pomegranate Chocolate Pots, to her Hot'n'Sour Soup ... I wanted to try it ALL!! Ultimately, though, my choice was made - Black Bean Burgers!
Why the burgers when there were so many other tasty options? Well, because we love burgers and I've never made a vegetarian version - and considering my desire to lead more a meat-free life, these burgers seemed like a perfect choice. Because I'd never done this before, I kept a pretty open mind... bell pepper and apple in a burger? Sure, whatever! I'll take it! In fact, I love that there were so many flavor elements in these burgers - I love love love the feeling of knowing that dinner is delicious AND incredibly healthy. My only horse-up? I don't think I smushed enough of the beans... I had a teensy bit of trouble getting the burgers to stick together. So long as I was delicate enough getting the formed patties into the pan, the act of cooking them helped bind them together.
I served each patty on a roll smeared with goat cheese and topped with sliced avocado (I know, I know, I'll take any opportunity to use either or both in a meal!) I'd meant to roast some baby red potatoes to go with, but I got distracted. Didn't matter in the end anyway, as the burgers were super filling on their own! (And Dave had two!)
Would I make this again? You betcha. And you should, too.
Black Bean Burgers
c/o Cooking from A to Z
http://cookingfromatoz.blogspot.com/2007/10/good-old-black-bean-burgers.html
(makes 10 large patties)
1/2 medium Vidalia onion - chopped fine
1/3 medium red onion - chopped fine
1/2 orange bell pepper - chopped fine
1/2 granny smith apple - chopped fine
4 cloves garlic
1 jalapeno pepper
1.5" ginger
2 cans black beans
1/2 t allspice
1 t olive oil
1 t cumin seeds
salt
a few drops of habanero sauce
Grind up the garlic, ginger and jalapeno into a coarse paste, adding a little water if needed.
Heat the oil in a saucepan and toss in the cumin seeds. Once they're browned, add the onions and sauté them till translucent.
Add the bell peppers, apple, allspice and ginger/garlic/jalapeno mix and cook for another 3-4 minutes.
Now add the black beans, salt and habanero sauce and stir. Lightly mash the mixture with the spoon, leaving half of the black beans whole.
Cook, stirring, for a two to three more minutes. Remove from heat.
Once the mixture cools, take generous handfuls and flatten each into a chubby 4" diameter patty.
These can be cooked in batches on a lightly greased pan till browned and crisp on both sides. Serve with your favorite burger fixings!
See the recipe...
Sunday, January 13, 2008
Taste & Create 5: Ricotta and Besciamella Lasagna
 Can you believe that we're already finishing up Taste & Create 5? That's nuts!! I can't believe that time has flown so quickly! Quickly and tastily!!
This time around, the lovely Nicole paired me with the much-loved Dolores of Chronicles of Culinary Curiosity! I enjoy her blog because I feel like she lets you in, shares about herself in a way that you long for more... I look forward to each new post because she artfully and engagingly relates it to herself or her life.. and gives you something to think about in the process. (That, and she's darn funny!!)
I went back months and months of Dolores's blog. I searched and searched and really, when it came down to it, what I really wanted to make was something I'd read about recently. In much the same way the lasagna bug bit her, it bit me. Her tale about wanting the perfect recipe spoke to me (but not as much as the delicious photo spoke to me!)
Now, its been a looooong time since I've made lasagna. So long, I can't remember making it. I used to make manicotti every New Years Day (I've switched to making fried ravioli, hopefully I'll show that to you soon), so I guess that's close. I've never made a bechamel before, I know that to be true.
I don't know if you're like I was and thought lasagna was hard or complicated or time consuming. I can tell you, happily, that it doesn't have to be. Each component came together super fast... the sauce was a snap, the filling easy-peasy... the bechamel easy, too... though, mine was really really really thick, and I want to say that it shouldn't have been like that... that the bechamel's I've seen on tv have been smooth and flowy... not mine... it was thick like pudding... super-thick pudding... I kinda smeared it around during assembly, and I couldn't taste it being thick... so... who cares! :) I used fresh pasta sheets, because I don't like how weird and squidgy lasagna sheets get when you boil them. I also used fire-roasted crushed tomatoes (because that's what the grocer had - and omg, yum!) My only change for next time would be to make MORE tomato sauce. I had to have a sauceless layer towards the end, so that I'd have enough to top it off with. You can't tell in the finished product, but I know it's in there. (Not to mention, the sauce was amazing on fresh mozzarella alone!) :)
I can't tell you how excited I am to have so much leftover, too! I think I am going to put a bunch away in the freezer for a easy, delicious future meal... and we'll STILL have some for lunches this week. YUM!
My thanks to Dolores for a tasty recipe and to Nicole for bringing us together!
Ricotta and Besciamella Lasagna
c/o Dolores at Chronicles of Culinary Curiosity
http://culinarycuriosity.blogspot.com/2007/12/cibo-di-benessere-i-celebrazione.html
sourced from Maryann at http://findingladolcevita.blogspot.com/2007/09/ricotta-and-besciamella-lasagna.html
This recipe will make a 12x12 pan of lasagna.
Marinara Sauce:
Olive oil
2 garlic cloves, chopped
1 (28 ounce) can crushed tomatoes
Dash dried oregano, to taste
Dash dried basil, to taste
Salt and freshly ground black pepper, to taste
Besciamella Sauce:
4 tablespoons unsalted butter
7 tablespoons flour
Pinch salt
2 cups milk, scalded
½ teaspoon freshly grated nutmeg
Pinch white pepper
Filling:
15 ounces ricotta cheese
½ cup grated Parmesan cheese
½ fresh parsley, chopped
2 eggs
Salt and freshly ground pepper
Lasagna sheets, either redi-cook or boiled, softened lasagna sheets)
Grated Parmesan
Grated Mozzarella
First, make the Marinara sauce: In a sauce pan, drizzle a little olive oil and add chopped garlic cloves. Cook until transparent. Add crushed tomatoes, dried oregano, dried basil, salt and pepper to taste. Turn heat down and simmer, stirring often. While that is cooking down, make your besciamella.
Besciamella Sauce: In a sauce pan, melt the butter. Add the flour and whisk constantly for a few minutes, careful not to burn it. Add a pinch of salt. Pour scalded milk into the flour mixture all at once and continue to whisk another 3-4 minutes until thickened. Add nutmeg and a bit of white pepper. Lay aside.
Prepare the ricotta filling: Mix all ingredients together to combine.
Assembly: Start by putting about 1/2 C marinara on bottom of pan so the lasagna doesn't stick. Layer the ingredients, repeating until the pan was full: pasta sheets, ricotta, besciamella, marinara, grated mozzarella. Repeat in this order ending with the pasta layer. Then top with marinara, grated parmesan, mozzarella, fresh parsley, and a light drizzle of olive oil.
Cover with foil and bake in a 350 degree oven for about 1 hour. Lasagna is done when a knife comes out clean. After the first 40-45 minutes, uncover to brown the top.
When done, cover and let the lasagna rest at least 30-60 minutes before serving. This gives it time to set.
Friday, November 16, 2007
Taste & Create 3: Spanish Churros
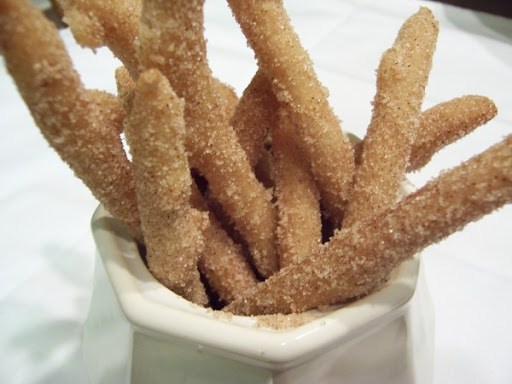 Are those churro fries? What? Let me explain!
Taste & Create, started by Nicole at For the Love of Food, is a great way for bloggers to interact. Sure, we read each other's work, and we often try out someone else's creations... but this event is specifically designed for that purpose. Participating bloggers are paired together and they make a dish from the other's blog. Sounds fun, right?
I was paired with the delightful Kelly at Sass & Veracity! Woowoo!! I have enjoyed her blog for as long as I've been reading food blogs, and it was a joy to rifle through her archives!
Scrolling through all her tasty entries... I kept coming back to one - her churros. Dave and I are completely smitten with churros. I'll admit, the ones we are in love with happen to come from Costco... for a dollar... but still. Sweet and crunch and tender.... and only a dollar??!?! I'll take it! Add to it that the ingredient list and directions are short and sweet, and you're looking at the perfect dessert (or snack!)
Now, this is where the trouble begins. Kelly's recipe calls for a pastry bag and a star piping tip. I thought, "I have that cake decorating kit... that should be ok..." Ha! I happily stirred my dough, let it cool a tiny bit, and then jammed it into my eeny-weeny icing bag. If you can imagine that, you can probably also imagine the eeny-weeny tip on it, too... maybe 3/16ths of an inch (and she called for a tip twice that size!!!) I have no idea what I was thinking. The dough is far to thick for such a small tip... the squeezing involved to get my thin little lengths of dough into the oil... yikes.
However, all was not lost. I managed my way through getting the tasty little churro-fries fried, drained, and rolled in cinnamon-sugar. All the work was worth it once we were able to nibble on them - and their sheer cuteness STILL has me smiling!
I will totally make these again - but not until I get a bigger tip! :)
My thanks goes out to Nicole for creating this fun exchange and to Kelly for her delicious blog!
Spanish Churros
c/o Kelly @ Sass & Veracity
http://sassandveracity.typepad.com/sass_veracity/2007/08/spanish-churros.html
1-1/2 tsp mild olive oil
1/4 tsp kosher or sea salt
1 cup unbleached flour
Oil for frying
granulated sugar for dusting
To make the churros, bring 1 cup water, the oil, and the salt to a boil in a saucepan. Add the flour all at once and stir vigorously with a wooden spoon until a smooth ball forms. Lower the heat and cook, flattening and turning the dough for 2 minutes. Cool and transfer to a pastry bag equipped with a 3/8-inch star tip (the fluted edge is essential).
Pour the oil to a depth of at least 1 inch in a skillet (or better still, use a deep-fryer heated to 360 degrees) and heat until the oil quickly browns a cube of bread. Squeeze 5-inch lengths of dough through the pastry tube into the oil -- as many as will comfortably fit.
Reduce the heat to medium-hot and fry until the churros puff and have barely begun to turn golden, about 20 seconds. Do not overcook -- the churros should be crunchy outside and still soft within.
Drain on paper towels. Dredge them in sugar while they're warm.
Sunday, October 21, 2007
Taste and Create: I Finally Don't Knead

I am late to the No Knead Bread party. Like, over a year late. I no longer qualify for being fashionable about it, either. O well. Better late than never!!!
How did I get here? Well, via Abby over at Plate Tectonics! We are participating in Taste & Create - an event in which we each pick a recipe from the other's blog, make it, and post about it! I waffled on what I was going to make - Abby had so many delicious things to choose from! Halloween being only a week away, I almost made her severed finger cookies... Yet... what I needed this weekend was the smell of baking bread... that o-so-comforting aroma permeating the apartment... Not to mention, I needed to see how fantastic this no knead bread was for myself!
I started the dough late Friday night. Sure, I'm still pretty new to yeast, but there are only three ingredients, what could I do wrong? Seriously people, this dough is a snap to make. And the way it smelled as it baked... omg. I could very well end up making this bread every weekend. Maybe.
Only one part frightened me. When I took the rolls out of the oven, they were rock hard... solid... stiff... and scary. I thought, "The whole world loves this recipe, how could I have killed it???!?!?!" But once they'd had a chance to settle, they softened. Not too much, though - they still retained a nice, chewy crust! Yay!
I can personally say that these rolls are terrific with just butter or with butter or jam. Tonight I will find out if they are as tasty with pasta (I'm sure they will be!) If you are another latecomer to this bread, consider this your invitation. These rolls are super easy and they smell and taste great!!
Thanks to Nicole for hosting this tasty little event. I look forward to next time!!
No-Knead Dinner Rolls
This recipe is adapted from Jim Lahey/Sullivan Street Bakery’s recipe published in the New York Times on November 8, 2006
Via Abby at Plate Tectonics
http://not-too-shabby.net/eats/?p=90
3 cups all-purpose or bread flour, more for dusting (I like Bob’s Red Mill white bread flour)
¼ teaspoon instant (“quick rise”) yeast
1¼ teaspoons salt
Cornmeal or wheat bran as needed
In a large bowl combine flour, yeast and salt. Add 1 5/8 cups water, and stir until blended; dough will be shaggy and sticky. Cover bowl with plastic wrap. Let dough rest at least 12 hours, preferably about 18, at warm room temperature, about 70 degrees.
Dough is ready when its surface is dotted with bubbles. Lightly flour a work surface and place dough on it; sprinkle it with a little more flour and fold it over on itself once or twice. Cover loosely with plastic wrap and let rest about 15 minutes.
Using just enough flour to keep dough from sticking to work surface or to your fingers, gently and quickly gather dough into a manageable lump. Divide ball into 12 equal size pieces, approximately the size of a large plum. (An easy way to do this is to cut it in half, then half again; then cut each of those pieces into thirds.) Using your fingers, tuck each piece into a ball shape. Generously coat a Silpat baking mat or a cotton towel (not terry cloth) with flour, wheat bran or cornmeal; put dough seam side down on towel and dust with more flour, bran or cornmeal. Be sure to space dough balls an inch or more apart so they don’t stick together as they rise. Cover with another cotton towel and let rise for about 2 hours. When they are ready, rolls will have significantly increased in size and will not readily spring back when poked with a finger.
About a half hour before baking, preheat your oven to 450 degrees. Get a nonstick 12-cup muffin pan and use aluminum foil to make a tented lid that fits around the pan. The tenting part is important—if the foil doesn’t rise well above the pan, your rolls will stick to it as they rise. You may need to join two pieces of foil. Set the foil “lid” aside and put the pan in the oven so that it, too, preheats.
When dough is ready, remove muffin pan from oven and quickly drop one dough ball into each cup. Cover with foil lid—and if you’re feeling frisky, spray some water under there just before covering (increasing the humidity under the foil tent). Bake 15-20 minutes, then remove foil and bake another 15 minutes, until rolls are beautifully browned. Cool on a rack.
Yields: 12 crusty, golden dinner rolls.


 Posts
Posts

