Showing posts with label lemon. Show all posts

Sunday, March 30, 2008

The Daring Bakers Do Dorie: Perfect Party Cake


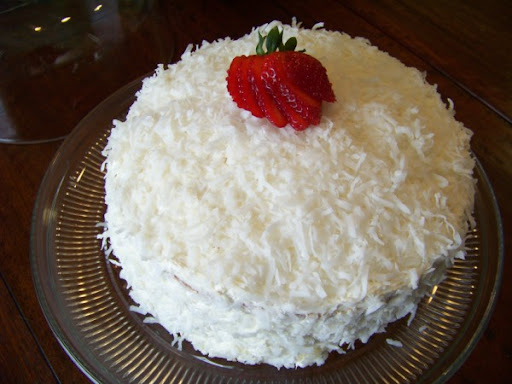
After last month's bread-baking debacle, I was so excited to see that Morven chose Dorie Greenspan's Perfect Party Cake, sourced from her much-loved Baking book. Why? For starters, because there isn't any yeast (ha!), but mostly because it was recently my birthday, and this cake would serve as a lovely birthday cake. And! I made cakes from Dorie's book for both my mom and my husband's birthdays, so I wanted to complete the arc. And there wasn't any yeast.


I wish there was such a thing as taste-o-vision or something, because I wish all of you non-DBers, or those of you that aren't invited over when a DBer makes their challenge, could try this cake. It is seriously the most pillowy-soft cake I have ever put in my mouth (and believe you me, I have put A LOT of cake in said mouth.) I don't even know what to compare it to. Its a little like angel-food, but not all springy. It reminds me of really really sassy wedding cake, only better.

We were given the freedom to fill the cake as we wished, and though I'd fully planned to make the recipe to Dorie's letter, when I was at the grocery store picking out seedless raspberry jam (and I even had the jar in my hand!), I instead picked up a jar of preserves I've had before. My friend Liane once suggested to me this wonderful strawberry preserves with champagne. While I loved it, I never felt like my toast or pbj's did it justice. I thought that THIS cake was my opportunity to really let the jam shine.

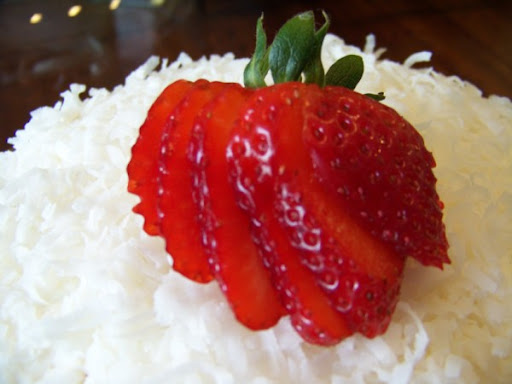
And shine it did. The preserves went beautifully with the fluffy lemoney buttercream and surprisingly well with the coconut! (I hadn't expected that, but I should have, because Dorie is a genius!)

This cake was a dream to put together. I made the cakes last night and let them cool to room temperature before wrapping them in clingfilm. I made the buttercream this morning and layered the cake, preserves, and buttercream. I couldn't stand the idea of waiting to try it (and I think my mom is coming by with a cake she made for later), so we cut into it. (Yay cake for lunch!)

Please make sure that you have lots of milk, or some hot tea or coffee to serve with this cake, as it is really sweet. Really really sweet. Not that I'm complaining - it is just worth mentioning, for those of you with aversions to stuff like that.

If someone special to you is having a birthday or party, make this cake. You no doubt will be crowned the Rock Star of the Evening.

Thank you, Morven, for a wonderful challenge! This cake was just the thing I needed!!

Head on over to the Daring Baker's Blogroll to see all the other Rock Stars!

See the recipe...


Tuesday, March 11, 2008

Fusilli Pasta with Burrata Cheese, Spinach, Lemon, and Toasted Almonds

This was a very spontaneous dish. Dave and I had popped into Balducci's for a few things (very few, or else I'm not allowed to go very often!) and I happened to see that they had some burrata in the cheese case. I'd never had it before and I've always wanted to try. Was it last Summer or Fall that it was all the craze?

Well, burrata in hand, we looked up what to make with it and got cracking. With the new laptop, it was really awesome to have it open to the recipe in the kitchen. Ah, technology.

Now, I'm keeping an open mind, but I didn't love the burrata. This won't make any sense to you, but I don't really like cheese as a whole. It's the smell. I like some cheeses in things, and I like fresh mozzarella in a Caprese salad, and I adore pizza and the like... but I have to wash my hands after I grate Parmesan because I don't like the way my hands smell (not that I wouldn't wash them anyway, of course!) So, less-stinky cheeses are cool, more stinky, not so much. I really wanted to like the burrata because I love fresh mozz... the burrata was stinky in a way I couldn't make friends with. The creamy texture was really great, I'll admit that... but I also picked around any clumps I couldn't just mix in. O well. At least it looked pretty.

Now, the REST of it I liked. The perfectly cooked pasta, tossed in the lemonybutterygarlicy goodness, tossed with the toasted almonds and spinach... dreamy.


Campanelle Pasta with Burrata Cheese, Spinach, Lemon, and Toasted Almonds
c/o Bon Appetit Magazine, December 2004
http://www.epicurious.com/recipes/food/views/231293

Burrata is a luscious Italian cheese made by mixing cream and unspun mozzarella curds together (for a texture similar to ricotta): the mixture is then inserted into the center of a ball of fresh mozzarella. It can be found in some supermarkets, at specialty foods shops, and at Italian markets. Substitute fresh mozzarella if you can't find burrata.

1 pound campanelle (trumpet-shaped pasta) or fusilli (spiral-shaped pasta)
2 tablespoons (1/4 stick) butter
1/3 cup olive oil
2 large garlic cloves, minced
1/4 cup lemon juice
1 teaspoon finely grated lemon peel
1 6-ounce package baby spinach (about 4 cups)
3/4 cup sliced almonds, toasted
1 pound burrata cheese, cut into 1-inch chunks

Cook pasta in large pot of boiling salted water until tender but still firm to bite, stirring occasionally.

Meanwhile, melt butter with oil in heavy large skillet over medium heat. Add garlic; sauté until soft, about 2 minutes. Add lemon juice and lemon peel. Drain pasta; transfer to large bowl. Place spinach and almonds atop hot pasta. Pour hot lemon mixture over spinach. Toss until spinach is wilted, about 1 minute. Divide pasta among plates. Top with burrata cheese, sprinkle with salt and pepper, and serve.

See the recipe...


Monday, January 28, 2008

Attack of the Pie!


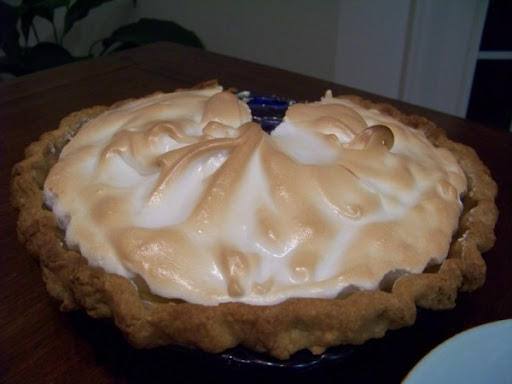
So excited was I to cut into this pie, that I forgot to take a photo of it before the knife went in. Oops! It's too bad, too, because it all went downhill once I took out a slice! :) The Daring Bakers that got started early in the month warned us of weepy meringue or oozy filling... so I knew to prepare myself. What's interesting is that I was most worried about the meringue... I have way less experience with it. The curd, I thought, would be my friend, as I'd had a great time with the Alice Waters' curd I'd made around Christmas. Boy, was I fooled. :)
Before I get to the sordid details, I'd like to thank Jen of The Canadian Baker for choosing this month's theme. This pie was a lovely, bright way to brave our way through Winter. My pie might have looked a mess, but it was seriously delicious. Thanks, Jen!!

Now, on to the pie! I focused on the crust. I haven't had much luck making my own crust, so I had big, strong hopes that this one would work out. Let me tell you, I could have snacked on the raw pie crust all afternoon! It was sweet and tasty and just the right texture. After it's various rests, it baked up like a dream! I set it aside and went shopping. (What better way to let something cool?)

The instructions for the curd were different in nature than I was used to, but it came together nicely (or so I thought). I whisked and stirred and poured it into the cooled crust and sat it aside. (I don't think I went shopping... maybe played xbox?) When I felt like it was cool enough, I moved onto the meringue. I'd let my whites come to room temperature (for once - I almost never remember to do that) and added the extras and got foamy. Once it was ready, I "piled" it on, just like the recipe requested. Now, it started off taller, but I spent so much time decoratively smearing it around that it lost a little of its oomph. Let that be a lesson to you! :)

Once it baked to a nice golden hue, I set aside and got to making dinner. We had dinner and watched the NHL all-star game and I could barely contain myself - I WANTED PIE! Dave and I rushed out and cut into it (and it wasn't until after I cut into it that I realized I hadn't taken a picture of it!) and I could tell something wasn't quite right. It didn't put up as much fight as I'd thought it should... and when I pulled that first slice out, and saw how oozy it was... Bummer. The meringue held its shape, but the filling squirmed right out like the blob in that movie... The Blob... (lol)... not a total loss, we just spooned the filling onto our plates and dug in! A spoonful of tart filling, topped with airy meringue along with the yummy crust... heavenly. I have no other words. Yah, it didn't look like it was supposed to, but everything came together to make one delicious pie. What I will also take from this is that I needn't be worried about making my own crust OR meringue. (I just need to make sure I save these recipes in a good place!)

Thanks again to Jen and to all of the Daring Bakers. I am so happy to be a part of this supportive, hysterical, friendly bunch! Please take a trip around the Internet to see all of their amazing pies, tarts, and tartelettes!


Lemon Meringue Pie

(from "Wanda's Pie in the Sky" by Wanda Beaver)

Makes one 10-inch (25 cm) pie

For the Crust:
3/4 cup (180 mL) cold butter; cut into ½-inch (1.2 cm) pieces
2 cups (475 mL) all-purpose flour
1/4 cup (60 mL) granulated sugar
1/4 tsp (1.2 mL) salt
1/3 cup (80 mL) ice water

For the Filling:
2 cups (475 mL) water
1 cup (240 mL) granulated sugar
1/2 cup (120 mL) cornstarch
5 egg yolks, beaten
1/4 cup (60 mL) butter
3/4 cup (180 mL) fresh lemon juice
1 tbsp (15 mL) lemon zest
1 tsp (5 mL) vanilla extract

For the Meringue:
5 egg whites, room temperature
1/2 tsp (2.5 mL) cream of tartar
1/4 tsp (1.2 mL) salt
1/2 tsp (2.5 mL) vanilla extract
3/4 cup (180 mL) granulated sugar

To Make the Crust:
Make sure all ingredients are as cold as possible. Using a food processor or pastry cutter and a large bowl, combine the butter, flour, sugar and salt. Process or cut in until the mixture resembles coarse meal and begins to clump together. Sprinkle with water, let rest 30 seconds and then either process very briefly or cut in with about 15 strokes of the pastry cutter, just until the dough begins to stick together and come away from the sides of the bowl. Turn onto a lightly floured work surface and press together to form a disk. Wrap in plastic and chill for at least 20 minutes.

Allow the dough to warm slightly to room temperature if it is too hard to roll. On a lightly floured board (or countertop) roll the disk to a thickness of 1/8 inch (.3 cm). Cut a circle about 2 inches (5 cm) larger than the pie plate and transfer the pastry into the plate by folding it in half or by rolling it onto the rolling pin. Turn the pastry under, leaving an edge that hangs over the plate about 1/2 inch (1.2 cm). Flute decoratively. Chill for 30 minutes.

Preheat oven to 350ºF (180ºC). Line the crust with foil and fill with metal pie weights or dried beans. Bake for 20 to 25 minutes. Carefully remove the foil and continue baking for 10 to 15 minutes, until golden. Cool completely before filling.

To Make the Filling:
Bring the water to a boil in a large, heavy saucepan. Remove from the heat and let rest 5 minutes. Whisk the sugar and cornstarch together. Add the mixture gradually to the hot water, whisking until completely incorporated. Return to the heat and cook over medium heat, whisking constantly until the mixture comes to a boil. The mixture will be very thick. Add about 1 cup (240 mL) of the hot mixture to the beaten egg yolks, whisking until smooth. Whisking vigorously, add the warmed yolks to the pot and continue cooking, stirring constantly, until mixture comes to a boil. Remove from the heat and stir in butter until incorporated. Add the lemon juice, zest and vanilla, stirring until combined. Pour into the prepared crust. Cover with plastic wrap to prevent a skin from forming on the surface, and cool to room temperature.

To Make the Meringue:
Preheat the oven to 375ºF (190ºC). Using an electric mixer beat the egg whites with the cream of tartar, salt and vanilla extract until soft peaks form. Add the sugar gradually, beating until it forms stiff, glossy peaks. Pile onto the cooled pie, bringing the meringue all the way over to the edge of the crust to seal it completely. Bake for 15 to 20 minutes, or until golden. Cool on a rack. Serve within 6 hours to avoid a soggy crust.

See the recipe...


Wednesday, September 26, 2007

Grandpa Day #2 / Hazelnut, Ricotta, and Lemon Pesto Pasta

Today marks the anniversary of my grandfather's passing, so we're having beans, franks, and potatoes for dinner. You've seen that already (but this time I got some hot dogs from the butcher) (my grandpa would have LOVED my butcher, btw), so I thought I might try to tempt you with a delicious pasta dinner we had earlier this week.

For this installment of Presto Pasta Night, hosted by Ruth at Once Upon a Feast, my second in as many weeks (go me!), I give to you: Hazelnut, Ricotta, and Lemon Pesto Pasta!!

I found this recipe in the August issue of Bon Appetit magazine... It isn't something that normally would have caught my eye, but belonging to our CSA and making regular trips to the farmer's market on weekends... we've had a lot of tomatoes in our house... so the lack of tomatoes really appealed to me. That, and I had a giant tub of ricotta in the fridge (from all those SBD-friendly desserts!)

See how there aren't multiple paragraphs of instructions? Its that easy. Process it all (in their order, of course) and boil some pasta, and you're done. Seriously. I wasn't sure I wanted to toss the whole bowl into the pasta (and I'm glad I didn't - more later), but I should have used more than I did. The moisture in the pesto was soaked up into the pasta itself, which make the whole thing really really sticky. On future helpings, I added more pesto, and it was fine. I almost want to compare it to the crumb layer in frosting... let the pasta soak up the first bit, add more and its perfect. Anyway... do what you'd like, the stickyness was a little weird, but it made it easier to cut and eat with a fork! ;)

The reason I'm glad I didn't use up all the sauce is this: Its awesome on a pizza! I went online to grab the recipe for the blog, and I saw that a reviewer suggested using the pesto on pizza - and since I'm currently in love with all things White Pizza, I had to try it out. I toasted a whole grain flat out wrap (thanks, Marcie!), then smeared the pesto on. I added a few spoonfuls of ricotta, and then put it back in the oven for 10 minutes. O my gawd. Its now become the only thing I want to eat anymore. If I had a toaster oven at work, I seriously could eat this every day of the week. No photo, and I'm sorry about that, but I'm sure you can all imagine it.

I still have all of the ingredients at home, so you betcha that I'm pulling them all out this weekend!

Hazelnut, Ricotta, and Lemon Pesto
Bon Appetit, August 2007
http://www.epicurious.com/recipes/food/views/239059

This can be tossed with a pound of pasta (serve warm or chilled), used as a topping for grilled chicken, or spread onto toasted slices of baguette or focaccia.

Makes about 2 1/3 cups.

1 garlic clove, peeled
1/2 cup hazelnuts, toasted, husked (about 2 ounces)
1/2 cup coarsely chopped fresh basil
5 tablespoons extra-virgin olive oil, divided
1 1/2 cups whole-milk ricotta cheese (from one 15-ounce container)
3 tablespoons fresh lemon juice
1 1/2 teaspoons (packed) finely grated lemon peel
3 tablespoons freshly grated Pecorino Romano cheese
Fine sea salt

With processor running, drop garlic clove into machine and blend until finely chopped. Add hazelnuts, basil, and 2 tablespoons olive oil; process until hazelnuts and basil are finely chopped. Add ricotta cheese, lemon juice, lemon peel, and remaining 3 tablespoons olive oil; process until well blended. Transfer mixture to small bowl and stir in Pecorino Romano cheese. Season to taste with sea salt and freshly ground black pepper. DO AHEAD Can be made 2 days ahead. Cover and refrigerate.

See the recipe...


Wednesday, August 15, 2007

Creamy Lemon-Vanilla Ricotta Soufflés

OMG, I need a set of ramekins! I totally wasn't thinking, and made these cute little souffles in a giant muffin tin - and when it came time to eat them.... omg! I need ramekins! Dave and I stood there and blinked at each other with "what now?" looks on our faces! Its a good thing we aren't fussy, because we huddled together over the tin with our spoons and ate right out of it! (It was actually pretty cute!)

One of the non-food things I miss during our SBD phase is baking desserts. I might only bake once a week, or every other week, but I miss knowing that I could whip up a batch of brownies or cookies or more of that Winning Hearts and Minds cake just because I felt like it. Its even harder with all of the tasty sweets you guys have been cooking up lately! Know that I have a full file folder full of them, so that when I'm free, I can bake up a storm! (My new work people had better watch out!) :)

These souffles were light and dainty and very refreshing. While I really dug them as they were, I imagined them being even better with a nice sauce! On top of that, the flavoring was so easy, I think I'm going to try to fiddle with it, to give us some souffle dessert options.

I'll keep you posted! In the meantime - do you guys have any flavoring suggestions?

Creamy Lemon-Vanilla Ricotta Soufflés
From:
The South Beach Diet Taste of Summer Cookbook

1 cup part-skim ricotta cheese
2 large eggs, separated
3 tablespoons granular sugar substitute
2 teaspoons grated lemon zest
½ teaspoon lemon extract
½ teaspoon vanilla extract
Pinch salt

Preheat the oven to 375°F. Lightly coat 4 (4 ounce) ramekins with cooking spray.

In a large bowl, whisk ricotta, egg yolks, 1 tablespoon of the sugar substitute, lemon zest, lemon extract, and vanilla until combined.

In another large bowl, with an electric mixer at high speed, beat egg whites and salt until soft peaks form, 2 to 3 minutes. Add remaining 2 tablespoons sugar substitute and continue beating until stiff peaks form. Gently fold a third of the egg whites into ricotta mixture until combined. Repeat with remaining egg whites.

Spoon ricotta mixture into prepared ramekins and bake until soufflés have risen and are set and lightly browned, about 15 minutes. Serve immediately.

Makes 4 (1/2 cup) servings.

Per serving: 130 cals, 7 g fat, 4 g sat fat, 10 g protein, 5 g carbs, 0 g fiber, 180 mg sodium

See the recipe...


Saturday, May 5, 2007

Lemon-Coconut Bars for LiveStrong Day


When I read about Barbara's A Taste of Yellow event, I couldn't not want to participate.

LIVESTRONG Day is the Lance Armstrong Foundation's (LAF) grassroots advocacy initiative to unify people affected by cancer and to raise awareness about cancer survivorship issues on a national level and in local communities across the country. LIVESTRONG Day 2007 will occur on Wednesday, May 16.


It takes remarkable strength to fight such an awful disease, and every little bit we can do to help is needed. We all know someone that has fought or is currently battling the disease, which is why its so important to show your support.

Sure, lemon bars won't fight cancer. But maybe they'll get you thinking about donating, volunteering, participating in an event, or just talking to people about what they can to to help. Fighting cancer isn't just about wearing bracelets (though that helps), its about taking care of the people you love, its about looking forward, not back.


Lemon Coconut Bars
Bon Appetit, April 2004
http://www.epicurious.com/recipes/recipe_views/views/109406

Crust
1 cup all purpose flour
1/4 cup sugar
1/4 teaspoon salt
3/4 cup sweetened flaked coconut, toasted, cooled
6 tablespoons (3/4 stick) chilled unsalted butter, cut into 1/2-inch cubes

Filling
3/4 cup sugar
2 large eggs
1/4 cup fresh lemon juice
1 tablespoon (packed) finely grated lemon peel
1 teaspoon all purpose flour
1/2 teaspoon baking powder
Pinch of salt
1/4 cup powdered sugar

For crust:
Preheat oven to 350°F. Line 8x8x2-inch metal baking pan with foil, leaving overhang. Butter foil. Combine flour, sugar, and salt in processor; blend 5 seconds. Add coconut and butter; process until mixture resembles fine meal and begins to clump together. Gather dough into ball. Press dough evenly over bottom of prepared pan. Bake crust until golden at edges, about 25 minutes.

Meanwhile, prepare filling:
Combine 3/4 cup sugar, eggs, lemon juice, lemon peel, flour, baking powder, and salt in processor. Blend filling until smooth.

Remove crust from oven. Pour filling evenly over hot crust. Return to oven and bake until filling begins to brown at edges and is just set and springy to touch in center, about 30 minutes. Transfer pan to rack; cool lemon bars completely.

Using foil as aid, transfer lemon bars to work surface. Flatten foil edges. Cut into 16 bars. Sift powdered sugar over. (Can be made 5 days ahead. Store airtight in single layer in refrigerator.)

Makes 16.

Bon Appétit
April 2004

See the recipe...