
 [Quick shout-out: Happy Birthday, Mom!!]
Growing up, that is what my friends and I used to call going to museums or the theater: getting culture. We'd go, we'd appreciate the arts or learn some history and come away smarter (or so we thought.) This cake certainly made ME smarter, and while it doesn't look the way it should, it was quite the learning experience. This is why I love being a Daring Baker. Our darling, daring creators Lis and Ivonne, accompanied by members Fran and Shea, chose for us the dramatic Opera Cake. For those of you that don't know, the Opera Cake is a classic chocolate-coffee cake, thought to be served at a French-American Opera reception in the 1930s. It is usually a coffee-syrup soaked almond cake layered with chocolate. The sides of the cake are left bare to better showcase the layered effect. That said, our hostesses asked that we keep our cakes light in color in flavor, preferably yellow or white, in honor of our friend Barbara and her unwavering support of LiveSTRONG, the Lance Armstrong Foundation. While the recipe called for almond meal to make the jaconde, we were allowed to deviate, so I chose pistachio. I cannot tell you how long it took me to shell all those nuts, but it was well worth it. And I had help, so I can't complain. ;)
 Why pistachio? You see, my husband and I have a new favorite dessert, found at Michel Richard's Citronelle in Georgetown, DC. It is this lovely layered dessert, much like an Opera Cake, with a cookie layer, a cheesecake layer, a pistachio cake layer, with blueberries and raspberry tuile on top. I wanted to try to get as close to that cake as possible. This seemed like the perfect first step. We were also allowed to customize the syrup and buttercream flavors - so I went with a basic vanilla syrup and used cream cheese instead of butter in my buttercream.
Now, I don't know enough about making buttercream to know what I did wrong, but man, was it a runny mess. A seriously runny mess. I was crunched for time - my mom was due over in a few short hours, so I couldn't go out and get more ingredients for a re-do. What I did do, and I imagine it probably counts as rule-breaking (but know that I wasn't happy about it), is I mixed unflavored gelatin with some heavy cream and mixed it into the runny cheesecake buttercream. 90 minutes in the fridge and the buttercream thickened up slightly. Not as much as I'd hoped, but enough. No crisp edges here, but close enough, right?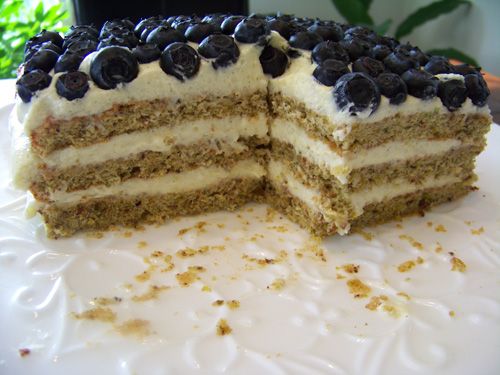 This cake was exactly what I had hoped for flavor-wise. The pistachio jaconde was light and tender and flavored perfectly. The cream cheese buttercream was delicate and smooth and brought the pistachios and blueberries together in a fresh way, almost as though they were made to go together. My mom commented that it was too sweet, and I tend to agree with her - but it wasn't anything that a slightly smaller slice and a glass of cold milk wouldn't solve!
Thank you, ladies, for a wonderful learning experience! This is definitely a dessert I wouldn't have tried on my own, but I am so glad to have made!
Please check out what the other Daring Baker's have created - I marvel at their creativity!
The Daring Bakers’ Opéra Cake
Adapted from Dorie Greenspan’s Paris Sweets and Tish Boyle’s and Timothy Moriarty’s Chocolate Passion.
For the joconde:
6 large egg whites, at room temperature
2 tbsp. (30 grams) granulated sugar
2 cups (225 grams) ground blanched almonds
2 cups icing sugar, sifted
6 large eggs
½ cup (70 grams) all-purpose flour
3 tbsp. (1½ ounces; 45 grams) unsalted butter, melted and cooled
Divide the oven into thirds by positioning a rack in the upper third of the oven and the lower third of the oven.
Preheat the oven to 425◦F. (220◦C).
Line two 12½ x 15½- inch (31 x 39-cm) jelly-roll pans with parchment paper and brush with melted butter.
In the bowl of a stand mixer fitted with the whisk attachment (or using a handheld mixer), beat the egg whites until they form soft peaks. Add the granulated sugar and beat until the peaks are stiff and glossy. If you do not have another mixer bowl, gently scrape the meringue into another bowl and set aside.
If you only have one bowl, wash it after removing the egg whites or if you have a second bowl, use that one. Attach the paddle attachment to the stand mixer (or using a handheld mixer again) and beat the almonds, icing sugar and eggs on medium speed until light and voluminous, about 3 minutes.
Add the flour and beat on low speed until the flour is just combined (be very careful not to overmix here!!!).
Using a rubber spatula, gently fold the meringue into the almond mixture and then fold in the melted butter. Divide the batter between the pans and spread it evenly to cover the entire surface of each pan.
Bake the cake layers until they are lightly browned and just springy to the touch. This could take anywhere from 5 to 9 minutes depending on your oven. Place one jelly-roll pan in the middle of the oven and the second jelly-roll pan in the bottom third of the oven.
Put the pans on a heatproof counter and run a sharp knife along the edges of the cake to loosen it from the pan. Cover each with a sheet of parchment or wax paper, turn the pans over, and unmold.
Carefully peel away the parchment, then turn the parchment over and use it to cover the cakes. Let the cakes cool to room temperature.
For the soaking syrup:
½ cup (125 grams) water
⅓ cup (65 grams) granulated sugar
1 to 2 tbsp. of the flavouring of your choice (i.e., vanilla extract, almond extract, cognac, limoncello, coconut cream, honey etc.)
Stir all the syrup ingredients together in the saucepan and bring to a boil.
Remove from the heat and let cool to room temperature.
For the buttercream (The recipe for the buttercream that is listed here is based on the original. When testing the buttercream, we tested a slightly modified version that had 2 cups sugar, ½ cup water and 1¾ cups butter. The eggs remained the same. We ended up with a very creamy buttercream. But we don’t want anyone to be afraid of our modified version so you have the option of using the original above or the quantities we’ve listed here in this note):
1 cup (100 grams) granulated sugar (Used to say 2 cups but should be 1 cup)
¼ cup (60 grams) water (Used to say ½ cup but should say ¼ cup)
seeds of one vanilla bean (split a vanilla bean down the middle and scrape out the seeds) or 1 tbsp. pure vanilla extract
1 large egg
1 large egg yolk
1¾ sticks (7 ounces; 200 grams) unsalted butter, at room temperature (Used to say 1¾ cups of butter but it should be 1¾ sticks).
flavouring of your choice (a tablespoon of an extract, a few tablespoons of melted white chocolate, citrus zest, etc.)
Combine the sugar, water and vanilla bean seeds or extract in a small saucepan and warm over medium heat just until the sugar dissolves.
Continue to cook, without stirring, until the syrup reaches 225◦F (107◦C) (Note: The original recipe instructs to heat the syrup to 255◦F (124◦C). We heated it to 225◦F and it worked just fine. However, if you are concerned, then by all means heat your syrup to 255◦F.) on a candy or instant-read thermometer. Once it reaches that temperature, remove the syrup from the heat.
While the syrup is heating, begin whisking the egg and egg yolk at high speed in the bowl of your mixer using the whisk attachment. Whisk them until they are pale and foamy.
When the sugar syrup reaches the correct temperature and you remove it from the heat, reduce the mixer speed to low speed and begin slowly (very slowly) pouring the syrup down the side of the bowl being very careful not to splatter the syrup into the path of the whisk attachment. Some of the syrup will spin onto the sides of the bowl but don’t worry about this and don’t try to stir it into the mixture as it will harden!
Raise the speed to medium-high and continue beating until the eggs are thick and satiny and the mixture is cool to the touch (about 5 minutes or so).
While the egg mixture is beating, place the softened butter in a bowl and mash it with a spatula until you have a soft creamy mass.
With the mixer on medium speed, begin adding in two-tablespoon chunks. When all the butter has been incorporated, raise the mixer speed to high and beat until the buttercream is thick and shiny.
At this point add in your flavouring and beat for an additional minute or so.
Refrigerate the buttercream, stirring it often, until it’s set enough (firm enough) to spread when topped with a layer of cake (about 20 minutes).
For the ganache/mousse:
7 ounces white chocolate
1 cup plus 3 tbsp. heavy cream (35% cream)
1 tbsp. liquer of your choice (Bailey’s, Amaretto, etc.)
Melt the white chocolate and the 3 tbsp. of heavy cream in a small saucepan.
Stir to ensure that it’s smooth and that the chocolate is melted. Add the tablespoon of liqueur to the chocolate and stir. Set aside to cool completely.
In the bowl of a stand mixer, whip the remaining 1 cup of heavy cream until soft peaks form.
Gently fold the whipped cream into the cooled chocolate to form a mousse.
If it’s too thin, refrigerate it for a bit until it’s spreadable.
If you’re not going to use it right away, refrigerate until you’re ready to use.
For the glaze:
14 ounces white chocolate, coarsely chopped
½ cup heavy cream (35% cream)
Melt the white chocolate with the heavy cream. Whisk the mixture gently until smooth.
Let cool for 10 minutes and then pour over the chilled cake. Using a long metal cake spatula, smooth out into an even layer.
Place the cake into the refrigerator for 30 minutes to set.
Enjoy!
Wednesday, May 28, 2008
The Daring Bakers Go Out for Some Culture!
Tuesday, May 27, 2008
TwD: Pecan Honey Sticky Buns
 I didn't participate in Tuesdays with Dorie this week - too much going on this holiday weekend, but please pop over to the site to check out what the other members made, Pecan Honey Sticky Buns, courtesy of Madam Chow's Kitchen.
Enjoy!
Saturday, May 24, 2008
Taste & Create: Tasty, Tasty Biscuits
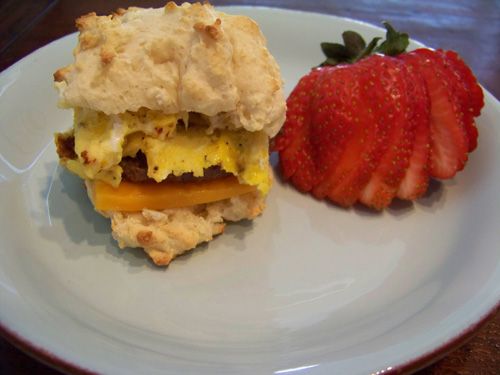

Crater Biscuits
adapted from My Food Blog
12 Tbsps all-purpose flour
1 tsp baking powder
6 Tbsp skim milk
3 tsp Greek yogurt
Preheat oven to 425.
Mix dry ingredients. Quickly mix in milk and yogurt.
Drop into mounds and bake for 10-13 minutes.
Makes 4 biscuits.
See the recipe...
Tuesday, May 20, 2008
TwD: Ugly but Delicious
 I can't begin to tell you how excited I was to see madeleines chosen for this installment of Tuesdays with Dorie. I had a lovely experience making them before, and knew that Dorie's would be just as excellent!Who cares if they weren't pretty - because they made up for it in the taste department. They were perfectly lemony and sweet without being too much of either. I really like Dorie's direction to blend the sugar and the lemon zest before you start - the fragrance is heavenly. If it weren't weird to do so, I could just eat it with a spoon. I restrained myself and moved forward.
I would like to think it was some kind of rookie mistake... and certainly, I won't let it happen again, but I totally over-filled my pan. The batter was thick (and delicious) and I just spooned these heaping spoonfuls into the molds. That said, I could have ended up with more than just 12. If you don't count all the batter I ate - tested! - this could have netted at least 16 cookies... maybe 18. They didn't suffer for it, but they weren't as adorable and cute as I'd hoped.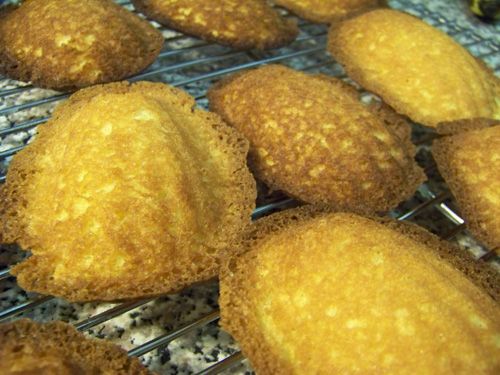
All 12 cookies were gone in 12 hours. We had a bunch the night I made them and the rest for breakfast the day after. (Bacon and eggs are over-rated.) I fully intended to make these again over the weekend, and make them properly. Sadly, it just didn't happen. These lovely babies WILL be made again, however. They are too tasty to resist.
My thanks to Tara for a lovely choice! Please go check out the other bakers at Tuesdays with Dorie - their madeleines are MUCH prettier!
Traditional Madelines
c/o Baking: From My Home to Yours, by Dorie Greenspan
http://www.amazon.de/Baking-Home-Yours-Dorie-Greenspan/dp/0618443363/ref=sr_1_1?ie=UTF8&s=books-intl-de&qid=1209562505&sr=1-1
2/3 cup all-purpose flour
¾ teaspoon baking powder
Pinch of salt
½ cup sugar
Grated zest of 1 lemon
2 large eggs, at room temperature
2 teaspoons pure vanilla extract
¾ stick (6 tablespoons) unsalted butter, melted and cooled
Confectioners’ sugar, for dusting
Whisk together the flour, baking powder and salt.
Working in a mixer bowl, or in a large bowl, rub the sugar and lemon zest together with your fingertips until the sugar is moist and fragrant. Add the eggs to the bowl. Working with the whisk attachment, or with a hand mixer, beat the eggs and sugar together on medium-high speed until pale, thick and light, 2 to 3 minutes. Beat in the vanilla. With a rubber spatula, very gently fold in the dry ingredients, followed by the melted butter. Press a piece of plastic wrap against the surface of the batter and refrigerate it for at least 3 hours, or for up to 2 days. This long chill period will help the batter form the hump that is characteristic of madeleines. (For convenience, you can spoon the batter into the madeleine molds, cover and refrigerate, then bake the cookies directly from the fridge; see below for instructions on prepping the pans.)
GETTING READY TO BAKE:
Center a rack in the oven and preheat the oven to 400 degrees F. Butter 12 full-size madeleine molds, or up to 36 mini madeleine molds, dust the insides with flour and tap out the excess. Or, if you have a nonstick pan (or pans), give it a light coating of vegetable cooking spray. If you have a silicone pan, no prep is needed. Place the pan(s) on a baking sheet.
Spoon the batter into the molds, filling each one almost to the top. Don’t worry about spreading the batter evenly, the oven’s heat will take care of that. Bake large madeleines for 11 to 13 minutes, and minis for 8 to 10 minutes, or until they are golden and the tops spring back when touched.
Remove the pan(s) from the oven and release the madeleines from the molds by rapping the edge of the pan against the counter. Gently pry any recalcitrant madeleines from the pan using your fingers or a butter knife. Transfer the cookies to a rack to cool to just warm or to room temperature.
If you are making minis and have more batter, bake the next batch(es), making certain that you cool, then properly prepare the pan(s) before baking.
Just before serving, dust the madeleines with confectioners’ sugar.
Makes 12 large or 36 mini cookies
Serving: Serve the cookies when they are only slightly warm or when they reach room temperature, with tea or espresso.
Storing: Although the batter can be kept in the refrigerator for up to 2 days, the madeleines should be eaten soon after they are made. You can keep them overnight in a sealed container, but they really are better on day 1. If you must store them, wrap them airtight and freeze them; they’ll keep for up to 2 months.
Friday, May 16, 2008
White Cheese Pizza with Spring Onions
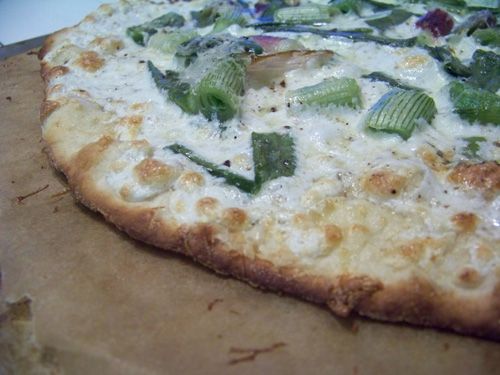 My two confessions for today: I miss the sun and I cannot stop thinking about this pizza. I couldn't decide which was more pressing, so I gave you both. The weather man says we should get a little sun tomorrow morning before we return to cloudy wetness, so I'll try to make the most of it. Reattaining this pizza is easier - and something I have far more control over.
I spent some time last weekend ripping recipes out of magazines and this one stayed top of the pile. I love home made pizza - and I've been itching to use my new pizza stone. It may also have had something to do with my love of white pizza... but who's counting.
I've never had a ramp. The original recipe calls for them. Considering their brief window of availability, the substitution of spring onions is offered. I happened across some of the most beautiful spring onions at the market Sunday morning. They were enormous and had beautiful purple outer skins. I really wish I had taken a picture of them before I prepared them for the pizza. (Considering my plan is to make this again this weekend, I will snap a photo then!)
I cannot begin to tell you how happy I was with the dough. I have a really shoddy track record with yeast anything, but despite my misgivings (and my husband's groans), I tried it anyway. It came together with minimal fuss, rose as directed, and tasted divine. Perfect marriage of crisp and chewy, it held up really well to the weight of the onions and all the cheese I piled on top.
My only complaint? I wish there were more of it. The recipe specifically says that it is a 12-inch pizza, and it was, but it was also decently thin. I hadn't planned anything to go with it (a salad would have been nice) but even with an approved pizza side, I would have preferred more pizza. This next go-round, I believe I will be making two.
White Cheese Pizza with Ramps
c/o Food and Wine Magazine, April 2008
http://www.foodandwine.com/recipes/white-cheese-pizza-with-ramps
The name Chicago comes from the Algonquin word chicagoua, which some historians say means “ramp”—a wild onion with a delicious garlicky flavor. That’s one reason Chicago chefs like Tony Mantuano feel a sentimental attachment to the pungent spring plant. (Scallions are also great substitutes.) To drink with his ramp-topped pizza, Mantuano suggests a Dolcetto d’Alba from Italy’s Piedmont region. It’s light-bodied enough not to overwhelm the pizza’s flavors, yet it has a peppery zip that can match the ramps’ intensity. Marcarini’s floral 2005 Fontanazza is a great choice, as is the plummy 2005 Cogno Vigna del Mandorlo.
Dough
1 cup all-purpose flour
1 1/2 teaspoons active dry yeast
1/2 teaspoon salt
1/4 teaspoon sugar
1/4 cup plus 2 tablespoons warm water
Topping
10 ramps or medium scallions
Extra-virgin olive oil, for brushing
1 cup coarsely grated fresh mozzarella cheese (4 ounces); see Note
Salt and freshly ground black pepper
1/4 cup freshly grated Parmigiano–Reggiano cheese
MAKE THE DOUGH: In a large bowl, whisk the flour together with the yeast, salt and sugar. Pour in the water and stir well with a wooden spoon to form a dough. Scrape the dough out onto a lightly floured work surface and knead for a few minutes until smooth. Transfer the pizza dough to a lightly oiled large bowl. Cover with plastic wrap or a damp towel and let stand in a warm place until the pizza dough has doubled in bulk, about 1 1/2 hours.
Set a pizza stone on the bottom or on the bottom shelf of the oven and preheat to 500° for at least 30 minutes.
MAKE THE TOPPING: Bring a medium saucepan of salted water to a boil. Blanch the ramps until they are bright green but still al dente, about 1 minute. Drain, pat dry and cut into 1-inch lengths.
Punch down the pizza dough and transfer it to a lightly floured work surface. Roll out the dough to a 12-inch round, about 1/8 inch thick. Transfer the dough to a lightly floured pizza peel or an inverted baking sheet. Brush the dough with olive oil and sprinkle on the grated mozzarella in an even layer. Scatter the blanched ramps over the mozzarella and season lightly with salt and pepper. Top the pizza with the Parmigiano-Reggiano cheese.
Slide the pizza from the peel onto the hot stone. Bake for about 8 minutes, until the cheese has melted and the pizza crust is browned and crisp on the bottom. Transfer the pizza to a work surface, cut into wedges and serve right away.
Make ahead: The pizza dough can be frozen for up to 1 month.
Notes: For the cheese, Mantuano recommends the Crescenza by Paula Lambert’s Mozzarella Company in Dallas (mozzco.com). You can also use water-packed fresh mozzarella or fiore di latte; drain the cheese well before grating it.
Tuesday, May 13, 2008
TwD: It's Like Geology!

I am a brand new member of Tuesdays with Dorie. I'd been watching them for ages (because who doesn't like Dorie!) and I really wanted to get in on the fun!
What is Tuesdays at Dorie, you ask? Well, Laurie of Quirky Cupcake wanted a way to push herself to bake more, and to bake more specifically from Dorie Greenspan's Baking: From My Home to Yours. She realized that there was no better way than to get a group together... because much like working out at the gym, sometimes you just need a push. Each week, a member selects the next recipe and the party starts anew. This week, Dianne chose the Florida Pie. While I adore both key lime pie and coconut cream pie, I'd never had the two on a spoon at once. I don't know why, but I was a little nervous about the combination. Seriously, what was I thinking?? The tart lime layer combined beautifully with the coconut cream layer! I don't know how I'll ever be able to go back to single-flavor pie again! My favorite part is how it looks sliced in half. You have the older Coconut Cream Period, followed by the creamy Lime Age. We currently live in the Era of Meringue - and if you look closely, you can see teensy little coconut trilobites! Heh.
 We are encouraged to make the recipes our own - so I opted to make mini-pies in large cupcake tins. I had a bit of a panic attack trying to get them out again, but suffered no broken pies. Only issue we did have with them miniaturized was that the bottom crust was thick and difficult to cut through. It didn't stop us, but it is worth noting. :)
This recipe isn't difficult in the slightest, but it isn't quick. The pies have to set in the freezer in various stages, so plan this dessert out in advance.
Florida Pie
c/o Baking: From My Home to Yours, by Dorie Greenspan
http://www.amazon.com/Baking-Home-Yours-Dorie-Greenspan/dp/0618443363
1 9-inch graham cracker crust (page 235), fully baked and cooled, or a store-bought crust
1 1/3 cups heavy cream
1 1/2 cups shredded sweetened coconut
4 large eggs, separated
1 14-ounce can sweetened condensed milk
1/2 cup fresh Key (or regular) lime juice (from about 5 regular limes)
1/4 cup of sugar
Getting Ready:
Center a rack in the oven and preheat the oven to 350 degrees F. Put the pie plate on a baking sheet lined with parchment of a silicone mat.
Put the cream and 1 cup of the coconut in a small saucepan and bring it to a boil over medium-low heat, stirring almost constantly. Continue to cook and stir until the cream is reduced by half and the mixture is slightly thickened. Scrape the coconut cream into a bowl and set it aside while you prepare the lime filling.
Working with a stand mixer, preferably fitted with a paddle attachment, or with a hand mixer in a large bowl beat the egg yolks at high speed until thick and pale. Reduce the mixer speed to low and beat in the condensed milk. Still on low, add half of the lime juice. When it is incorporated, add the reaming juice, again mixing until it is blended. Spread the coconut cream in the bottom of the graham cracker crust, and pour over the lime filling.
Bake the pie for 12 minutes. Transfer the pie to a cooling rack and cool for 15 minutes, then freeze the pie for at least 1 hour.
To Finish the Pie with Meringue:
Put the 4 egg whites and the sugar in a medium heavy-bottomed saucepan and heat over medium-low heat, whisking all the while, until the whites are hot to the touch. Transfer the whites to a stand mixer, fitted with the whisk attachment, or use a hand mixer in a large bowl, and beat the whites at high speed until they reach room temperature and hold firm peaks. Using a rubber spatula, fold the remaining 1/2 cup coconut into the meringue.
Spread the meringue over the top of the pie, and run the pie under the broiler until the top of the meringue is golden brown. (Or, if you've got a blowtorch, you can use it to brown the meringue.) Return the pie to the freezer for another 30 minutes or for up to 3 hours before serving.
Sunday, May 11, 2008
Bad Photo Sunday: Chicken Goulash with Biscuit Dumplings

Happy Mother's Day!
My friend Deborah, at Taste and Tell, has started breaking her weekend blogging silence with something she likes to call Bad Photo Sunday. She explains it perfectly - we strive to share beautiful dishes with the world, so our less-stunning recipes lie fallow. I couldn't agree more that this is a perfect way to ration them out! Sure, we food bloggers have our Daring Bakers, we have our Tuesdays with Dorie, our Weekend Herb Blogging, Presto Pasta Night and our Waiter, there is something in my's, but Bad Photo Sunday? It is a genius way to accept that not everything is perfect, and that we're happy to admit it!
"Goulash" doesn't even sound pretty, does it?
Having learned how delicious chicken thighs were, I was instantly attracted to this recipe. Not to mention the dumplings. I had never dumplinged in this fashion before. My grandpa used to make a fantastic Chicken and Dumplings, and while this is nothing like it, I had their memory as inspiration.
As you can see, my dumplings are a little dark. They aren't burned, exactly, but they are toasty. Even in their state, they were moist and tender and so nice with the saucy goulash. We really enjoyed the heat the Hungarian paprika gave the dish. It had a heat without being hot - and considering we had this in February, it was well received!
Chicken Goulash with Biscuit Dumplings
c/o Food and Wine Magazine, March 2008
http://www.foodandwine.com/recipes/chicken-goulash-with-biscuit-dumplings
The chicken stock and sour cream both serve a dual purpose here: They moisten the biscuits and enrich the thick, luscious sauce.
2 pounds skinless, boneless chicken thighs, cut into 2-inch pieces
Salt and freshly ground pepper
1 1/2 cups all-purpose flour, plus more for dusting
5 tablespoons cold unsalted butter, cubed
2 tablespoons extra-virgin olive oil
2 teaspoons baking powder
2 1/2 cups chicken stock or low-sodium broth
1 cup sour cream
1 large white onion, finely chopped
1 red bell pepper, finely diced
2 garlic cloves, minced
2 tablespoons hot Hungarian paprika
3/4 teaspoon caraway seeds
1 teaspoon thyme leaves
Preheat the oven to 425°. Season the chicken with salt and pepper and dust lightly with flour. In a large, deep skillet, melt 1 tablespoon of the butter in the olive oil. Add the chicken and cook over high heat, turning once, until browned, about 7 minutes. Using a slotted spoon, transfer the chicken to a plate.
Meanwhile, in a food processor, pulse the flour, baking powder, 1/2 teaspoon of salt and 1/4 teaspoon of pepper. Pulse in the remaining 4 tablespoons of butter until the mixture resembles coarse meal. Whisk 1/2 cup of the stock with 1/2 cup of the sour cream and drizzle over the dry ingredients; pulse until a dough forms.
Add the onion, bell pepper and garlic to the skillet and cook over high heat, stirring occasionally, until softened, about 3 minutes. Return the chicken to the skillet. Stir in the paprika and caraway and cook for 30 seconds. Add the remaining 2 cups of chicken stock and 1/2 cup of sour cream and stir until smooth. Add the thyme leaves and bring to a boil.
Scoop twelve 3-tablespoon-size mounds of biscuit dough over the chicken. Transfer the skillet to the oven and bake for 20 minutes, until the sauce is bubbling and the biscuits are cooked. Turn on the broiler and broil for 2 minutes, until the biscuits are golden. Serve the goulash in bowls, spooning the biscuits on top.
Friday, May 9, 2008
Heidi's Coconut Macaroon Pancakes
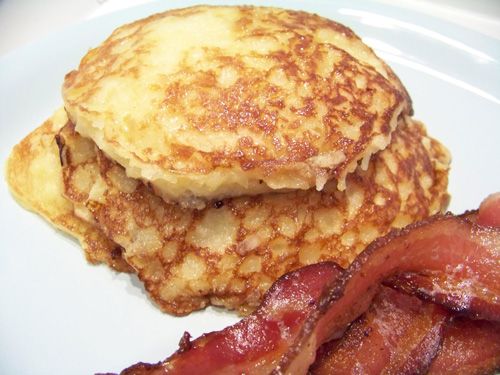
These are glorious. I printed the recipe the moment I read it on 101 Cookbooks. They are something of a happy experiment for Heidi - and I can only hope she has more of them!
These aren't your light and fluffy pancakes, no sir. They are dense (yet delicate), sweet and chewy. They are everything that is wonderful about the coconut macaroon, but miraculously a pancake instead. Now, I am a big fan of the fluffy pancake, but these are certainly a treat. Dave didn't love them as much as I did, but that's because he has "texture issues" with coconut. I love him anyway.
The only real trick to these is the flipping. The shredded coconut doesn't spread as much as the batter as they cook, which means you'll have a bit of thin pancake around the periphery of the pancake... and it is a little daintier than the center - which makes it a little iffy on the flip. Take your time and you will be rewarded.
I chose not to syrup them - a little butter did me fine. With a side of bacon, these beauties made a wonderful mid-week dinner. (I even took some leftovers for lunch! Lucky me!)
Coconut Macaroon Pancakes
c/o Heidi at 101 Cookbooks
http://www.101cookbooks.com/archives/coconut-macaroon-pancakes-recipe.html
Look for shredded coconut where each thread is thin and at least 1/2-inch long. Not dusty or fleck-like. If you make the batter the night before, the batter will thicken up quite a bit. Give it a stir, but dont worry about it beyond that. Drop little scoops onto the griddle - they will flatten out when they come into contact with the heat. They go from golden to burnt in a flash, so stay attentive. I prefer to use whole wheat pastry flour for this recipe but you can substitute whatever you have on hand - all-purpose flour, or regular pastry flour. Lemon zest might be a great addition, as would ginger, and/or toasted, chopped macadamia nuts.
1 14-ounce can of coconut milk
2 tablespoons honey (or agave nectar)
1 /4 cup whole wheat pastry flour (or all-purpose or regular pastry flour)
3 cups unsweetened dried shredded coconut
scant 1/2 teaspoon fine grain sea salt
2 teaspoons baking powder
3 large eggs. whisked in a medium bowl
1/4 cup brown sugar
In a small saucepan heat the coconut milk and honey, bring barely to a simmer.
In a separate large bowl combine the flour, coconut, salt and baking powder. Stir the coconut milk into the flour mixture.
Whisk about 1/3 cup of the coconut mixture into the eggs. Now quickly mix the eggs back into the large bowl of coconut batter. Stir until well combined. You can do this the night before if you like.
Heat your favorite non-stick (or very well-seasoned) skillet, pan, or griddle to medium-hot and brush it with a bit of butter. Test for the right temperature. If a drop of water dropped onto the pan starts to dance, you are in the ballpark. Drop a heaping tablespoon into the skillet, sprinkle the top with a bit of brown sugar. Wait until the pancake bottom is deep golden in color, then flip with a spatula and cook the other side until golden and cooked through. Repeat with the remaining batter.
Makes dozens of silver dollar sized pancakes, or a dozen or so larger ones.


