
 Checking through my old posts, I realized I never posted about my mom's birthday cake! And her birthday was May 28th! My apologies, Mom! :)
I'm sure you can guess who the cake belongs to - the always fabulous Dorie Greenspan! I watched this cake make its rounds on other blogs and when my book arrived in the mail, this beautiful cake was on the cover. With my mom's bday coming up, and her only request that the cake be chocolate, I knew I had to try it out for myself.
Cake aside, I really enjoy how Dorie's recipes read. You can imagine here there with you, in your kitchen, giving you pointers... telling you not to worry at what your batter looks like, that its SUPPOSED to look like that! Its been a while since I've baked anything, I can promise you that my next date with my oven, I'll bring Dorie along with me as a chaperone.
The cake came together without a hitch. Thank goodness she tells you what the batter looks like, or else I would have totally flipped out. And not in a good way. I gotta say, when the frosting came together (I've never made marshmallow anything before) and I tasted it, I actually let out a little "whup!" of joy, and I ran a spoonful into my husband so he could whup too. It was perfectly creamy and marshmallowey and perfect. Yay!
One thing I would like to try with the marshmallow - one of our new fav. restaurants has a dessert I love... Its a super-fudgy brownie topped with a layer of marshmallow, and they broil it just to melt the fluff and goo it up.... I need to be able to make this delish dessert at home...
Anyway, make this cake. Its fantastic and you'll love it. Give into the peer pressure!
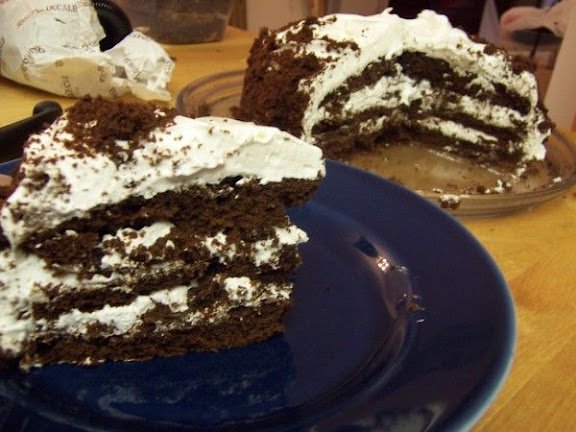
Devil’s Food White-out Cake
From: Baking: From My Home to Yours, by Dorie Greenspan
http://www.amazon.com/Baking-Home-Yours-Dorie-Greenspan/dp/0618443363/ref=pd_bbs_sr_1/002-6815521-7348005?ie=UTF8&s=books&qid=1180888595&sr=8-1
For the cake:
1 1/3 cups all-purpose flour
½ cup unsweetened cocoa powder
¾ teaspoon baking soda
½ teaspoon baking powder
¼ teaspoon salt
1 ¼ sticks (10 tablespoons) unsalted butter, at room temperature
½ cup (packed) light brown sugar
½ cup sugar
3 large eggs, at room temperature
1 teaspoon pure vanilla extract
2 ounces bittersweet chocolate, melted and cooled
½ cup buttermilk or whole milk, at room temperature
½ cup boiling water
4 ounces semisweet or milk chocolate, finely chopped, or 2/3 cup store-bought mini chocolate chips
For the filling and frosting:
½ cup egg whites (about 4 large)
1 cup sugar
¾ teaspoon cream of tartar
1 cup water
1 tablespoon pure vanilla extract
Getting ready: Center a rack in the oven and preheat the oven to 350 degrees F. Butter two 8-x-2-inch round cake pans, dust the insides with flour, tap out the excess and line the bottoms with wax or parchment paper. Put the pans on a baking sheet.
To make the cake: Sift together the flour, cocoa, baking soda, baking powder and salt.
Working with a stand mixer, preferably fitted with a paddle attachment, or with a hand mixer in a large bowl, beat the butter on medium speed until soft and creamy. Add the sugars and continue to beat for another 3 minutes. Add the eggs one by one, beating for 1 minutes after each addition. Beat in the vanilla; don’t be concerned if the mixture looks curdled. Reduce the mixer speed to low and mix in the melted chocolate. When it is fully incorporated, add the dry ingredients alternately with the buttermilk, adding the dry ingredients in 3 additions and the milk in 2 (begin and end with the dry ingredients); scrape down the sides of the bowl as needed and mix only until the ingredients disappear into the batter. At this point, the batter will be thick, like frosting. Still working on low speed, mix in the boiling water, which will thin the batter considerably. Switch to a rubber spatula, scrape down the bowl and stir in the chopped chocolate. Divide the batter evenly between the two pans and smooth the tops with the rubber spatula.
Bake for 25 to 30 minutes, rotating the pans at the midway point. When fully bakes, the cakes will be springy to the touch and a thin knife inserted into the centers will come out clean. Don’t worry if the tops have a few small cracks. Transfer the cake pans to a rack and cool for about 5 minutes, then run a knife around the sides of the cakes, unmold them and peel off the paper liners. Invert and cool to room temperature right side up. (The cooled cakes layers can be wrapped airtight and stored at room temperature overnight or frozen for up to 2 months.)
When you are ready to fill and frost the cake, inspect the layers. If the cakes have crowned, use a long serrated knife and a gentle sawing motion to even them. With the same knife, slice each layer horizontally in half. Set 3 layers aside and crumble the fourth layer; set the crumbs aside.
To make the filling and frosting: Put the egg whites in a clean, dry mixer bowl or in another large bowl. Have a candy thermometer at hand.
Put the sugar, cream of tartar and water in a small saucepan and stir to combine. Bring the mixture to a boil over medium-high heat, cover the pan and boil 3 minutes. Uncover and allow the syrup to boil until it reaches 242 degrees F on the candy thermometer. While the syrup is cooking, start beating the egg whites.
When the syrup is about 235 degrees F, begin beating the egg whites on medium speed with the whisk attachment or with a hand mixer. If the whites form firm, shiny peaks before the syrup reaches temperature, reduce the mixer speed to low and keep mixing the whites until the syrup catches up. With the mixer at medium speed, and standing back slightly, carefully pour in the hot syrup, pouring it between the beater(s) and the side of the bowl. Splatters are inevitable – don’t try to scrape them into the whites, just carry on. Add the vanilla extract and keep beating the whites at medium speed until they reach room temperature, about 5 minutes. You should have a smooth, shiny, marshmallowy frosting. Although you could keep it in the fridge in a pinch, it’s really better to use it right now.
To assemble the cake: Put a bottom layer cut side up on a cardboard cake round or on a cake plate protected by strips of wax or parchment paper. Using a long metal icing spatula, cover the layer generously with frosting. Top with a second layer, cut side up, and frost it. Finish with the third layer, cut side down, and frost the sides and top of the cake. Don’t worry about smoothing the frosting – it should be swirly. Now, cover the entire cake with the chocolate cake crumbs, gently pressing the crumbs in to the filling with your fingers.
Refrigerate the cake for about 1 hour before serving. (If its more convenient, you can chill the cake for 8 hours or more; cover it loosely and keep it away from foods with strong odors.)


5 comments:
I see this every time I pull out my cookbook and I swear it is calling out to me to make it! I need to find an occasion, though. Maybe I should celebrate that it is Monday!?!
Oh man that looks good. I love Dorie's recipes, too!
Wow, that looks fantastic. I think I feel the need to buy another cookbook!
I'm with Deborah. Every time I pull this cookbook out, which is often, I tell myself to make that cake soon. The cover photo pulls me in every time!
Happy birthday to your mom!
I gave in to the peer pressure and made the white-out chocolate cake.
I posted my pictures at
http://occasionalbaker.blogspot.com
Have a great day!
Julius
Post a Comment