
 This dinner earned mixed results in my house. I didn't really care for it, but the husband thought it was awesome. (Figures!)
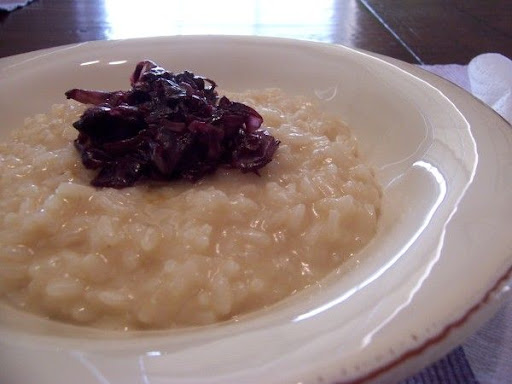
I think I found the bitterness of the radicchio off-putting (though, I'll admit, it could have been the wine I used). I loved the risotto, and I even appreciated the licorice... but all together, in addition to the wine paired... didn't impress my taste buds.
Dave specifically picked this recipe out of the magazine a few weeks ago, and he's really gotten into wine and what pairs with what.. so we had really been looking forward to it. I'm sure I'll try it again - if not just for him, but to make sure I actually didn't like it. Silly, I know. :)
Edit: I should have mentioned this last night. I couldn't find powdered licorice root. What I did find was licorice root extract in the vitamin section. So rather than sprinkle on the powder, we used droplets of extract.
Radicchio and Licorice Risotto
Wine Enthusiast Magazine, June 2007
1 head radicchio
Olive oil
Salt
Freshly ground white pepper
¾ cup red wine
1 cup Carnaroli rice
¼ white wine
4 cups vegetable broth
1 teaspoon white vinegar
5 ounces butter
¼ cup grated Parmigiano cheese
1 teaspoon powdered licorice root
Wash the radicchio leaves and cut into paper-thin strips. Fry in a pan with olive oil and season with salt and a pinch of ground white pepper. Pour in the red wine until it is absorbed by the radicchio and set aside to cool.
Lightly toast the rice in a large pot with half the butter. Wet with the white wine and cook over low heat for 15 minutes, slowly adding the vegetable broth and stirring constantly so that the rice stays fluid and does not stick to the pot.
Five minutes before the rice is ready (al dente), add the white vinegar. At the very end blend in remaining butter and Parmigiano cheese.
Serve the risotto in deep dishes and decorate with one tablespoon of the radicchio and red wine mixture on top. Lightly sprinkle over the licorice powder. Serve immediately.
Wednesday, May 30, 2007
Radicchio and Licorice Risotto
Tuesday, May 29, 2007
Fettuccine with Escarole and Brie
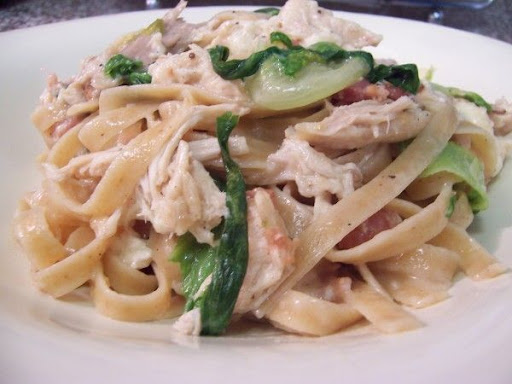 Its too bad this bowl probably contains a thousand calories, because I'd love to be able to make this again soon. Funny thing is, I was born lactose intolerant, but the docs were able to talk my stomach into digesting dairy anyway. (Its a silly story, but its explains my hatred of strawberry milkshakes.) While I love ice cream, and I'm ok with most cheese if its melted (as in pizza or in sandwiches)(except cheddar, gross), I have a really hard time liking cheeses. I don't like how they smell, I don't like the texture, I don't like the flavor.. blech, cheese. Dave has tried to warm me up to them. (There he goes again.) I will say, to my defense, he found the process too entertaining. He loves the face I make the instant a stinky cheese touches my tongue. I think he would give me tastes I wouldn't like on purpose, just so I'd make that Mr. Yuck face. Evil husband.
Fettuccine with Escarole and Brie
Food & Wine Magazine, May 2007
http://www.foodandwine.com/recipes/fettuccine-with-escarole-and-brie
3/4 pound fettuccine
2 tablespoons extra-virgin olive oil
2 ounces thinly sliced pancetta or bacon, coarsely chopped
1 large garlic clove, minced
1 shallot, minced
1 pound escarole, cut into 1-inch ribbons
Salt and freshly ground pepper
1/2 pound Brie (preferably a wedge), rind removed
In a large pot of generously salted boiling water, cook the pasta until just al dente. Drain the pasta, reserving 1 1/4 cups of the cooking water.
Meanwhile, in a very large skillet, heat the olive oil. Add the pancetta and cook over high heat, stirring, until lightly browned, about 2 minutes. Add the garlic and shallot and cook until fragrant, about 1 minute. Add the escarole, season with salt and pepper and cook, stirring, just until wilted.
Add the pasta to the skillet along with 1 cup of the reserved pasta cooking water. Tear the Brie into 1-inch pieces and add to the skillet. Cook the pasta over moderate heat, tossing, until the Brie is melted and the sauce is thick and creamy, about 4 minutes; add more of the pasta cooking water if the sauce is dry. Season the pasta with salt and pepper. Transfer the pasta to bowls and serve immediately.
Monday, May 28, 2007
Happy Memorial Day!!! Happy Birthday, Mom!!
 Happy Memorial Day!! The photo above is of my Grandpa with his plane from WW2. This might be one of my favorite photos of him. He was a US Air Force Pilot, and boy did he have some stories. I hope all of you go out and hug your vets, remember the fallen, and pray for those abroad risking their lives.
Happy Birthday, Mom!!! We seem to be on a trend of celebrating a week late, but at least this gives me a little more time to find the perfect chocolate cake recipe! :)
I think we might be the only people not grilling or bbq-ing this weekend. I totally wasn't thinking last week when I planned out the weekend's worth of dinners. I don't mind, really, and I don't think Dave did either.
I am saving the post about tonight's dinner until tomorrow, but that doesn't mean I have no food to post about tonight! (Just no new pictures.)
This morning, I was all about refilling the freezer. I love the flavors of slow-cooked meals, but I prefer something a little faster on a weeknight. (Who doesn't?) I started off making more of the twice-cooked red chile sauce that goes so nicely with steaks. Then I made another batch of the grater-box gnocchi. And then, to use up the sour cream sitting in the fridge, I made a batch of snickerdoodle muffins! Whew! Didn't take me too long, as I could have more than one thing going at once, and now I can just pull something out for dinner (or breakfast, in the case of the muffins), whip it together, and have it taste like it took way longer! Nice!
Scallops on a Plate
 I had something elegant and thought-out to go with this post, since it was such a snazzy dinner. But then we went and watched Snakes on a Plane, and all my fancy words are gone. Do not watch that movie. Well, watch it if you're into cheesy silly weird action movies. But when you're trying to have a nice dinner, do not follow it with this.
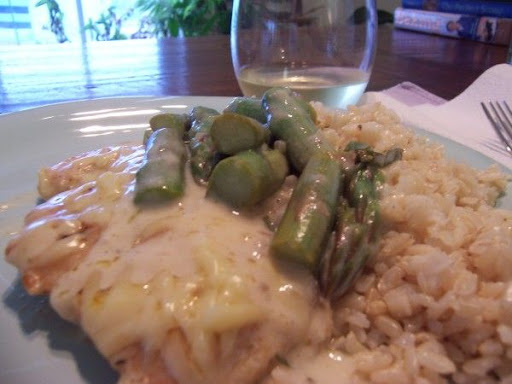
Since we had rice last night, and pasta tomorrow night, I wasn't sure what to have the scallops and asparagus with - so we had toast! Now, I happen to love toast. It might be one of my favorite foods. (I'm easy.) Let me tell you, toast was brilliant with this sauce. There was plenty of sauce to go around, and it was tasty to dunk in.
Since it was just the two of us, and I'm a little squidgy about reheating seafood, I only bought 11 scallops. Why eleven? 10 seemed like too few, 12 too many. (Ha!) I think the weight came to about a third of what the recipe called for, so this could happily feed more folks, especially if you served it with something more substantial.
Anyway, piece of cake to make, even better to have for dinner. If not for the 4 tablespoons of butter, I'd almost call it healthy.
Scallops with Asparagus
Gourmet Magazine, April 2007
http://www.epicurious.com/recipes/recipe_views/views/238094
1 lb medium asparagus
3 tablespoons olive oil
2 lb large sea scallops, tough ligament removed from side of each if attached
1/2 teaspoon black pepper
3/4 teaspoon salt
1/3 cup dry white wine
2 teaspoons white-wine vinegar
1/2 stick (1/4 cup) unsalted butter, cut into tablespoon pieces
Trim asparagus, then cut stems into 1/4-inch-thick diagonal slices, leaving tips whole.
Heat 1 tablespoon oil in a 12-inch heavy nonstick skillet over moderately high heat until hot but not smoking, then sauté asparagus, stirring occasionally, until just tender, 5 to 6 minutes. Transfer with a slotted spoon to a plate, reserving skillet off heat (do not clean).
Pat scallops dry and sprinkle with pepper and 1/2 teaspoon salt. Add 1 tablespoon oil to skillet and heat over moderately high heat until hot but not smoking, then sauté half of scallops, turning over once, until browned and just cooked through, 4 to 6 minutes total. Transfer scallops with tongs to another plate as cooked.
Wipe out skillet with paper towels, then add remaining tablespoon oil and heat until hot but not smoking. Sauté remaining scallops, turning over once, until browned and cooked through, 4 to 6 minutes total, transferring to plate. (Do not wipe out skillet after second batch.)
Carefully add wine and vinegar to skillet (mixture may spatter) and boil, scraping up brown bits, until liquid is reduced to about 2 tablespoons, about 1 minute. Add any scallop juices accumulated on plate and bring to a simmer.
Reduce heat to low and whisk in butter, 1 tablespoon at a time, until incorporated.
Add asparagus and remaining 1/4 teaspoon salt and cook until heated through, about 1 minute.
Serve scallops topped with asparagus and sauce.
Saturday, May 26, 2007
Chili Shrimp and Coconut Risotto
 I tell ya, chili and coconut are friends. Good friends. And I especially enjoy when shrimp is invited to their party.
This is one of the recipes saved in the Great Recipe Cull of a month or so ago. It makes me smile that it was pulled from a magazine in 2002. Ah, memories.
I am so glad I learned how great Thai red chili paste is. I eventually found it in a jar, rather than a can (so I can save it in the fridge), and I just love the heat it provides. Nothing drastic, but enough to make your nose run and the back of your neck sweat. Its not the same fire you get with buffalo wings, and for that, I am grateful!
One edit I think this recipe could use... more scallions. It asked for one, I used two, and I felt like it got lost in the rice. Next time, I'll probably go with at least 4. Oh, and in case anyone is counting, I used "lite" coconut milk. I try to save calories where I can - especially since we followed dinner with angel food cake alongside that blueberry-pie-ice-cream!
Chili Shrimp and Coconut Risotto
Real Simple Magazine, September 2002
http://food.realsimple.com/realsimple/recipefinder.dyn?action=displayRecipe&recipe_id=524272
2 tablespoons olive oil
Add the chili paste and coconut milk to the pan and bring to a boil. Reduce heat and simmer, stirring occasionally, until thickened and reduced by half, about 5 minutes. Add the rice, bean sprouts, scallion, lime juice, and shrimp and cook until heated through, 3 to 4 minutes. Serve garnished with basil leaves.
Thursday, May 24, 2007
Don't Forget About Caesar!!

Only three days left to get your HHDD #12: Caesar entries in to me! Come one, come all, gimme your Caesar! :)
On a side note, there was a really interesting article about romaine (aka cos) lettuce in Kim O'Donnel's blog, A Mighty Appetite, on the washingtonpost.com today. Check it out here.
Wednesday, May 23, 2007
Buffalo Meatball Sub
 I am a creature of impulse. When I see something I want, its usually best to get it, rather that try to distract myself with something different. I find this method saves time AND calories! ;)
You will understand, then, when I tell you about the Meatball Sub entry on Julie's blog, Noshtalgia , I just had to have it. I saw it yesterday, and we had it for dinner tonight. (Quick turn-around!)
Sure, I tried to get fancy and put the subs under the broiler, both to toast the bread and melt the cheese. And yes, in less than a minute, the bread was burnt to a crisp. Ha! But how else would I get to be all MacGuyver on dinner and whip out the spare kaiser rolls we had laying around doing nothing??? I mean, that guy didn't get by on his good looks alone!
I used ground buffalo instead of beef (blame Marcie), and while I couldn't really tell the difference, the buffalo made one tasty meatball!
To get the recipe, click through to the post on Julie's blog here:
http://noshtalgia.blogspot.com/2007/05/bert-and-angies-meatball-subs.html
Check out the rest of her site, too, its pretty rad.
Classic Blueberry Pie (Disaster!!)
 I will start with the good parts. The filling was wonderful. My mom and I had to fight over who got to stick their nose in the bowl to inhale the lovely berry and cinnamony goodness. It was a snap to make, and am more than happy to make it again, and branch out into other fruit pies. So far, I have made the occasional apple pie, and I love to make peach upside-down cake, but this blueberry pie, I expect, has given me the faith that other fruity pies are within my reach. Even more important, my previously fruit-pie-hating husband really liked this pie, so def. a keeper.
Also nice, the flaky pie dough (I thought) was really simple. Before I rolled it out, I would have told you that I thought it was the first time I'd tried to make my own dough. But when the rolling-out disaster happened, it jogged my memory. "O yah, I remember this. This is why I don't do this! Aaargh!" I followed the instructions, only adding enough ice water as I thought it needed (which ended up being less than half), I balled it, I chilled it, I loved it. The poor dough just wouldn't hold together when rolled. It cracked, it crumbled, I almost cried. I managed to salvage the top round, but I ended up calling the Ever Patient and Wonderful Man I Married in, and he went to the store for a pie crust. (Saved!)
So as we had our Mother's Day dinner of ribs, the pie baked and filled the apartment with a lovely smell. It would have been hard to leave it to cool for as long as we did, but we'd stuffed ourselves on dinner. :)
The pie went fantastically with the goat cheese ice cream. (Yay experiment!) Having the top round of homemade dough made me really wonder what the pie would have tasted like with the homemade bottom. I say this because the store bought dough seemed to vanish into the pie, I don't know that I ever had a bite of it, and it I did, it didn't stand out one bit. The dough I did use was so wonderful, I'd be willing to give it another go, if I knew what I did wrong the first time.
Thoughts??? Help me save future pies!
The leftover pie was not lost, however. I mixed the remaining pie with a pint of light vanilla ice cream and popped it into the freezer. :)
Classic Blueberry Pie
From Leslie Mackie’s Macrina Bakery and Café Cookbook
Makes 1 (9-inch) double-crusted pie
7 cups (3 ½ pints) organic blueberries
¾ cup granulated sugar
¼ cup light brown sugar
2 teaspoons freshly grated lemon zest
1 teaspoon cinnamon
1 teaspoon pure vanilla extract
3 tablespoons unbleached all-purpose flour
½ recipe Flaky Pie Dough (recipe follows), chilled
1 tablespoon unsalted butter, cut into small pieces
Egg wash made with 1 egg and 1 teaspoon water
Coarse raw sugar
Vanilla ice cream, for serving
Sort through the blueberries, removing any stems and leaves. Gently rinse the blueberries and lay them out on paper towels to dry.
Combine 3 ½ cups of the blueberries, granulated sugar, brown sugar, lemon zest, cinnamon, vanilla extract and flour in a medium saucepan and mix with a spoon. Cook over medium heat until the fruit juices have been released and the mixture has thickened, 5 to 8 minutes, stirring frequently to keep the mixture from burning. Pour the cooked fruit into a large stainless steel bowl and add the remaining blueberries. Stir with a spoon and set aside until the fruit has cooled to room temperature.
Divide the chilled pie dough into 2 pieces, making one piece slightly larger than the other. Coat your hands with flour and shape the larger piece of dough into a ball. Working on a floured surface, flatten the ball slightly, then roll it into a 12-ince circle, about 1/8 inch thick. Fit the rolled dough into a 9-inch pie pan, then trim the edges of the dough to leave a 1-inch overhang around the pan. Roll out the remaining piece of dough 1/8 inch thick and trim into a 10-inch circle. Set aside. This will be the top crust.
Pour the cooled fruit into the pie shell and dot with butter. Brush the top side of the overhanging dough with a little egg wash. Lift the top crust onto the pie, folding it in half to make it easier to accurately position. Lift the overhanging dough onto the top crust and crimp with your fingers. Mark the crimped edges with a fork, then brush all of the crust with egg wash. Sprinkle with coarse raw sugar and chill in the refrigerator for at least 30 minutes.
Preheat oven to 375°F. Line a rimmed baking sheet with parchment paper.
Place the pie on the prepared baking sheet. Using a sharp knife, cut 4 slits in the center of the crust. Bake pie for 50 to 55 minutes. The crust will be golden brown and the fruit will be bubbling in the center of the pie. Let cool for 30 to 40 minutes, then serve with vanilla ice cream.
And:
Flaky Pie Dough
From Leslie Mackie’s Macrina Bakery and Café Cookbook
Makes enough dough for 2 double-crusted (9-inch) pies, or 2 (10-inch) rustic galettes or tarts
5 ¼ cups unbleached all-purpose flour
1 tablespoon kosher salt
12 tablespoons (1 ½ sticks) unsalted butter, chilled and cut into ¼-inch pieces
1 ¾ cups solid vegetable shortening, chilled
1 cup ice water
Combine flour and salt in a large bowl and toss together. Add butter and cut it into the flour until the texture is coarse and crumbly. You can use a pastry cutter or your fingers, but I like to use two forks. Break up the shortening and add it in small pieces. Cut in the shortening until the dough is crumbly again. Add ice water and mix just until the water is incorporated and the dough sticks together when pinched. This dough is quite sticky, so dust your hands with flour before handling it. Pull dough from bowl onto a lightly floured work surface (chilled marble is ideal) and pat it into a block. Wrap the dough tightly in plastic wrap and chill in the refrigerator for at least 1 hour before using. Since this recipe makes enough dough for 2 pies or tarts, I recommend cutting it in half before chilling.
Flaky Pie Dough will last for up to 4 days in the refrigerator and for up to 1 month in the freezer. If you freeze half or all of the dough, it’s a good idea to double wrap it. Frozen dough needs to be fully defrosted before its used, and my preferred method is to transfer the dough to the refrigerator 1 day before I plan on baking with it. The dough can also be defrosted at room temperature, but it needs to be re-chilled in the refrigerator for 1 hour prior to using.
Tuesday, May 22, 2007
Succotash with Shrimp
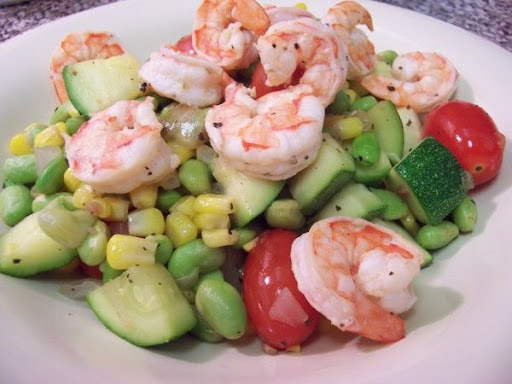 I love the color in this dish - the greens of the zucchini and edamame, the yellow of the corn, the red of the tomatoes, and the orange of the shrimp - I really feel like this healthy dinner is something you can feel happy about eating and serving. I'd say that it could serve four if you had some bread to go with it (which is what we did).
This recipe is from Fitness Magazine. I decided recently that I get way too many magazines, and of all of them, I'd keep the cooking mags over the fitness ones, but with recipes like this, they aren't going anywhere!!
I sub out edamame for lima beans, and I swapped out shrimp for the scallops. Go with what you like, and you can't go wrong.
Succotash with Shrimp
Adapted from recipe in Fitness Magazine
http://www.fitnessmagazine.com/fitness/story.jhtml?storyid=/templatedata/fitness/story/data/1169224538664.xml&catref=ftn20&page=3
2 teaspoons olive oil
1 small onion, diced
2 cloves garlic, minced
2 1/2 cups frozen corn kernels, defrosted
10-ounce package frozen edamame
1 medium zucchini (about 1/2 pound), quartered lengthwise and sliced
1 pint grape tomatoes, halved
1 pound shrimp
1/4 teaspoon salt
1/4 teaspoon freshly ground black pepper, plus more to taste
Cooking spray
1 tablespoon cider vinegar
1/4 cup chopped fresh basil
To make succotash, heat oil in a large skillet over medium heat. Add onion and let cook, stirring occasionally, until softened, about 2 minutes. Add garlic and cook 1 minute more. Stir in corn, edamame, zucchini, and tomatoes; cook, stirring occasionally, until vegetables are tender, about 7 minutes.
In the meantime, pat the shrimp dry and season with 1/4 teaspoon salt and 1/4 teaspoon pepper. Spray a large nonstick skillet or grill pan with cooking spray and preheat over medium-high heat. Add shrimp and cook until opaque, 5 to 6 minutes, turning once.
Stir vinegar and basil into the succotash, season with salt and pepper, and serve topped with grilled shrimp.
Per serving: 362 calories, 34g protein, 49g carbohydrate, 5g fat (1g saturated), 9g fiber
Monday, May 21, 2007
Mother's Day a Week Late
 As I mentioned last weekend, my mom had to work, so we Mother's Day-ed her today and I tried to fill the meal with things she liked. I remember growing up that dinner from H.R. Ribsters was a big deal, and I distinctly remember her excitement at making these little "Bubbly Pies," (I think they were from a scifi book) that were essentially little blueberry tarts. I'd also made that goat cheese ice cream a few weeks ago, and planned to serve it with the pie (and as I'd hoped, they were great together!)
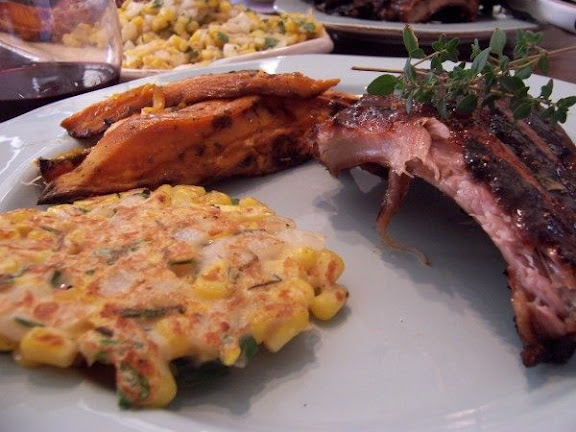
We all decided that the ribs were good, but "different." I think Dave called them "interesting" but he promised me that wasn't a bad thing. He did hit it on the head when he said that he is used to bbq ribs - flavorwise. These had the char from the oven, but the sauce wasn't very bbq-esque. It was very simple, in fact. Honey, cayenne pepper, and fresh thyme. The simple sauce didn't mask the flavor of the ribs, which was really great.
Because we were starving, I probably rushed the corn cakes, as they were a little too floury. I've made them a few times, each previously a great success. I really enjoy how fresh and summery they are, and I find them a perfect side for any bbq/cookout.With the sweet potatoes/yams, it calls for Wegmans basting oil - all that is is olive oil with herbs in it, so feel free to substitute what you like. I'd also start checking them at 35-40 minutes, I think 50 is too long and can make for squishy wedges.
The corn cakes are from The Domestic Goddess' site, and the sweet potatoes are a Wegmans recipe.
I'll save the blueberry pie disaster story for Tuesday. Stay tuned!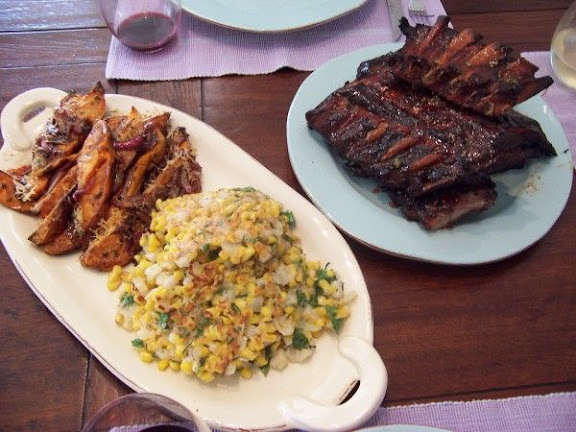
Thyme-Glazed Baby Back Ribs
From: Happy in the Kitchen: The Craft of Cooking, the Art of Eating
By Michel Richard
http://www.amazon.com/Happy-Kitchen-Craft-Cooking-Eating/dp/1579652999/ref=pd_bbs_sr_1/102-6030309-2846555?ie=UTF8&s=books&qid=1176927459&sr=8-1
2 racks baby back ribs (about 2 pounds each)
1/3 cup fine sea salt, plus additional for sprinkling
1 large leek
5 star anise
2 teaspoons chili flakes
2 teaspoons black peppercorns
8 thyme sprigs, plus 2 teaspoons thyme leaves
2 cups 1-ince chunks onion (about ½ large)
2 cups 1-inch carrots (about 4 large)
1 ½ cups honey
1 cup red wine vinegar
Cayenne pepper
Freshly ground black pepper
Cut each rack of ribs crosswise into 2 pieces, and place in a large stockpot. Add enough cold water to just cover, about 4 quarts. Add the salt and bring to a boil over medium-high heat. As the water heats, skim off any foam that rises and place it in a bowl. Once no more foam comes to the surface, strain the contents of the bowl through a fine-mesh strained back into the pot, then discard the scum remaining in the strainer.
Meanwhile, cut off the green portions of the leek (discard or reserve for another use) and the root end. Split the leek lengthwise and rinse under warm water to remove any dirt; set aside. Place the star anise, chili flakes, peppercorns, and 4 of the thyme sprigs on a square of cheesecloth and tie into a bundle.
Once there s no more foam in the stockpot, add the spice bundle, leek onions, carrots, 1 cup of the honey, and the vinegar to the pot. Partially cover the pot and reduce the heat to keep the liquid at just under a simmer; there should only be very light bubbling at the edges of the pot. Cook for 45 minutes, or until the meat is tender but not yet falling from the bones. Remove the pot from the heat and cool the ribs completely in the liquid.
Preheat the oven to 425°F. Line a baking sheet pan with a Silpat or parchment paper.
Remove the meat from the cooking liquid and drain on paper towels. (Discard the liquid.) Scrape away and discard any silverskin remaining on the underside of the ribs. Dry the ribs completely.
Warm the remaining ½ cup honey in the microwave or on the stove until liquefied. Add cayenne pepper to taste. Brush both sides of the ribs with half the honey and sprinkle with the thyme leaves, salt, and black pepper. Place the ribs meaty side up on the prepared baking sheet.
Bake the ribs for about 30 minutes, or until the tops are lightly caramelized and shiny.
Serve a half rack per person, or cut into individual ribs. Place the ribs on a platter, brush with the remaining honey, and garnish with the remaining thyme sprigs.
Serves 4 as a main course or 4 to 6 as an appetizer.
With:
Corn Cakes
c/o The Domestic Goddess
http://www.domesticgoddess.ca/recipes.php?recipe=10056
1⁄2 cup flour
¾ teaspoon kosher salt
½ teaspoon freshly cracked black pepper
1 large egg
1/3 cup milk
2 cups corn kernels
½ Vidalia onion, chopped finely
3 tablespoons chopped fresh Italian parsley
1 tablespoon chopped fresh chives
Pinch or two of crushed red pepper flakes
2 tablespoons vegetable oil (for frying)
In a bowl, combine flour, salt, pepper, egg and milk until just combined. Fold in corn, onion, chives and parsley.
Heat about 1 1⁄2 - 2 tablespoons vegetable oil in large skillet on medium heat. Drop 1⁄4 cups of batter onto skillet (or more if you want bigger cakes). Flatten slightly with spatula and cook until browned, about 4 minutes per side.
Repeat with remaining batter, keeping cooked cakes warm in oven until served. Serve with maple syrup or hot sauce, depending on what they are accompanying.
And:
Roasted Yams
c/o Wegmans Menu Magazine, Holiday 2003
http://www.wegmans.com/greatMeals/recipes/frameset.asp?recipe=4862&url=displayrecipe.asp&direct=false
4 medium yams (about 3 1/4 lbs total), cut in wedges
4 Tbsp Wegmans Basting Oil, divided
1 small (about 1/4 lb) red onion, peeled, halved, thinly sliced
1/4 cup Italian Classics Three Leaf Balsamic Vinegar of Modena
2 Tbsp grated Italian Classics Parmigiano-Reggiano
Preheat oven to 350 degrees.
Place yams in single layer on large baking sheet; toss with 3 Tbsp basting oil to coat. Roast on center rack about 45 min or until tender.
Heat remaining 1 Tbsp basting oil in skillet on medium until oil faintly smokes. Add onion; cook, stirring, about 10 min, until slightly browned and soft. Add vinegar, stirring to loosen browned bits on bottom of pan. Cook 2-3 min to reduce to syrupy consistency.
Remove yams from oven; spoon onion mix evenly over top. Sprinkle with cheese. Roast about 10 min.
Option(s): Garnish with additional cheese, if desired.
See the recipe...
Sunday, May 20, 2007
HHDD 12 - Bring Me Your Caesars!

Send your submission to me at otherpeoplesfoodATgmailDOTcom!
Can't wait to see it! :) See the recipe...
Saturday, May 19, 2007
Sloppy Joe MMMBop
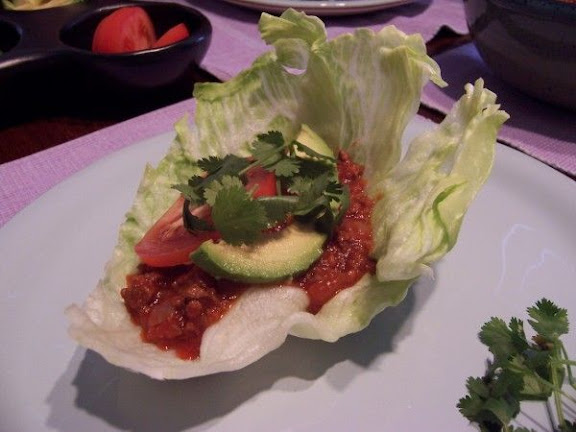 So, we were about to sit down to Sloppy Joes, and MMMBop was going on the Bose. As you can see in the picture, my sloppy joe is a little wonky. I don't know where I got it, but when I first made this recipe a few years ago, we had it in lettuce wraps, rather than buns. (Could have been South Beach Diet inspired, in fact). Dave doesn't care for them this way, so he used buns leftover from last nights burgers.
This particular recipe, found in Everyday Food magazine, suggested making it two different ways - for kids and adults. Kids get smaller buns, grown-ups get cilantro and avocado. (Yay being old!)
Sure, you could easily make Manwich or other brand sloppy joe from a can, but why? This is so easy and tastes great. Me, I like the lettuce... give it a go!
Sloppy Joes
Everyday Food Magazine, September 2005
http://www.marthastewart.com/portal/site/mslo/menuitem.fc77a0dbc44dd1611e3bf410b5900aa0/?vgnextoid=2543a6e806b0f010VgnVCM1000003d370a0aRCRD&autonomy_kw=sloppy%20joe&rsc=ns2006_r3
1 1/4 pounds ground beef chuck
Coarse salt and ground pepper
1 onion, finely chopped
2 garlic cloves, minced
1 tomato puree, (14.5 ounces)
2 tablespoons light-brown sugar
1 tablespoon cider vinegar
1 tablespoon tomato paste
1 teaspoon Worcestershire sauce
4 hamburger rolls, cut into mini buns
1 tablespoon chopped fresh cilantro
1 tablespoon pickled jalapeno chiles
2 hoagie rolls, split in half
1/2 ripe avocado, thinly sliced
For the Kids (Serves 2) In a large skillet over medium-high heat, cook beef, breaking apart pieces with a wooden spoon, until lightly browned, 5 to 6 minutes. Season with 1 1/2 teaspoons salt and 1/4 teaspoon pepper. Add onion and garlic; cook, stirring, until translucent, about 5 minutes.
Add puréed tomatoes, sugar, vinegar, tomato paste, Worcestershire, and 1 1/2 cups water. Reduce heat to medium-low; simmer until thickened, about 20 minutes. Reserve half the beef mixture for the adults. Divide remaining evenly among the mini buns (2 per serving).
For the Adults (Serves 2) Stir cilantro and jalapenos into the reserved beef mixture. Dividing evenly, spoon over bottom halves of rolls; top with avocado slices.
Friday, May 18, 2007
Lamburger Most Awesome
If we hadn't eloped last August, today would have been our Wedding Day (insert cartoon bird sigh). I have a hard time imagining how it would have been, really, because I'm so thrilled with how we did it. (Note to Everyone: Elope to Vegas - its AWESOME!)
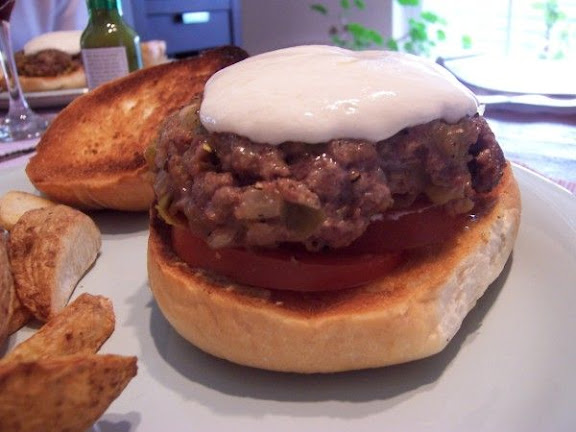
You know what else is awesome? And also wholesome and delicious? Burgers, duh! We'd gotten some ground lamb from the farmer's market last weekend, and it just so happened that I'd tabbed the Lamburger recipe in Michel Richard's book (ok, I have an addiction to his book, so what?). Coincidentally, it happened to be our almost-wedding-day, and considering that my diet mainly consisted of cheeseburgers when we visited St. Thomas (we were going to destination wed there), the burgers seemed fitting.
I will say that I only had 1 lb of meat, and it called for 1.5 lbs, so they were a bit un-firm. This did not hurt their flavor however, as this ended up being another night I wish I had spare stomachs. If you try them, make sure you have enough lamb, or else you might lose the burgers through the grill.
So what if I already submitted to Freya and Paul's Big Burger Ballyhoo... they said I could submit again, so I'm gonna! I like the photo with this one way more than the last one... I was still pretty new back then (back then equals a month, but still, that's a lot of practice taking pictures!)
Lamburger
From: Happy in the Kitchen: The Craft of Cooking, the Art of Eating
By Michel Richard
http://www.amazon.com/Happy-Kitchen-Craft-Cooking-Eating/dp/1579652999/ref=pd_bbs_sr_1/102-6030309-2846555?ie=UTF8&s=books&qid=1176927459&sr=8-1
¼ cup extra virgin olive oil
1 medium white onion, cut into small dice (about ¾ cup)
4 garlic cloves, 2 peeled, 2 left unpeeled and halved
1 teaspoon ground cumin
One 7-ounce can peeled whole Anaheim chiles, rinsed, drained, and cut into small dice
1 teaspoon granulated sugar
Fine sea salt and freshly ground black pepper
1 ½ pounds boneless lamb loin or other lean cut
Cayenne pepper
4 hamburger buns, split
4 slices mozzarella or about ½ cup crumbled goat cheese
4 large tomato slices
Mustard
Tabasco green pepper sauce
In a medium nonstick sauté pan, heat 2 tablespoons of the olive oil over medium-high heat. Add the onion, reduce the heat, and sauté gently for about 20 minutes, or until tender and slightly caramelized. Using a rasp grater, grate the peeled garlic directly into the pan (or mince the garlic and add it.) Add the cumin and sauté for another 3 to 4 minutes. Add the diced chiles and cook for about 3 minutes. Stir in the sugar and salt and pepper to taste. Remove from the heat, spread the mixture on a plate, and refrigerate while you prepare the meat.
Cut away and discard any fat for sinew from the lamb. With a very sharp knife, chop the meat until slightly coarser than ground meat. Place in a bowl, and season with salt.
Once the onion mixture has cooled, add it to the meat. Season with 2 pinches of cayenne and stir together. To test the mixture for seasoning, you can place a small spoonful on a plate and cook in the microwave; taste and adjust the seasoning as necessary. Divide the meat into quarters and shape into burgers. (The burgers can be refrigerated for a few hours before cooking.)
Preheat the broiler. Place the buns cut side up on a baking sheet, place under the broiler, and toast until golden brown. Set aside, and reduce the oven temperature to 325°F.
Remove the burgers from the refrigerator. Season on both sides with salt and pepper. In a large pan or skillet, combine the remaining 2 tablespoons olive oil and the garlic halves and heat over medium-high heat. The garlic will flavor the oil; do not let it burn. Place the burgers in the pan and cook, turning once, or about 1 to 1 ½ minutes per side, adjusting the heat as necessary, until golden brown on both sides.
Transfer the burgers to a baking sheet and then into the oven for about 3 to 4 minutes. Place the cheese on top and cook for 1 to 2 minutes, or until the burgers are cooked as desired and the cheese is melted.
Place the burgers on the toasted buns and top with the sliced tomatoes. Serve with mustard and Tabasco green pepper sauce.
Serves 4 as a main course.
Thursday, May 17, 2007
20 Days Until My CSA!!!
 I'm sure some or most of you know what a CSA is, but I'll tell you anyway! CSA stands for Community Supported Agriculture. Imagine your monthly magazine subscriptions were weekly, and... imagine that they were made of vegetables! Local, farm-raised, often organic (or close), friendly, happy vegetables. Mine starts first week in June and runs through mid-September. The trick with it is that you pay for your share of vegetables long before you get them. Paying early enables the farm to go out and get the seeds and supplies they need get going. You are investing in your summer's share of veggies early.
Once the CSA starts, you have a few options. You can pick your share up at the farm, you can pick it up at a drop-off site, or you can have your share delivered to your home. The choices tend to depend more on the CSA itself, but considering I had about half a dozen to choose from, you can find a CSA that works for you. You can also get fruit shares or egg shares or meat shares... but we started small with the mini-share of vegetables. If this little experiment works out, I'm hopeful that we'll go bigger next year.
Aside from the charm of knowing exactly where my veggies are coming from, and helping local farmers do what they enjoy (I hope!), what I really like about this CSA stuff is that we'll get to learn how to eat more seasonally. I know, I know, summer is its own season.... but I paid more attention last year, and actually noticed when fruits and veg started and vanished from my farmer's market.. and something about that fascinated me. Nah, I won't go canning or freezing for the winter or anything... but I think it will be more than fun to watch the steady change in my deliveries as the weeks pass, and I look forward to learning to cook some of the vegetables that I've never before handled.
If this sounds like fun to you, too, check out LocalHarvest.com to find a CSA near you!
And this past weekend, I finally planted all my plants - tons of peppers, a couple of tomato plants, tasty herbs - and I have more seedlings still making their way (tomatillos, dark opal purple basil, cilantro and giant parsley). I've since weathered the seedlings (they were still inside when I took the picture above) so they're outside with the big boys now.
I am, sadly, really really bad with plants. I love them, I do, but the remembering to water them before they shrivel up part... boy, do I stink. Last summer went a little better, and I'm more invested in the plants this go-round, and my darling husband loves to nag me about them ("Have you watered the plants? When was the last time you watered those? Are you trying to kill them???") (Ahhh, looooove), so I'm hopeful that in a few weeks, I'll have the beginnings of some peppers, tomatoes, and tomatillos, plus an array of tasty herbs.
(I won't get into it, but I'm also really excited about the seeds from Seed Savers - I've linked you to their About Us page, so go check them out.)
Wednesday, May 16, 2007
Creamy Farfalle with Cremini, Asparagus and Walnuts
 This is a dinner that I never ever ever would have considered making before I met my husband. Ever. I cannot stress this enough. Mushrooms? Slimy. Asparagus? Gross! I don't know how he did it, but he managed to get me to try both again, and turns out - they're both tasty! Especially in this! (What isn't yummy with mascarpone, really?)
I'll also say that the very first time I made this recipe, I left out the walnuts. Why? I don't like them. (Ha!) I tried it again, and because of the husband, I added the nuts... and... as you can probably guess.. I liked it... I still don't really like walnuts, but I do appreciate them in this meal.
I wasn't sure I'd be making any pasta this week, so I'm glad I managed to fit it in, so I can participate in my third Presto Pasta Night, hosted by the lovely Ruth, of Once Upon a Feast! (Thanks, Ruth!) The recipe makes a lot, so if you don't have a lot of mouths to feed, plan on leftovers. Most of the sauce soaks into the pasta, so it won't look as good reheated, but it will taste juuuuust fiiiiiiine. :)
Creamy Farfalle with Cremini, Asparagus and Walnuts
By Giada de Laurentiis
http://www.foodnetwork.com/food/recipes/recipe/0,1977,FOOD_9936_29662,00.html
Salt
1 pound farfalle pasta
3 tablespoons butter
1 pound cremini mushrooms, thickly sliced
1 pound thin asparagus, trimmed, cut crosswise into 1-inch pieces
1 cup mascarpone cheese
Pinch freshly grated nutmeg
3/4 cup walnuts, toasted
1/4 cup freshly grated Parmesan
Bring a large pot of salted water to a boil. Add the farfalle and cook until al dente, stirring occasionally, about 12 minutes. Drain, reserving 1 cup of pasta water.
Meanwhile, melt the butter in a heavy large skillet over medium heat. Add the mushrooms and sauté until tender and most of the juices have evaporated, about 5 minutes. Add the asparagus and sauté until the asparagus is crisp-tender, about 5 minutes. Add the farfalle. Stir in the mascarpone and nutmeg and toss until the cheese coats the pasta, adding the reserved cooking liquid 1/4 cup at a time to moisten. Stir in 1/2 cup of walnuts. Season the pasta, to taste, with salt and pepper. Mound the pasta in a large bowl. Sprinkle with the Parmesan and remaining 1/4 cup of walnuts. Serve.
See the recipe...
Monday, May 14, 2007
Ice Cream Fight!!!
 Since we had already-made frozen bolognese for dinner, and I planned it that way, I saved the gelato and ice cream I made over the weekend for tonight's post. Yay ice cream!
I'd gotten David Lebovitz's The Perfect Scoop early last week and I couldn't wait to stuff my ice cream attachment thingamabob into my too-small freezer. I made the bases Friday and Saturday night, and whirred them Saturday and Sunday mornings, respectively.
We had 5 (sigh, only 5) chocolate chip cookies left from Thursday (relax, I took half to work Friday), so I made two ice cream sandwiches with the gelato. Next time, I'll plan a little better and I'll skip sharing with the co-workers! (sorry!) :)
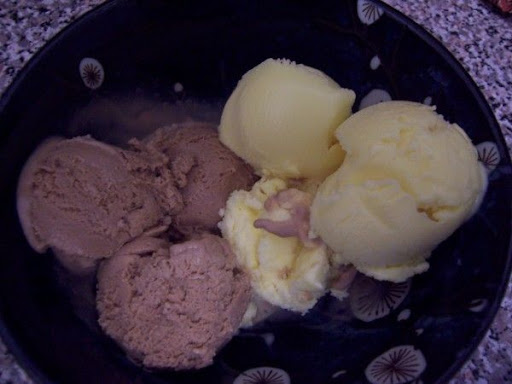
Gianduja translated to me, just based on ingredients, into chocolate hazelnut. (Which is my fav. flavor from the gelato bar at Whole Foods), so it was an easy first choice. Next time, I'll follow David's suggestion and I'll mix in some chocolate swirls. I might also work hazelnuts into the mix. Yanno, just get crazy.
I know what you must be thinking next - goat cheese? Really? And I can happily tell you, its good. It is! It's like a tangy cheesecake ice cream. It freezes a little more solidly, so thaw it a bit before you try to dig into it. I'm going to try to keep it around to this weekend, when I make my mom a blueberry pie... I think the pie and the goat cheese ice cream could be friends, don't you?
Gianduja Gelato
From: The Perfect Scoop: Ice Creams, Sorbets, Granitas, and Sweet Accompaniments
By David Lebovitz
http://www.amazon.com/Perfect-Scoop-Sorbets-Granitas-Accompaniments/dp/1580088082/ref=pd_bbs_sr_1/102-3962652-3548104?ie=UTF8&s=books&qid=1179016241&sr=8-1
1 ½ cups (185 g) hazelnuts, toasted
1 cup (250 ml) whole milk
2 cups (500 ml) heavy cream
¾ (150 g) sugar
¼ teaspoon coarse salt
4 ounces (115 g) milk chocolate, finely chopped
5 large egg yolk
1/8 teaspoon vanilla extract
Rub the hazelnuts in a kitchen towel to remove as much of the papery skins as possible, then finely chop them in a food processor or blender.
Warm the milk with 1 cup (250ml) of the cream, sugar and salt in a saucepan. Once warm, remove from the heat and add the chopped hazelnuts. Cover and let steep at room temperature for 1 hour.
Put the milk chocolate pieces in a large bowl. Heat the remaining 1 cup (250ml) cream in a medium sauce pan until it just begins to boil. Pour it over the milk chocolate pieces and stir until the chocolate is completely melted and smooth. Set a mesh strainer over the top.
Pour the hazelnut infused milk through a strainer into a medium saucepan, squeezing the nuts firmly with your hands to extract as much of the flavorful liquid as possible. Discard the hazelnuts.
Rewarm the hazelnut-infused mixture. In a separate medium bowl, whisk together the egg yolks. Slowly pour the warm hazelnut mixture into the egg yolks, whisking constantly, then scrape the warmed egg yolks back into the saucepan.
Stir the mixture constantly over a medium heat with a heatproof spatula, scraping the bottom as you stir, until the mixture thickens and coats the spatula. Pour the custard through a strainer and stir it into the milk chocolate mixture. Add the vanilla and stir until cool over an ice bath.
Chill the mixture thoroughly in a refrigerator, then freeze it in your ice cream maker according to the manufacturer’s instructions.
And:
Goat Cheese Ice Cream
From: The Perfect Scoop: Ice Creams, Sorbets, Granitas, and Sweet Accompaniments
By David Lebovitz
http://www.amazon.com/Perfect-Scoop-Sorbets-Granitas-Accompaniments/dp/1580088082/ref=pd_bbs_sr_1/102-3962652-3548104?ie=UTF8&s=books&qid=1179016241&sr=8-1
1 ½ cups (375 ml) whole milk
2/3 cup (130 g) sugar
8 ounces (230 g) fresh goat cheese
6 egg yolks
Warm the milk and sugar in a medium saucepan. While the milk is warming, crumble the goat cheese into a large bowl and set a mesh strainer on top.
In a separate medium bowl, whisk together the egg yolks. Slowly pour the warm mixture into the egg yolks, whisking constantly, then scrape the warmed egg yolks back into the saucepan.
Stir the mixture constantly over medium heat with a heatproof spatula, scraping the bottom as you stir, until the mixture thickens and coats the spatula. Pour the custard through the strainer and stir it into the goat cheese. Keep stirring until the cheese is melted, then stir until cool over an ice bath.
Chill the mixture thoroughly in the refrigerator, then freeze it in your ice cream maker according to the manufacturer’s instructions.
Wine Inspired Tastiness
 I'll start by wishing everyone a lovely Mother's Day! My mom has to work today (she's an ER nurse), so we're Mothering her up with dinner next weekend. Dave's mom is in AZ, but we made sure to call and chat with her lots. :)
Now, on to the food!
My husband picked out this Barolo. He then asked me to make a "meat with meaty meat sauce" dinner to go with said wine. He nagged at me for weeks until I caved.

I'd remembered seeing a yummy looking steak recipe in Michel Richard's Happy in the Kitchen, so I sought it out, got Dave's approval and went forth to gather ingredients. We went to Whole Foods, because I figured they'd have the enoki mushrooms (I'd never heard of them before), and they did not disappoint.
This might have been the best dinner I've ever made. Best. Ever. Getting an enoki, some potatoes, and a piece of steak on the fork all at once was heavenly. Michel Richard is a genius.
I reduced the Syrah sauce Saturday night, not because I had to, but because I like to break up as many steps as I can get away with. We'd had a late lunch at WF Saturday, so we had wine and cheese for dinner... and because I wasn't cooking, I thought "why not make that reducing sauce?" If you taste it after the first reduction, and you don't like it, don't worry. I think its supposed to taste like junk at that point. It gets WAY BETTER, I promise.
The potatoes were easy-peasy, and the porcini gave me an excuse to use my snazzy blender. I think I had more mushrooms than I was supposed to (I got the 3 ounces, but they ended up being more than 3/4 cup), so the sauce was more like a paste. Because it was pasty, it left the potatoes looking a little weird, but still good to eat.
The batter-fried enoki were dreamy. Dreamy. DO NOT leave them out, because you'll miss them. In fact, I'd even recommend making extra. Dave asked that I make them "just because," as a snack. Ha!
I'll end with the wine. It was delicious. His nagging was well-founded. The wine had a great mouth-feel, was full-bodied, was just spicy enough without being too agressive. (I don't pretend to know what I'm talking about with wine, so thats the best you get!)
Don't do what we did and drink it all in less than an hour. :)
Filet Mignon with Simple Syrah Sauce
From: Happy in the Kitchen: The Craft of Cooking, the Art of Eating
By Michel Richard
http://www.amazon.com/Happy-Kitchen-Craft-Cooking-Eating/dp/1579652999/ref=pd_bbs_sr_1/102-6030309-2846555?ie=UTF8&s=books&qid=1176927459&sr=8-1
Syrah Sauce
2 tablespoons (1 ounce) unsalted butter
1 cup finely chopped shallots
1 cup diced (1/4-inch) yellow onion (about 1 medium)
½ cup diced (1/4-inch) beets (about ½ medium)
2 garlic cloves, grated on a rasp or finely chopped
A sprig of thyme
½ cup diced (1/4 inch) Yukon Gold potato, (1 medium)
1 bottle (750 ml) Syrah
1 cup Reduced Chicken Stock (recipe follows)
1 tablespoon granulated sugar
Fine sea salt and freshly ground black pepper
Potatoes
3 ½ cups diced (1/2-inch) Yukon Gold potatoes (1/2 to 3 pounds potatoes)
¼ cup plus 2 tablespoons extra virgin olive oil
6 tablespoons (3 ounces) unsalted butter
4 unpeeled garlic cloves
Fleur de sel and freshly ground black pepper
Porcini Sauce
3 ounces porcini mushrooms (about 5), fresh or frozen
2 tablespoons extra virgin olive oil
1 garlic clove, thinly sliced
Fine sea salt
¾ cup Reduced Chicken Stock
1 ½ teaspoons unsalted butter
Four 8-ounce filets mignons
Fleur de sel
Freshly ground black pepper
1 to 2 tablespoons extra virgin olive oil
1 to 2 tablespoons (1/2 to 1 ounce) unsalted butter
½ recipe Enoki Tempura (recipe follows)
To prepare the Syrah sauce: In a medium sauté pan, melt 1 tablespoon of the butter over medium heat. Add the shallots, onions, beets, garlic and thyme and sauté for 5 minutes, stirring occasionally. Add the potato and sauté for another 5 minutes, stirring occasionally. Pour in the wine and chicken stock and bring to a boil. Reduce the heat and simmer for 45 minutes to 1 hour, until reduced by half.
Meanwhile, prepare the potatoes. Fill a large bowl with water. Swish the potato cubes in the water to remove some of the excess starch and to keep them from discoloring. Drain and dry thoroughly with kitchen towels.
Place a colander over a large bowl. In one large or two medium skillets that will hold the potatoes in a single layer, heat ¼ cup of the oil and 4 tablespoons of the butter over medium-high heat. Add the potatoes and garlic, adjusting the heat as necessary to brown but not burn the potatoes. Once the potatoes are lightly browned on the bottom, continue to cook, turning the potatoes occasionally, to brown them on all sides, about 10 to 12 minutes; be careful not to move the potatoes too often, or they may break up.
Drain the potatoes in the colander. Remove the garlic and discard. (The potatoes can hold at room temperature for a few hours.)
When the Syrah sauce has reduced by half, strain it through a fine-mesh strainer into a small pot. Add the sugar and season to taste with the salt and pepper. Place the pot over the heat and to a boil. Reduce the heat and simmer for 30 to 40 minutes, stirring occasionally, or until the liquid has reduced to ½ cup. Keep in warm place.
Meanwhile, position a rack in the center of the oven. Preheat the oven to 300°F.
To prepare the porcini sauce: If the porcini are frozen, let them thaw, then trim as necessary. Cut the mushrooms in half. You should have about ¾ cup. In a medium sauté pan, heat the olive oil over medium heat. Add the porcini and garlic, season with salt, and sauté for about 4 minutes, or until the porcini are browned. Drain off all of the fat and transfer the porcini to a small saucepan. Add the chicken stock, bring to a boil, and boil for a minute.
Transfer the sauce to a blender, add the butter, and puree until smooth. Return to the saucepan and keep in a warm place.
Season the filets mignons generously on all sides with fleur de sel and pepper. In a large skillet, heat one tablespoon each of the oil and butter over medium-high heat. Add the meat and brown on all sides, 3 to 4 minutes.
Transfer the filets to a baking dish or place in the oven, and cook for 10 to 12 minutes for medium-rare. The pan dripping can be added to the Syrah sauce.
While the filets are in the oven, warm the porcini sauce and Syrah sauce, then stir the remaining 1 tablespoon butter into the Syrah sauce.
To re-crisp the potatoes: In a large skillet, heat the remaining 2 tablespoons olive oil and 2 tablespoons butter over medium-high heat. Add the potatoes (set the colander aside), and cook, stirring occasionally for 3 to 4 minutes, or until hot and crisp. Wipe out the colander and drain the potatoes. Place in a large bowl and season with fleur de sel and pepper. Add the porcini sauce and toss well. Keep in a warm spot.
Check the beef: If you would like the crust very crispy, meat can be quickly sautéed in 1 tablespoon olive oil and 1 tablespoon butter in a skillet.
To serve, divide the porcini potatoes among 4 serving plates. Top each with a filets, and arrange the enoki tempura on the top. Spoon about 2 tablespoons of the Syrah sauce around each.
Makes 4 servings.
Reduced Chicken Stock
From: Happy in the Kitchen: The Craft of Cooking, the Art of Eating
By Michel Richard
http://www.amazon.com/Happy-Kitchen-Craft-Cooking-Eating/dp/1579652999/ref=pd_bbs_sr_1/102-6030309-2846555?ie=UTF8&s=books&qid=1176927459&sr=8-1
8 cups chicken stock
Place the stock in a saucepan and bring to a simmer, skimming off any foam that rises to the top. Reduce the heat slightly and simmer the stock until it has reduced by half. Let the stock cool, preferably in an ice bath, then refrigerate in a covered container for up to 2 days, or freeze for longer storage.
Makes 4 cups.
Enoki Tempura
From: Happy in the Kitchen: The Craft of Cooking, the Art of Eating
By Michel Richard
http://www.amazon.com/Happy-Kitchen-Craft-Cooking-Eating/dp/1579652999/ref=pd_bbs_sr_1/102-6030309-2846555?ie=UTF8&s=books&qid=1176927459&sr=8-1
Canola or peanut oil for deep-frying
½ cup all-purpose flour
¼ teaspoon baking soda
¼ cup cornstarch
¾ cup sparkling water
4 ounces enoki mushrooms
Fleur de del
Preheat the oven to 250F. Place a cooling rack on a backing sheet and place in the oven. Heat the oil to 350F in a deep fryer or large, heavy pot.
Meanwhile, in a large bowl, whisk together the flour, baking soda, cornstarch, and sparkling water. Cut off the root end of the mushrooms. Wish your hands, carefully separate the enoki into smaller sections or slivers; it is fine to have varying sizes.
Drop the enoki, in batches, into the better; life out and let any excess batter drip off, then carefully place in the hot oil; do not overcrowd the oil. Fry until the edges are lightly golden, then transfer to paper towels to drain. Sprinkle with fleur de sel. The tempura is really best eaten immediately, but the first batches can be held on the rack in the oven until all the mushrooms are fried; prop the oven door slightly open with a wooden spoon to let any steam escape.
Servers 4 as an appetizer, 8 as a garnish on a salad.
Friday, May 11, 2007
Parmesan and Polenta Chicken
 Chicken dinner number three did not disappoint. The combination of the spinach, basil, corn, and dressing... it was like healthy freshness in your mouth. I'm a big fan of slicing the chicken breasts in half horizontally, cuts the cooking time in half and it makes it easier to control my portions.
The polenta gave the chicken a really nice crunch. As I was prepping, I realized I was out of lemons, so I substituted limes.
I don't really know what else to say, other than, go out and make this dinner. Its perfect for springtime, and you can feel good about eating it. Brooke loved the recipe too, and she totally beat me to it. If two brand-new food bloggers accidentally make it in the same week and both love it, its got to mean something. :)
Parmesan and Polenta Chicken
Donna Hay Magazine, Issue 31
2 cobs corn, husks and silks removed
olive oil for brushing
2 chicken breasts (7 oz each)
flour for dusting
2 eggs, lightly whisked
½ cup polenta
1/3 cup finely grated parmesan cheese
2 tablespoons vegetable oil
3 ½ oz baby spinach leaves
½ basil leaves
grated parmesan cheese, extra to serve
dressing
2 teaspoons Dijon mustard
2 tablespoons lemon juice
1 clove garlic, crushed
1 tablespoon olive oil
2 teaspoons honey
sea salt and cracked black pepper
To make the dressing, place the mustard, lemon juice, garlic, oil, honey, salt and pepper in a bowl and whisk to combine. Set aside.
Preheat the oven to 425°F. Brush the corn with oil, place in a baking dish and roast for 25 minutes or until golden. Slice the kernels from the corn and set aside.
Slice the chicken in half horizontally, dust with the flour, dip into the egg and press into the combined polenta and parmesan to coat. Heat the oil in a non-stick frying pan over medium heat and cook the chicken for 2-3 minutes each side or until golden and cooked through. Arrange the chicken, corn spinach and basil on plates and spoon over the dressing and grated parmesan to serve.
Serves 4.
Thursday, May 10, 2007
Olivia’s Old-Fashioned Chocolate Chip Cookies
 Cool 15 minutes before eating? What? Like that happened.
I blame Peabody for this. (And she's posted more from the book since then.) I'm hooked on this cookbook. Cookies seemed like the easiest starting point, with the end goal being a yeast baby bread. Wish me luck.
But back to the cookies. Lovely. I don't know how big the cookies would be if I'd really only made 16 from the dough... we probably ended up with around 30. It was hard to wait an hour for the dough to chill in the fridge, but worth it. I also only baked the second and third batch 12 minutes each. The first set seemed too crunchy, almost dry. (gasp!) 12 minutes seemed to do the trick.
I wish we had some ice cream lounging around, so I could make sammiches with the extra cookies. (Not that they'll last all that long anyhow.)
Olivia’s Old-Fashioned Chocolate Chip Cookies
From Leslie Mackie’s Macrina Bakery and Café Cookbook
“This recipe, Macrina’s version on the traditional Toll House classic, makes the best chocolate chip cookies I’ve ever tasted. The recipe is actually named after two special Olivias: my daughter and the grandmother of our pastry chef, Karra Wise.”
Makes 16 cookies.
2 ¼ cups unbleached all-purpose flour
1 teaspoon baking soda
1 teaspoon salt
3 cups semi-sweet chocolate chips
8 tablespoons (1 stick) unsalted butter, at room temperature
½ cup vegetable shortening, at room temperature
¾ cup granulated sugar
¾ cup light brown sugar
2 eggs
1 teaspoon pure vanilla extract
Combine flour, baking soda, and salt in a medium bowl. Add chocolate chips and mix well with a spoon. Set aside.
Combine butter, shortening, granulated sugar and light brown sugar in the bowl of your stand mixer. Using the paddle attachment, mix on medium speed for about 5 minutes, until the mixture is smooth and pale in color. Add 1 egg and mix until incorporated. Scrape down the sides of the bowl, then add the remaining egg and vanilla extract. Continue mixing until incorporated, about 1 minute. Remove the bowl from the mixer and scrape down the sides of the bowl again.
Using a rubber spatula, fold half of the dry ingredients into the dough. After the first batch is fully incorporated, fold in the rest of the dry ingredients and continue folding until all of the flour has been absorbed. Scrape down the sides of the bowl and cover it with plastic wrap. Chill in the refrigerator for at least 1 hour. At this point the dough can be formed into cookies or stored in the refrigerator for up to 4 days.
Preheat oven to 350°F. Line two rimmed baking sheets with parchment paper.
Scoop dough out of the bowl (I like to use a medium ice cream scoop) and roll the dough into 2-inch balls. Place 8 balls on each baking sheet, leaving 3 inches between each ball. Flatten the balls with the palm of your hand to about 1 inch thick. Place 1 sheet of cookies in the refrigerator while baking the other sheet.
Bake cookies, 1 sheet at a time, on center rack of oven for 15 to 18 minutes each. To help the cookies bake evenly, rotate the baking sheet every 4 minutes or so. The finished cookies will be golden brown around the edges, and still light in the center. Let cool on the baking sheet for 15 minutes. The cooled cookies can be stored in an airtight container for up to 3 days.
Chicken & Asparagus with Melted Gruyere
 If my stomach were bigger, I would have had seconds. (I think I just had big firsts.) As it was, I made sure to eat up every last sauced piece of rice. I might have even licked the plate. (but I didn't, I promise.)
There wasn't much to tonight's dinner. Nothing fancy, but altogether perfect. Dave randomly picked out a wonderful Iron Horse Chardonnay, and upon reading its tasting notes, it was the most perfect wine we could have had in and with our meal.
I will confess, I tasted the sauce before I added everything back into the pan, and I wasn't impressed with it. Something magical happened when I put the asparagus and chicken back in, because dinner was awesome. (I cannot stress this enough.)
Even better, because its from Eating Well Magazine, its even healthy! Rock on!
Chicken & Asparagus with Melted Gruyere
Eating Well Magazine, June 2007
http://www.eatingwell.com/recipes/chicken_asparagus_gruyere.html
8 ounces asparagus, trimmed and cut into 1-inch pieces
2/3 C reduced-sodium chicken broth
2 Tsp.s plus ¼ C all-purpose flour, divided
4 boneless, skinless chicken breasts (1-1 ¼ pounds), trimmed
¼ Tsp. salt
½ Tsp. freshly ground pepper
1 Tbsp. canola oil
1 shallot, thinly sliced
½ C white wine
1/3 C reduced-fat sour cream
1 Tbsp. chopped fresh tarragon
2 Tsp.s lemon juice
2/3 C shredded Gruyère cheese
Place a steamer basket in a large saucepan, add 1 inch of water and bring to a boil. Add asparagus; cover and steam for 3 minutes. Uncover, remove from the heat and set aside.
Whisk broth and 2 teaspoons flour in a small bowl until smooth. Set aside.
Place the remaining 1/4 cup flour in a shallow dish. Sprinkle chicken with salt and pepper and dredge both sides in the flour, shaking off any excess.
Heat oil in a large skillet over medium heat. Add the chicken and cook until golden brown, 3 to 4 minutes per side, adjusting heat as needed to prevent scorching. Transfer to a plate and cover to keep warm.
Add shallot, wine and the reserved broth mixture to the pan; cook over medium heat, stirring, until thickened, about 2 minutes. Reduce heat to medium-low; stir in sour cream, tarragon, lemon juice and the reserved asparagus until combined. Return the chicken to the pan and turn to coat with the sauce. Sprinkle cheese on top of each piece of chicken, cover and continue cooking until the cheese is melted, about 2 minutes.
Wednesday, May 9, 2007
Sticky Chile Chicken
 Last week, for research purposes, I went out and got Donna Hay Magazine Issue #31.
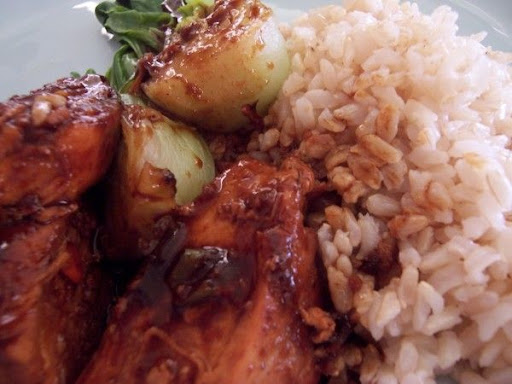
Tonight was the first dinner from the magazine (tune in Friday night for the second) and I have to say, YUM! Her recipes are straight forward, aren't ingredient heavy, and there are tons of photos. Love it! I will certainly look for it again at Borders.
I probably didn't let the sauce simmer long enough at the end, because it wasn't as sticky as it looked in the magazine photo. I will say that it was super spicy - but not in an evil way. The recipe called for "small red chiles," so I picked up some small red Thai chiles from Wegmans. I also used a serrano chile I had leftover from the weekend. Spicy that makes your nose run, but not so spicy you cry. Make sense?
I did cheat a little. I made the brown rice last night. After work and the gym, I really don't want to wait while my rice cooks for 45 minutes. I made enough for two dinners, so we'll have the rest tomorrow.
Enjoy!
Sticky Chile Chicken
Donna Hay Magazine, Issue 31
4 chicken breasts (7 oz each)
¼ cup hoisin sauce
¼ cup soy sauce
2 cloves garlic, crushed
2 small red chiles, chopped
2 teaspoons brown sugar
1 tablespoon vegetable oil
1/3 cup water
steamed rice and Asian greens to serve
Place the chicken, hoisin sauce, soy, garlic, chili and sugar in a bowl and toss to coat. Set aside to marinate for 10 minutes.
Heat a large non-stick frying pan over medium-high heat. Add the oil and chicken, reserving the marinade, and cook for 5-6 minutes each side or until cooked through. Remove from the frying pan and keep warm. Add the marinade and water to the frying pan and cook, over medium heat, for 2-3 minutes or until the sauce is thick and syrupy. Slice the chicken, spoon over the sauce and serve with steamed rice and Asian greens.
Serves 4.
Sunday, May 6, 2007
Pay de Lima (Lime Pie)
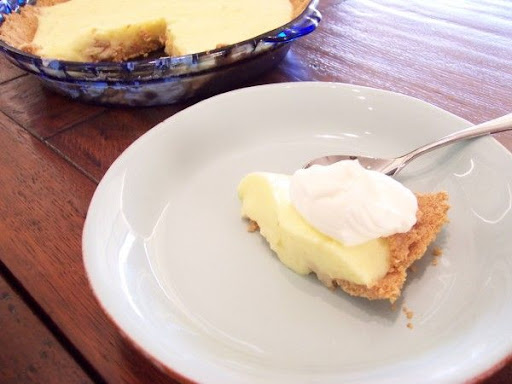
Pay de Lima (Lime Pie)
From Dona Tomas: Discovering Authentic Mexican Cooking, by Thomas Schnetz and Dona Savitsky
Graham Cracker Crust:
1 1/3 cups graham cracker crumbs (about 1 sleeve of crackers)
1 tablespoon granulated sugar
5 tablespoons unsalted butter, melted
Filling:
4 eggs
1 ½ cups granulated sugar
1 teaspoon lime zest
¾ cup freshly squeezed lime juice (from 8 to 9 limes)
½ cup unsalted butter, at room temperature, diced
To prepare crust, combine the cracker crumbs, sugar, and butter in a bowl and mix until they come together. Using your fingers, press the crumbs evenly into the bottom and sides of a 9-inch pie pan. The crust should be about ¼ inch thick all the way around.
To prepare the filling, bring a pot of water to a boil. Combine the eggs, sugar, lime zest, and lime juice in a stainless steel bowl. Place the bowl over the boiling water and whisk constantly for 15 minutes, until the mixture doubles in size, turns frothy and opaque, and forms ribbon-like folds off the end of he whisk. Gradually add the butter and whisk until completely melted.
Pour the batter into the crust and refrigerate for at least 6 hours before slicing and serving. Any leftovers can be covered and refrigerated for up to 3 days.
Serves 6.
Seis de Mayo
 Because May 5th is Grandpa Day at my house, we celebrate Cinco de Mayo on the 6th instead. I asked Dave to pick something else out of the Dona Tomas book, and I even tried the other version of rice, and I made beans from the book. (Pie is coming later this evening).
Again, this is a somewhat time-consuming meal, but also well worth it. I'm coming to decide that this might be my favorite book of the moment (I do have an un-read stack of them, though). So, either go out and get it, or enter HHDD #12 for a chance to win your very own!
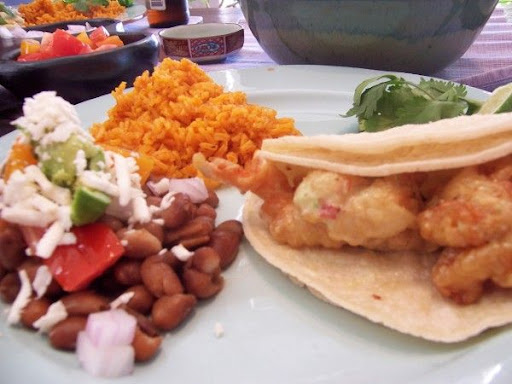
We'll have the leftovers tomorrow night for dinner, but I couldn't help but think that this would have been the perfect meal for company. I was able to get most of the prep done before noon (I've been having trouble sleeping past 7 AM; its made me exceedingly productive on weekends!), and because there were such fun toppings for the beans, it made for a really pretty table. Enjoy!
Note: The achiote paste was a really tricky thing for me to find. Don't do what I did and pop into your local chain grocery and expect to find it (unless your shop is cool like that). Skip right to the International Food Store, and go to their spices section. Took me two days to find it, and I was so excited to actually see it in real life, I bought three. :) Also worth noting, you could make it yourself, from allrecipes.com, but you'd still need strange ingredients.
Note: 5/7 - If you know you're going to have leftovers, try to reserve some aioli for the future meal. I reheated the shrimp in the oven, to try to maintain some crunchiness, and we ended up spooning the aioli onto each taco as we went. Also, the shrimp/lime/cilantro party is really great without the tortilla.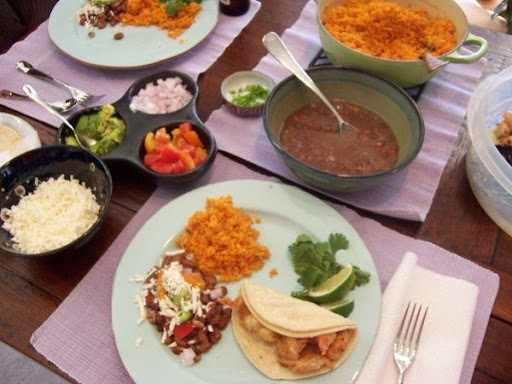
From Dona Tomas: Discovering Authentic Mexican Cooking, by Thomas Schnetz and Dona Savitsky
Achiote Marinade:
Makes ¾ cup (enough for 3 batches of rice)
2 ounces achiote paste
½ cup freshly squeezed orange juice (or ¼ cup orange juice and ¼ cup lime juice)
2 tablespoons water
¼ teaspoon salt
¼ teaspoon ground cumin
¼ teaspoon freshly ground white pepper
1 pinch allspice
1 clove garlic, chopped
Rice:
2 tablespoons canola oil
½ white onion, cut into ¼-inch dice
1 ½ cups medium- or long-grain white rice
2 ¾ cups water
2 to 3 teaspoons kosher salt
To prepare the marinade, combine all the ingredients in a blender and blend until well mixed. The marinade can be covered and refrigerated for up to 2 weeks, just be certain to remix with a whisk before using.
Place a saucepan over high heat and add the oil. When the oil is hot, add the onion, decrease the heat to medium, and sauté for 3 to 5 minutes, until translucent. Add the rice and continue to sauté for 5 to 7 minutes, until the grains are well coated with oil and begin to slightly brown.
Add the water, salt and ¼ cup of the marinade and increase the heat to high. Bring to a boil, then decrease the heat to medium. Cover and gently simmer for 30 to 40 minutes, until all the liquid is absorbed and the rice is fork tender. Fluff the rice with a fork before serving.
Serves 4 to 6.
Frijoles Con Todo (Pinto Beans with Everything)
From Dona Tomas: Discovering Authentic Mexican Cooking, by Thomas Schnetz and Dona Savitsky
2 cups pinto beans, picked over, rinsed and drained
About 3 tablespoons kosher salt
2 avocados, cut into ¾-inch dice
2 heirloom or vine-ripened tomatoes, cut into 1/3-inch dice
½ red onion, cut into ¼-inch dice
¼ lb queso Oaxaca, shredded
2 serrano chiles, minced
½ bunch cilantro, stemmed and chopped
Place the beans in a heavy-duty saucepan and cover with cold water so that the waterline is about 3 inches above the beans. (The traditional method would be to cook the beans in an olla or earthenware pot, but any ceramic or heavy-duty stainless steel saucepan, preferably with a copper-bottom will do.)
Bring the beans to a boil over high heat, then decrease the heat to medium and add the salt. Simmer for 2 to 4 hours, stirring occasionally to ensure they aren’t sticking to the bottom, until the beans are tender. Add more hot water from time to time to keep the beans fully submerged.
Stop adding water after 2 to 3 hours, when the beans seem close to becoming tender all the way through. The liquid at this point should be somewhat milky and cloudy and will start to thicken with the starch from the beans. You’ll want the water to slowly reduce until its just covering the beans when they’re perfectly tender.
Adjust the seasoning with salt as necessary. Ladle the beans and broth into each bowl and top with healthy portions of the avocado, tomatoes, onion, cheese, chiles, and cilantro right before serving.
Serves 4.Tacos de Camarones Fritos (Batter-fried Shrimp Tacos with Chile de Arbol Aioli)
From Dona Tomas: Discovering Authentic Mexican Cooking, by Thomas Schnetz and Dona Savitsky
Chile de Arbol Aioli:
1 dried chile de arbol
1 clove garlic
1 jalapeno chile
2 ½ teaspoons cider vinegar
3 ½ teaspoons granulated sugar
2 to 4 tablespoons water
1 egg yolk
¾ cup canola oil
About 2 teaspoons kosher salt
Batter:
1 cup flour
1 cup water
1 egg
3 cups canola oil
2 pounds shrimp (21/25 count), peeled, deveined, and split lengthwise
Kosher salt
16 (5 inch) fresh corn tortillas
¼ bunch cilantro sprigs
1 lime, cut into 4 wedges
The aioli can be prepared well ahead of time. Place a dry skillet over medium heat. Add the chile and toast for about 1 minute, pressing it into the pan and turning occasionally with tongs to prevent burning, until lightly browned. While the chile is still hot, remove the stem and submerge in a bowl of hot water for 30 minutes to rehydrate. Drain the chile and transfer to a blender. Add the garlic, jalapeno, vinegar, sugar, and 2 to 3 tablespoons of water and puree for about 1 minute, until liquefied.
Add the yolk to the blender and turn the motor on low speed. Carefully remove the lid and add the oil in a slow, steady stream so it forms an emulsion with the yolk and the chile puree. If the mixture is too thick ad won’t blend well with the oil, add 1 to 2 more tablespoons of water, then resume adding the oil. If you add the oil too quickly the sauce will not emulsify and you’ll have to start over.
The final aioli should have the consistency of thin mayonnaise with a speckled red color. Transfer to a bowl and stir in the 2 teaspoons salt, using more or less to taste. Cover and refrigerate until serving.
To prepare the batter, sift the flour into a large bowl. Add the water and egg and briskly whisk together until all the lumps have dissipated. Refrigerate for about 30 minutes, then stir briefly before using.
Pour the oil into a skillet to a depth of ¾ inch, and place over high heat for about 5 to 10 minutes (depending on your skillet and stove), until it reaches 350°F. Test the oil by dropping in a drip of batter; it should begin frying as soon as it hits the oil. Working in 3 batches, dredge the shrimp in the batter, then carefully place in the oil. Fry for 1 ½ to 2 minutes, until golden brown and crispy (the crispy texture is imperative as you don’t want the shrimp to become soggy when tossed with the aioli). Transfer the shrimp to paper towels to drain.
Once all the shrimp are fried and drained, toss them with a few pinches of salt and about ¾ cup of the aioli to lightly coat. Adjust the consistency, heat, and flavor with more aioli if necessary.
Place a skillet or griddle over medium heat. Working in batches as necessary, warm both sides of the tortillas in the skillet. Place them in stacks of 2 on individual plates or a platter, so that each taco ends up with a double layer of tortilla. Evenly divide the shrimp among the 8 stacks. Top each taco with 4 to 5 cilantro sprigs and serve at once with the lime wedges.
Serves 4.


